Citrix Connectivity
PubLauncher
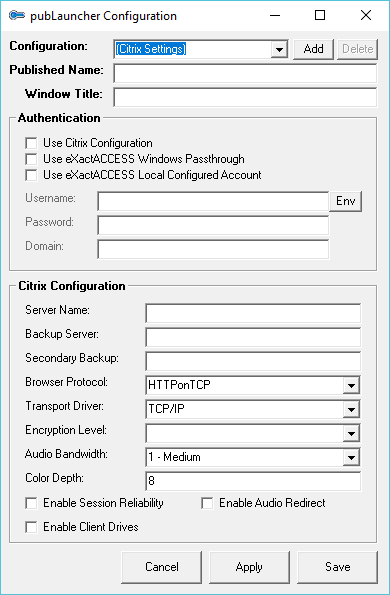
Configuration...
From a command line, run the following application:
Launch the pubLauncher Configuration UI. (Run from the command line "C:\Program Files(x86)\HealthCast\ExactAccess\pubLauncher.exe" /config )
PubLauncherSF
Configuration
Note
pubLauncherSF requires the Citrix receiver 4.7 or higher to be installed. For information on how to configure a published application using pubLauncherSF see ExactAccess Administrator.
Note
pubLauncherSF requires HTTP Basic Authentication to be enabled on the Storefront server in order to function properly. This setting can be enabled from the Citrix Studio or Citrix Storefront Management tools on the XenApp/XenDesktop or Storefront server. Open Citrix Studio or Citrix Storefront > Under the Citrix Storefront heading on the left, select Stores > On the right corner, under Store Services, select Manage Authentication Methods > from the Manage Authentication Methods window, check the HTTP Basic option; then, select OK. The preceding directions are using a XenApp/XenDesktop version 7.15 install, other versions may be different. Consult Citrix documentation on how to set the HTTP Basic Authentication Method for your version.
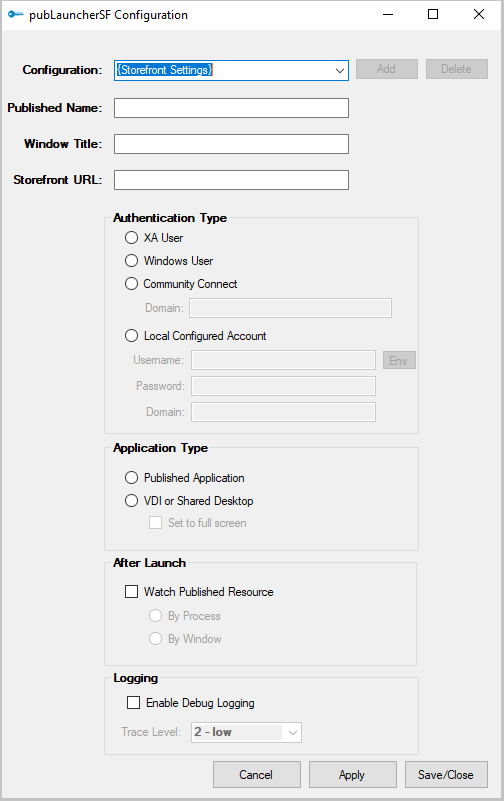
Open the pubLauncherSF configuration tool by running C:\Program Files (x86)\HealthCast\ExactAccess\pubLauncherSF.exe /config from the Windows Run command window or a Windows cmd.exe prompt.
From the configuration drop down select {Storefront Settings}. In the drop down erase {Storefront Settings} and replace with the desired configuration name then fill in the remaining configuration information.
After filling in the configuration values select the “Add” button and then select the “Save/Close” to save the new configuration to the registry. The newly configured key will appear under:[HKEY_LOCAL_MACHINE\SOFTWARE\HealthCast\ExactAccess\Storefront Settings\"Configuration name" where the configuration name is Configuration value in the Configuration drop-down list
Editing Configurations
Select the configuration name you wish to change from the drop down list.
Make the changes.
Select Cancel at any time to close the Configuration GUI without saving the change or
Select the Apply button to save the changes and leave the Configuration GUI open or select the Save/Close button to save your changes and close the Configuration UI.
pubLauncherSF Configuration Fields
Published Name- This is the name of the resource to be launched. The same name that is displayed on the Storefront web page. This is set in the registry asResourceName.
Window Title- This is the text that appears in the title bar of the published resource. Typically the published name a space and a "-" is sufficient. This is set in the registry asAppTitle.
Storefront URL- This is the Receiver for Web Sites URL found in Citrix Studio > Citrix Storefront > Stores. The correct URL – when placed in a browser should resolve to the Citrix StoreFront login page. This is set in the registry asURL
Authentication Type- This is set in the registry asAuthenticationType.
XA User- Log into Citrix Storefront with the credentials of the user logged into XA.AuthenticationTypevalue = 0
Windows User- Log into Citrix Storefront with the credentials of the user logged into Windows.AuthenticationTypevalue = 1
Community Connect- When using Epic Proxcard Login Device log into Citrix Storefront with XA SSO credentials.AuthenticationTypevalue = 2
Domain NameEnterthe domain name used with Community Connect. This is set in the registry asDomain
Local Configured Account- Log into Citrix Storefront with the credentials configured locally on this workstation.AuthenticationTypevalue = 3
Username- Enter Windows environmental variable used for the username e.g. %computername% will return the computer name of the workstation. This is set in the registry aslca_username
Env- Select theEnvbutton after filling in theUsernameWindows variable to see the value returned.
Password- Enter password for account. This value is encrypted and set in the registry aslca_password
Domain- Enter the domain for account. This is set in the registry aslca_domain
Application Type- If the published resource is a Shared desktop or VDI then select the Shared desktop or VDI radio button. If the published resource is an application (i.e. Microsoft Notepad or Calculator), select the Published application radio button. This is set in the registry asisDeskTop value = true/false. If the Shared desktop or VDI radio button is selected theSet to Full Screencheckbox will be enabled. If checked the Shared desktop or VDI will be displayed in full screen and the Citrix Tool bar is hidden limiting the user to the VDI or Shared Desktop. This is set in the registry asSetFullScreen value = true/false.
After Launch - If Watch Published Resource is checked pubLauncherSF will remain running until the Citrix published resource is closed. This setting should only be used at the direction of your Identity Automation/HealthCast Implementation Engineer or Solution Architect. This is set in the registry as WatchResource value = true/false
ByProcess - The process (wfica.exe or CDViewer.exe) is used to determine if the resource is still active. This is set in the registry asWatchByProcess value = true.
ByWindow - The published resource window with the title configured in Window Title setting is used to determine if the resource is still active. This option will not recognize additional windows launched in the Citrix session. This is set in the registry as WathcByProcess value = false,
Logging– If checked pubLauncherSF will log to %AppData%\HealthCast\logs\pubLauncherSF.log. This is set in the registry asEnableLogging value = true/false.
TraceLevel– Set Trace level 1 – 4 for logging. The higher the trace level the more detailed logging. This is set in the registry as TraceLevel.
TraceLevel value = 1 – minimal
TraceLevel value = 2 – low
TraceLevel value = 3 – medium
TraceLevel value = 4 – verbose
Optional Configuration Methods and Command line settings
Configure pubLauncherSF using registry settings
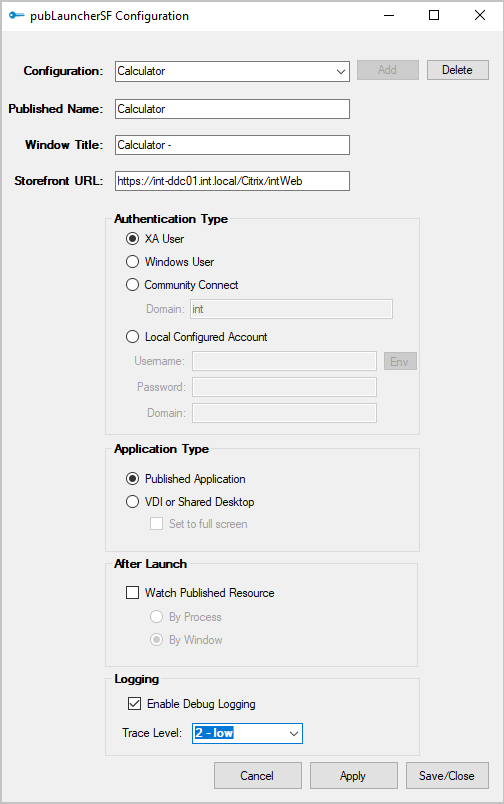
For example: pubLauncherSF.exe “Calculator” In this case pubLauncherSF will get it’s settings from the key named “Calculator” in the HKEY_LOCAL_MACHINE\SOFTWARE\HealthCast\ExactAccess\Storefront Settings key.
[HKEY_LOCAL_MACHINE\SOFTWARE\HealthCast\ExactAccess\Storefront Settings\Calculator]
"AppTitle"="Calculator -"
"AuthenticationType"="0"
"IsDesktop"="False"
"ResourceName"="Calculator"
"URL"=http://mytest.com/Citrix/intWeb
"SetFullScreen"="False"
"EnableLogging"="True"
"TraceLevel"="2"
"useTls12"="True"
Launch pubLauncherSF using Command Line
pubLauncherSF can also get all of its settings from a command line. The pubLauncherSF command line is formatted as a “|” delimited string.
For example:
pubLauncherSF.exe “ResourceName|Calculator|URL|https://test/Citrix/intWeb|AppTitle|Calculator -|AuthenticationType|0”
This command line will authenticate to the StoreFront server at https://test/Citrix/intWeb (URL|https://test/Citrix/intWeb) with the Windows user credentials (AuthenticationType|0) and launch the Calculator (ResourceName|Calculator) published resource, then search for the published application window with “Calculator –“ in its window title (AppTitle|Calculator -).
**Quotation marks must be included if the command line contains any spaces.**
Command line settings
ResourceName - This is the name of the resource to be launched. The same name that is displayed on the Storefront web page Required setting - No Default value
AppTitle – This is the text that appears in the title bar of the published resource. Typically the published name a space and a "-" is sufficient. Required setting - No Default value
URL – This is the Receiver for Web Sites URL found in Citrix Studio > Citrix Storefront > Stores. The correct URL – when placed in a browser should resolve to the Citrix StoreFront login page. Required setting - No Default value
IsDeskTop - If the published resource is a Shared desktop of VDI set to “True” Defaults to “False”
AuthenticationType – Determine what credentials to use when authenticating to StoreFront. 0 = Use XA user credentials 1 = Use Windows user credentials Defaults to “1”
SetFullScreen - When checked the published VDI or Shared Desktop is set to Full screen and the Citrix Tool bar is hidden limiting the user to the VDI or Shared Desktop. True = Set DVI/Shared Desktop to full screen False= Do not set DVI/Shared Desktop to full screen Defaults to “False”
CitrixLaunchTimeout - Defaults to 60
EnableLogging – If “True” pubLauncherSF will log to %AppData%\HealthCast\logs\pubLauncherSF.log Defaults to “False”
TraceLevel – Set Trace level 1 – 4 for logging. The higher the trace level the more detailed logging. TraceLevel 1 – minimal TraceLevel 2 – low TraceLevel 3 – medium TraceLevel 4 – verbose Defaults to “2”
useTls12 - To use storefront sites configured to only accept TLS 1.2 HTTPS connections, set this to true - Defaults to "True"
LaunchICAFolder - Save and launch the .ica file from different folder. Defaults to %Appdata%\HealthCast folder. To change add the path to the folder you want to save and launch the ica file from. Windows environmental variables can be used in the path i.e. LaunchICAFolder|%TEMP% will save/launch the ica file from C:\Users\<windows user name>\AppData\Local\Temp folder.