HCI Deploy Publisher
This guide explains how to use the HCI Deploy Publisher application, which is intended for use by IT personnel (connector developers and workstation administrators) to manage deployments of connectors that the organization needs to integrate an application into the XA Single Sign-On (SSO) solution. It assumes you are comfortable with Windows® (including registry and the file system) and your organization’s Directory Services, the concepts of deploying software, and that you are familiar with XA (logging in, application parameters, XA desktop and XA functionality).
Note
The Publisher application requires that the XA Client is installed on the workstation and you must be given permission to use it. You also must be an XA user (you will be authenticated to use the tool through XA).
Below are links to the features and function if the Publisher.
HCIDeploy Publisher - Testing
Recommended Practices for Testing Deployments
Make heavy use of testing locations. Create at least two test locations for testing installs and uninstalls.
Put test lab workstations in testing locations based on XA mode if your organization uses more than a single XA operation mode.
Test install.bat/install.vbs files before putting them in packages for distribution.
Test uninstall.bat/uninstall.vbs files before putting them in packages for distribution.
Test installs and uninstalls by adding and removing the package from the location(s) using HCIDeploy Publisher.
Ensure that there are no wscript.echo or msgbox commands in VB Scripts. In short, don't put any UI elements in the VB Script files that would cause the script to hang. UI Elements will not be displayed to end users.
Do not use pause or other commands that would hang a .bat file.
Remember that Batch and VB Script files may only execute for 30 seconds or less - if the script isn't finished with its work before that time, it will be deemed lost and will be terminated. If you need to perform a more lengthy process, consider using the batch command START to spawn a secondary script.
Add user notification script calls to the deployment install and uninstall scripts to monitor script execution during testing.
Look beyond Staging and Default
Make use of these locations for their intended purposes. Staging can be used to quickly "un-deploy" a wrapper - just remove it from the location. Remember that EVERY registered PC will receive the packages listed in Default, so be sure that what you put in the Default Location is supposed to be deployed to every workstation running HCIDeploy.
Given that, think carefully about creating new locations to organize the packages for deployment.
As mentioned in Recommended Practices for Testing Deployments, consider making a few test locations and only adding workstations to those that are under IT control. Remember to consider real world usage as a potential test as well, so consider creating a pre-deployment test location where one or two production machines are associated.
A good process to follow might include the following checklist:
Create your wrapper executable and any supporting files.
Pre-test any install.bat or install.vbs files using standard command line CMD.exe or WScript.exe under ADMINISTRATIVE account permissions.
Pre-test any uninstall.bat or uninstall.vbs files using standard command line CMD.exe or WScript.exe under ADMINISTRATIVE account permissions.
Once confident the custom scripts are operational, publish a new package containing your updates. The package will be associated with the Staging location.
Add the package to the Install Testing location (You would have to create one)
Install Testing should contain at least one IT machine - use the HCIDeploy Console application to quickly execute the synchronization, or have the Test Lab machines set for a 5 minute schedule for update checks. If XA is deployed in multiple modes in your organization, use a test machine in the test lab containing each of the modes in your deployment testing.
Verify any install.bat or install.vbs files execute on the test workstation and perform their intended operations as desired.
Remove the package from the Install Testing location - this will allow you to test the uninstall.bat or uninstall.vbs files to ensure they perform their intended tasks.
Add the package to the Connector Testing Location (you would have to create one) - The intent of this location is to provide a test bed to ensure proper connector operations.
Perform your standard connector testing procedures before considering putting the connector into pre-deployment production. Make updates to the connector and package as necessary.
Once confident any custom scripts are correctly operating for install and uninstall, add the package to the pre-deployment location (you would have to create one)
The Pre-deployment workstations should have a short time schedule for checks as well - maybe every 10-15 minutes
Gather feedback from the employees using these pre-deployment workstations to ensure they see acceptable behavior from the new or updated connector.
Once confident the connector is performing as expected, add the package to full production for the correct location. Remember, a package may be deployed to multiple locations if necessary.
If connector errors are reported from production, create new test packages with the contents of the old packages. Associate these new packages with your test environment and update and re-test the connector. Once the defect has been addressed, perform an update on the original package so that it creates a new version of the existing package.
Given Package 1 and Package 2
Package 1 is reported to have a defect - Package 2 is a clone of the contents of Package 1, just under a different name (They must be unique)
Update the connector, then update Package 2 via HCIDeploy Publisher.
Perform testing of Package 2 in the test locations.
Once confirmed the defect is addressed, perform an update of Package 1 via HCIDeploy Publisher.
This will ensure that connectors deployed to production address the defect without causing additional problems, and without having to uninstall or revoke the current connector from production.
Package Management
User Interface:
The user interface is designed to perform the following actions:
To create or import an already created package and publish it to the server
To export an already published package so it can be moved from test/development to production.
To manage workstation locations to organize packages for deployment
To manage workstations to limit the deployment scope of published packages
Below is the main interface to the HCIDeploy Publisher.
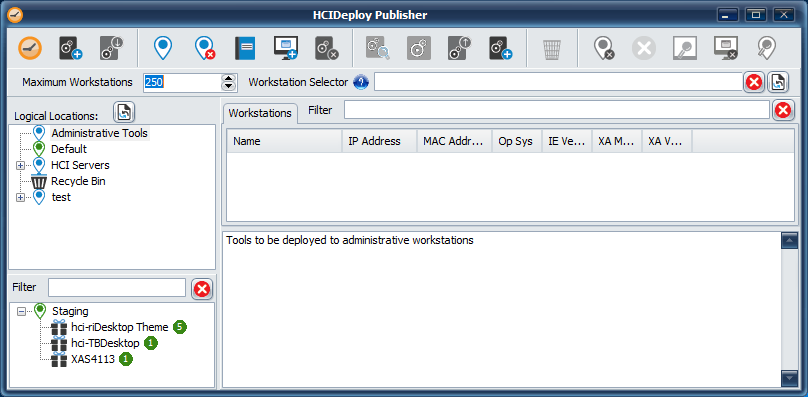
Info
The HCIDeploy Publisher is access controlled by ExactAccess. A user must be assigned permissions to the application, and must be logged into the ExactAccess client to run the Publisher.
Click the Create button, to be presented with the following screen:
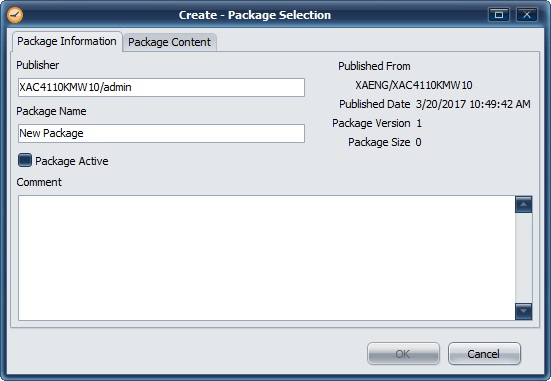
You may accept the default package information, but each package must have a unique name. Therefore, you must change the package name on this page. Once you have completed filling out the package information, select the "package content" tab to select the contents for the package.
Click the Package Content tab
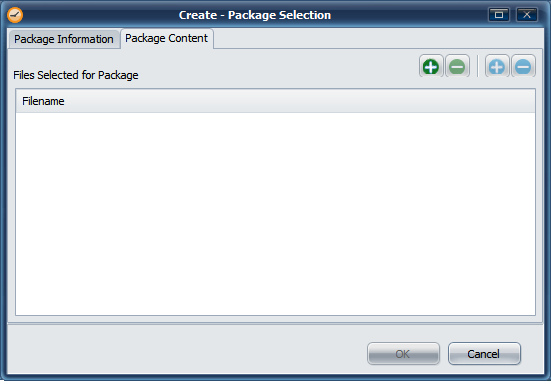
A pre-created package may be imported by dragging and dropping a package.zip file onto this page. Additionally, a package may be imported from the main interface context popup menu of the Staging location.
Add files using the green add( ) button. This will bring up a file selection dialog where you may select multiple files to add to the package. If you have several files, and they do not all reside in the same directory, you may select the add button to select other directories and files. Note that a package must contain files that have unique names. It is not possible to add a file from a different directory with the same name as an existing file in the package. This is a requirement of the operating systems file system, as all package files will be deployed to a single directory on a client workstation. Also note that the package name must be a valid file system name. It therefore, may not contain any of the following characters:
a quote ("), colon (:), backslash (\), forward slash (/) asterisk (*) or question mark (?)
Tip
Instead of using the button to add files, you can optionally browse for files using Windows Explorer and use drag and drop to the package selection dialog to add files to the package.
If you need to remove a file, select it from the list, and press the delete ( ) button.
The blue buttons ( ), (
), ( ) allow you to select the scripts that indicate usage for installation and uninstallation. These files will then be marked as either install script or uninstall script. Valid scripts are BAT, VBS, or EXE files.
Tip
The files no longer need to be named install.* or uninstall.*
Important
When clients older than 4.11 connect to and process packages for deployment, install and uninstall scripts must follow the 4.10 package standards. This means that to support older client versions, only VB script (*.vbs) and Batch files (*.bat) can be used, and they must be named install.* or uninstall.* - this is not necessary if all clients are 4.11 or higher.
Once all file selections are complete, click the OK button to begin the publishing process. If the package consists of individual files, the files will be compressed into a .package.zip file.
If the package is being imported, the compression step will be skipped
The file and package information will then be sent to the server. By default, the package will be associated with the "Staging" location.
In order to deploy the package to a workstation, the package must be assigned from the "Staging" location to another location that has associated workstations. Initially, there is only a single location where this is possible, so you must assign the package to the "Default" location.
See "Assigning Packages to a location" for information on how to associate a package with a new location.
The import scenario is provided so that packages may be created at locations that do not have access to direct publishing on the HCIDeploy Server. The package can be downloaded locally, then pushed to the site using technologies such as HTTP or FTP. Alternately, packages produced by HealthCast can be released to clients for direct import without having to re-package.
There are no "required" files for a package, however, there are several files that can be added for special circumstances.
Installation file - A Batch (.bat) VB Script (.vbs) or an Executable (.exe) may be specified as an "install" executable that will be started during package installation. Only one file may be marked as the install script.
UnInstallation file - A Batch (.bat) VB Script (.vbs) or an Executable (.exe) may be specified as an "uninstall" executable that will be started during package removal/uninstall. Only one file may be marked as the uninstall script.
Settings may be imported by exporting .reg files and adding the .reg to the package. In this case however, it is necessary to execute an install script to merge these settings into the registry. For more advanced registry manipulations, VB script, or executables may be used instead.
Example
example install.bat to import reg settings:
regedit /s exported_reg.reg
Sample Scripts
install.bat
rem REMOVE USERS and POWER USERS group access to the deployed folder contents
cacls . /E /C /R users
cacls . /E /C /R "power users"
install.bat
regedit.exe /s ".\myregfile.reg"
install.vbs
rem Make "Lock" appear on the context menu of XAUCM in the system tray icon
dim strKeyPath
dim path
dim objShell
Set objShell = CreateObject("WScript.Shell")
on error resume next
rem ----read registry for install path so we know where XA Lock is installed----
strKeyPath = "HKLM\Software\HealthCast\ExactAccess\LockPath"
path=objShell.RegRead(strKeyPath)
rem ----save the path to xalock.exe into the registry----
strKeyPath="HKLM\Software\HealthCast\ExactAccess\XAUCM\Lock"
call objShell.RegWrite(strKeyPath,path,"REG_SZ")
install.bat
rem enter an autolaunch application
if "%CURDIR%Z"=="Z" set CURDIR=%~d0%~p0
rem note: the following is meant to be entered on a single line
reg add HKLM\Software\HealthCast\ExactAccess\AutoLaunch /v Launch /t REG_SZ /d "\"%CURDIR%mywrapper.exe\"" /f
install.bat
rem Remove "Lock" from the XA Application Desktop
rem note: the following is meant to be entered on a single line
reg delete HKLM\Software\HealthCast\ExactAccess\applications /v xalock.exe /f
install.bat
rem To send a message, changing the tile as well as the message if the message contains spaces:
"c:\program files (x86)\healthcast\ExactAccess\hcsendnotice" 0,"title with spaces","message with spaces"
"c:\program files (x86)\healthcast\ExactAccess\hcsendnotice" 0,title,"message with spaces"
rem to send a message, changing the title, but only need a one word message
"c:\program files (x86)\healthcast\ExactAccess\hcsendnotice" "title with spaces",message
rem To send a message with the default title "Notice":
"c:\program files (x86)\healthcast\ExactAccess\hcsendnotice" message with spaces
"c:\program files (x86)\healthcast\ExactAccess\hcsendnotice" "message with spaces"
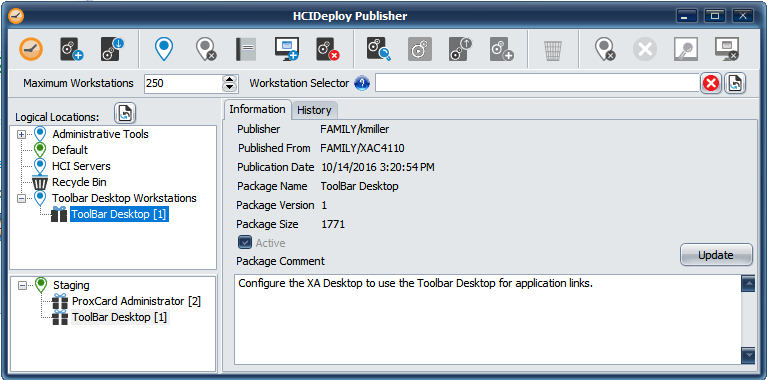
Select a package from the list to enable the Update button. Using the update functionality is identical to using the create functionality with the exception that a package must be selected before you can update it. If you add files to the package, you will create a new version of the package. Package content may be completely different and is not dependent on any previous version of the package. If a previous file is not included in the new package, it will not be present on the workstation after deployment of the new version.
Administrators may also right click the package from the staging location and choose to update the package.
You may view the package information by selecting a package from the tree view. This will download the package information from the server and display the information next to the package list view. The numbers in brackets [ ] indicate the highest package version available for that package.
Comments may be added to the package, and they may be multi-line comments. It is also possible to update the comment field by clicking the Update button. Enter a new comment into the Package Comment field, then click the Save button to commit the changes.
Tip
To add a new line, press shift-enter when editing the Package comment.
You may also view the history by selecting the History tab on the package to display previous version information.
From the Package History list, right click on a specific version, and that version can be exported so that it can be moved to a different server. You will be prompted for a location and file name to save the exported package version.
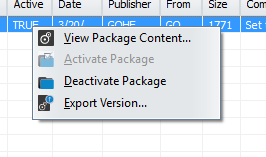
It is possible to deactivate a version to "revert" to deploying a previous version. Additionally, the package content may be reviewed for a specific version of the package.
Workstation Locations
A package location represents a grouping for packages and workstations. This is a logical grouping only, and is provided so that packages may be distributed to the correct set of PCs representing a sub-set of users or workflows within an organization.
By selecting the refresh ( ) button, the HCIDeploy Publisher will load the available locations from the server and display them in the list. Each location, when expanded, will display a list of packages (
 ) associated. To view computers, select the location - a new tab will display the workstations associated with the location. The Filter and workstation selector fields may be used to limit the number of workstations listed in this view.
 |
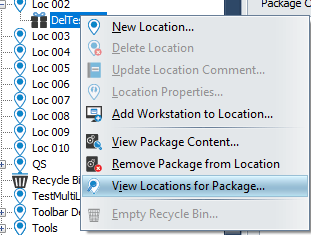
In the staging package list, right click the desired package and select "View Locations for Package..."
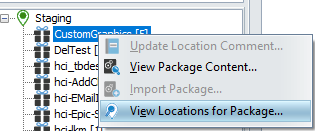 |
From the Logical Locations, expand the location and right click on a package. Select "View Locations for Package..."
 |
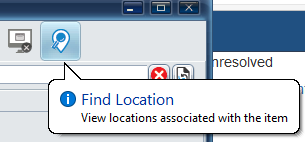
Optionally, select the package in either view and click the Find Locations button in the toolbar
 |
The workstation selctor is sent to the server during a query for workstation information. This reduces network traffic, and makes the query execute faster. The server will discard workstations from the result that do not match what the selector contains. It is also possible to use the wildcard * to indicate match anywhere in the field data, or to specify that a field must begin or end with the text entered.
Example:
Windows 10* - will match all workstations that have an Operating system of Windows 10 (enterprise, pro) - Filter meaning: workstation starts with windows 10.
To show only Windows 10 enterprise systems, use *10 ent* - Filter meaning: operating system contains "10 ent" somewhere in the field.
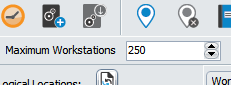
Example: If you want to see only workstations that have Kiosk Mode installed - enter kiosk into the filter - the server will discard workstations that do not have this word as part of one of the fields (name, operating system, xa mode, etc) This could still return a large number of workstations, so as a further limiter, enter the maximum number of workstations for the server to return in the "Maximum Workstations field".
 |
Info
It is not strictly necessary to use the * wildcard in the filter, but it does help speed up processing on the server when it is used.
The filter field allows for the client side limiting of workstation information, much like a smart search, and applies after the workstation list has been retrieved from the server. It will hide workstations that do not match the filter information. For example, to show only workstations that have IE 11.5xx installed, enter 11.5 in the filter field. The filter will match all fields, including IP address, MAC address, XA version, XA Mode, IE Version, Operating System, and Workstation Name. Example: Entering [02 into the filter will display workstations that have a MAC address starting with 02. It may be necessary to enter more information into the filter to limit the view if there are multiple fields containing a match to the filter entry.
The filter feature has now been added to the staging location, and is capable of filtering available packages in the list. This may be important when dealing with a large number of packages, such as remote system info packages that have been uploaded to the server. It work like the other filters, enter some partial text to limit the display to only packages that have that text appear somewhere in the name. Press enter on the filter field to apply the filter, and click the X button next to the field to clear it.
Right click on the locations list and select "New Location..." from the context menu. You are then prompted to enter a new location name. Each location name must be unique.
If you have made a mistake when creating a location, or you no longer need a particular location, you may remove the location by right clicking on the location in the list and selecting "Delete Location" from the context menu.
Note that the location must not have any associated workstations or packages before it may be deleted.
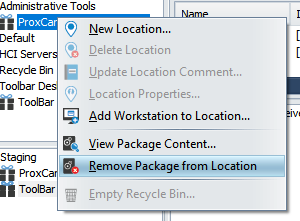
Previous versions used the recycle bin to remove packages from a location, as they could only be associated with a single location. It is now possible (with 4.11 and above) to assign a single package to multiple locations. Instead of using the recycle bin, there is a new context menu specific to this operation.
When creating a location, it is now possible to mark the location with a special flag indicating that any workstations associated with this location can no longer be added to other locations. The purpose of which is to segregate specific workflow configurations and ensure that they are not overridden by incorrect settings. For example, creating a location that configures workstations for Locking Kiosk Mode. Workstations in this location should not also be in a location that configures the workstation for Standard Mode, as the settings would conflict and may cause the workstation to be unusable.
Warning
This setting can only be set when creating a new location. The location must be removed and re-created in order to change the flag.
Locations are a simple means of segregating a particular set of workstations from the rest of the organizations workstations. These workstations may be physically located in the same building, floor or even in the same office, but that is not a requirement for associating them with a location in HCIDeploy. The concept for locations in HCIDeploy is that this set of workstations will all receive the same set of packages. Packages may contain files, installs, or just configuration settings. The commonality is that all workstations will be configured the same way (with the same workflow), or will contain the same files, or have the same applications installed when using HCIDeploy.
It is therefore recommended that location names be chosen based on the type of configuration desired which reveal the usage of the associated workstations, rather than by a geographical name such as a building, floor or office.
A Test or pre-deployment location should be created and test lab workstations be associated with this location to facilitate pre-deployment roll-out testing of deployment install scripts and connector functionality. Several such locations may be desired, so feel free to create as many as necessary. There is no imposed limit to the number of locations that may be created, but it is suggested to limit these to as few as possible to prevent excessive load times of the package location list.
There are two pre-configured locations after a fresh setup of HCIDeploy. These pre-configured locations have special meanings and also have some limitations associated with them as well.
The Default Location is a location that all unassigned workstations will be associated with. Each workstation associated with the Default Location will receive the packages associated with the Default Location. The Default Location may not be deleted, and it is not possible to browse for workstations to associate with the Default Location.
The Staging Location is a special location that all first time published packages will be associated with. No workstation may be associated with this location so that wrapper developers may publish their packages knowing that the package will not be immediately deployed. This allows for the opportunity to create a Testing or Pre-Deployment location and associate a specific set of workstations dedicated to testing the package deployment and the package functionality before it is deployed throughout the organization.
The Recycle Bin Location is a special location that is used to mark package for deletion. To completely delete a package from all locations, including staging, place the package into the Recycle Bin, then Empty the Recycle Bin from the context menu. If you add a package by mistake to the Recycle Bin Location, use the Remove Package from Location option to recover the package prior to using the Empty Recycle Bin option.
Warning
Empty Recycle Bin is a permanent option. There is no way to recover the package once it has been removed. The package will be removed from all associated locations, including the staging location.
This operation will also remove all history associated with the package(s) that are placed within the Recycle Bin location.
HCIDeploy running on a client will request a list of packages by asking the HCIDeploy server for a package list. This request includes sending the name of the workstation to the server. The server then determines what location the workstation is associated with, selecting all packages from that location as well as adding all of the packages associated with the Default Location.
Select the location to have workstations added, then select the Add workstation to Location option. Pick the workstation(s) from the workstation browser. Optionally, expand the location for which a workstation is associated. Select and drag the workstation to a new location and drop it on that location. The workstation will now be associated with the new location. The workstation will retain its previous location and will now receive updates from the newly selected location.
Assigning packages is done in the same manner as assigning workstations. Expand the staging location and locate the package. Select and drag the package to a new location and drop it on that location. The package will now be associated with the new location. It will retain association with other locations.
It may be desirable to remove workstation registration if the workstation name has been changed, or the workstation is no longer functional or in operation. This may be done using the HCIDeploy Publisher selecting the location the workstation is associated with, finding the workstation in the workstations list, right clicking on the desired workstation and choosing "Unregister workstation" from the context menu
Warning
Unregistering a workstation will remove all location associations and cannot be undone. If the workstation is still active, all packages NOT in the default location will be uninstalled.
If the workstation name once again becomes active, it will re-register the name and be associated with the Default Location, rather than any previously associated location.
Warning
Note that any workstation(s) that have not contacted the HCIDeploy Server in a certain time period will automatically be removed from the server. The default time to live is 30 days. If a workstation remains powered off for this length of time, it will be removed, and loose all associated location settings. This setting can be adjusted on the HCIDeploy server:
HKEY_LOCAL_MACHINE\SOFTWARE\HealthCast\HCIDeployServer
MaxAgeInDaysForValidWorkstations: reg_dword