Recommended Policies for Kiosk Mode workstations
As an administrator, you can control how long Chrome, Edge, or Firefox keeps data such as history, cookies, and passwords. Certain data can be deleted as soon as the browser closes or when it becomes older than the time that you specify. This can keep SnapApp secure across sessions.
Delete Data when Chrome Closes
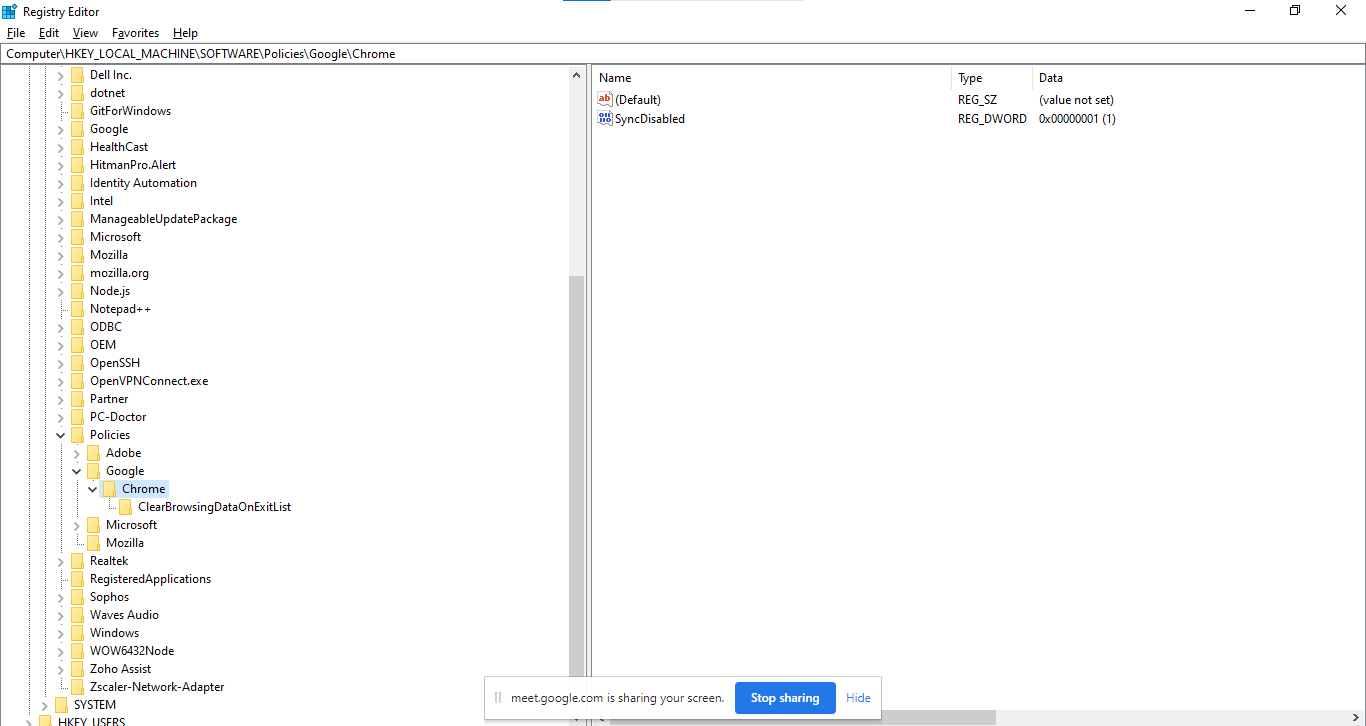
Before you begin, turn off Google Sync using the SyncDisabled policy. If you set the policy to delete data at the platform level, turn Sync off at the platform level. Likewise, if the policy is set to delete data at the user level, Sync must be turned off at the user level.
Recommended Minimum data types to set for deleting sessions or disabling by Identity Automation:
cookies_and_other_site_data: Deletes cookies and other site data
password_signin: Deletes saved passwords
autofill: Deletes saved autofill data that was saved in the browser
site_settings: Resets site settings to their defaults
hosted_app_data: Deletes data cache for hosted apps that are installed in the browser
Open the Local Group Policy Editor on your computer by pressing Win+R and typing
gpedit.msc. Then press Enter.Navigate to Computer Configuration > Administrative Templates > Google Chrome.
Find the setting called Clear Browsing Data on Exit. Double-click this setting and choose Enabled.
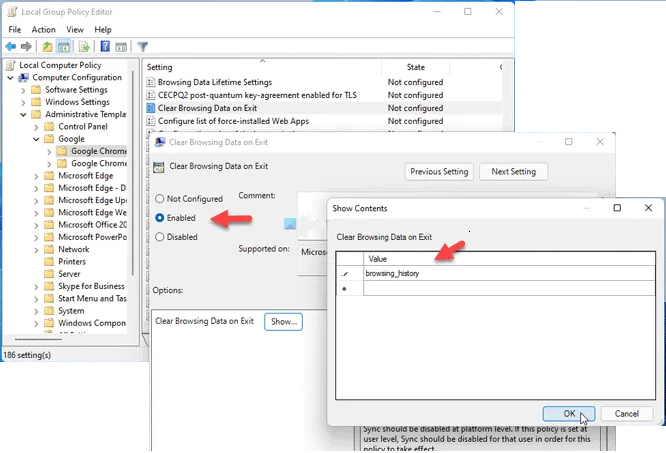
Click on the Show button and enter the items you want to remove on exit as displayed above. The following parameters can be used:
browsing_history
download_history
cookies_and_other_site_data
cached_images_and_files
autofill
password_signin
gsite_settings
hosted_app_cata
Set the minimum data type settings as recommended earlier.
Once complete, click OK twice to save the change. Restart Google Chrome for this to take effect.
Note
Minimum settings recommended by Identity Automation are cookies_and_other_site_data, autofill, password_signin, site_settings, and hosted_app_Data.
Press Win+R and type
regedit, then press Enter and click Yes to open the registry Editor on your computer. From there, navigate to HKEY_LOCAL_MACHINE\SOFTWARE|Policies.Right-click on Policies > New > Key and name it Google. Then right-click on Google > New > Key and name it Chrome.
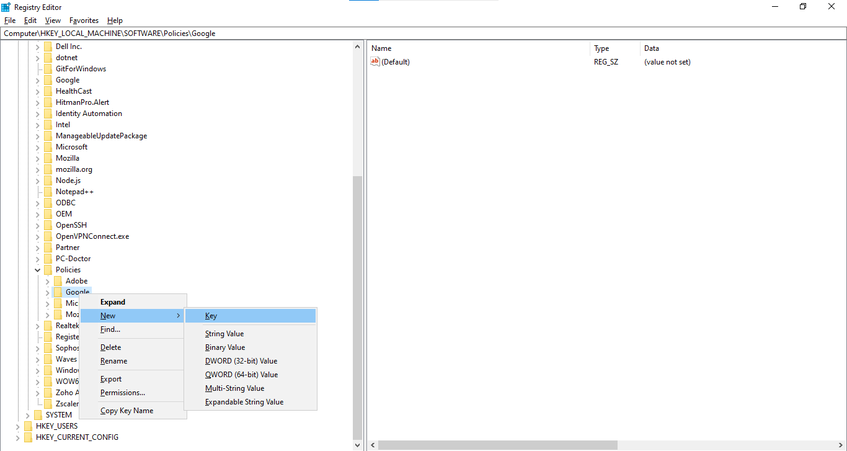
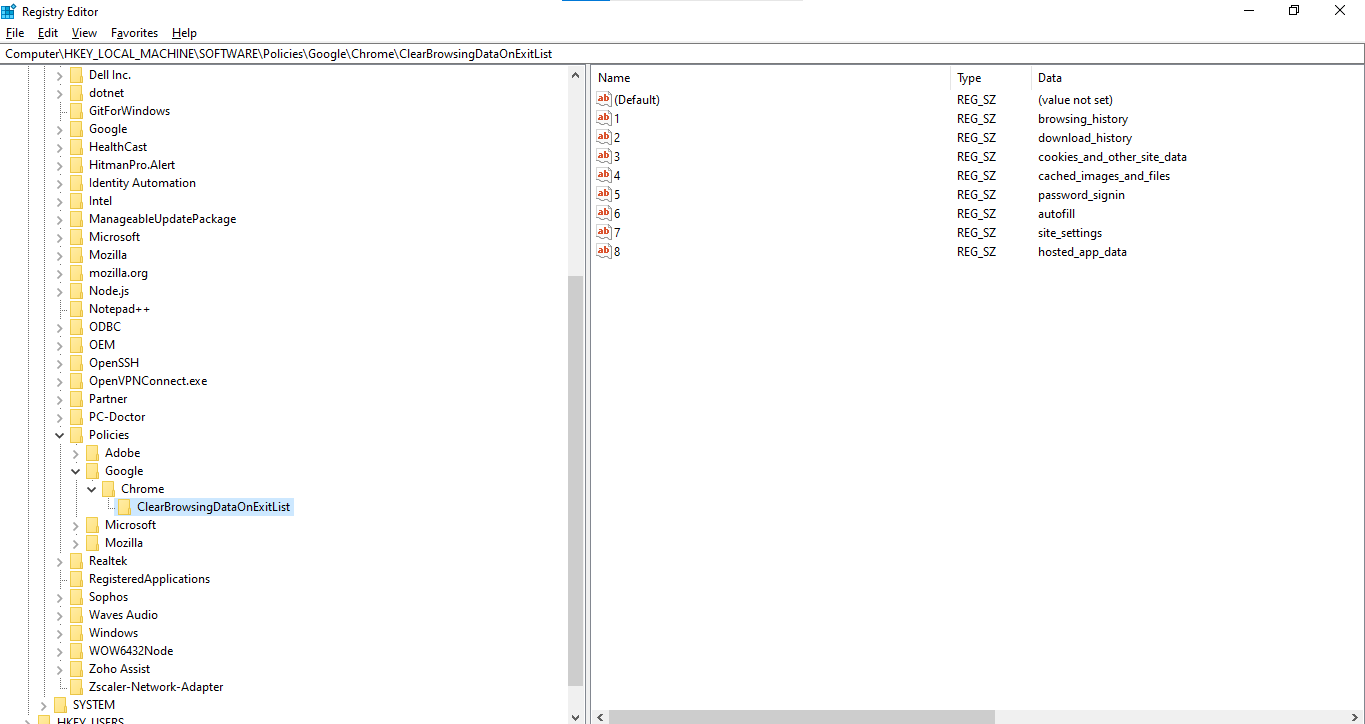
Then right-click on the Chrome key > New > Key and name it ClearBrowsingDataOnExitList.
Right-click on ClearBrowsingDataOnExitList > New > String Value and name it 1.
Double-click on that to set the Value data as displayed here:
Then click OK and reboot the computer.
Set SyncDisabled setting in registry as displayed here:
 |
Delete Data when Edge Closes
For Microsoft Edge, you can delete your browsing history on exit via Edge Settings or by using the Registry.
Launch the Microsoft Edge browser.
Go to the Settings and more menu in the upper-right corner of the browser window.
Click the menu, select the Settings option. In the new window that opens, choose Privacy and Services. In the right pane, scroll down to the Clear Browsing Data section. Choose the the heading Choose what to clear every time you close the browser.
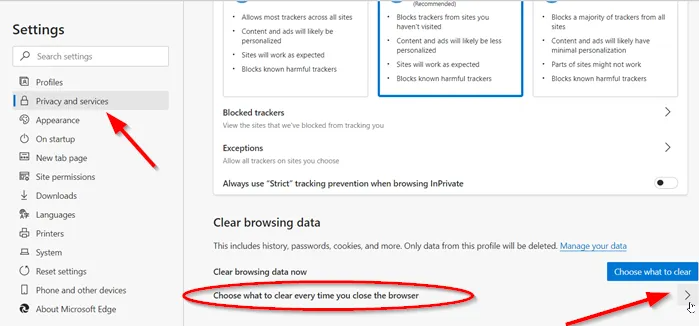
To delete or clear the browsing history of Edge on close, toggle the switch for Browsing History to the On position.

When enabled, the Edge browser will be configured to automatically delete Microsoft Edge browsing history on exit.
Open registry editor and navigate to HKEY_LOCAL_MACHINE\SOFTWARE\Policies\Microsoft.
Right-click on Microsoft and select New > Key and name it Edge.
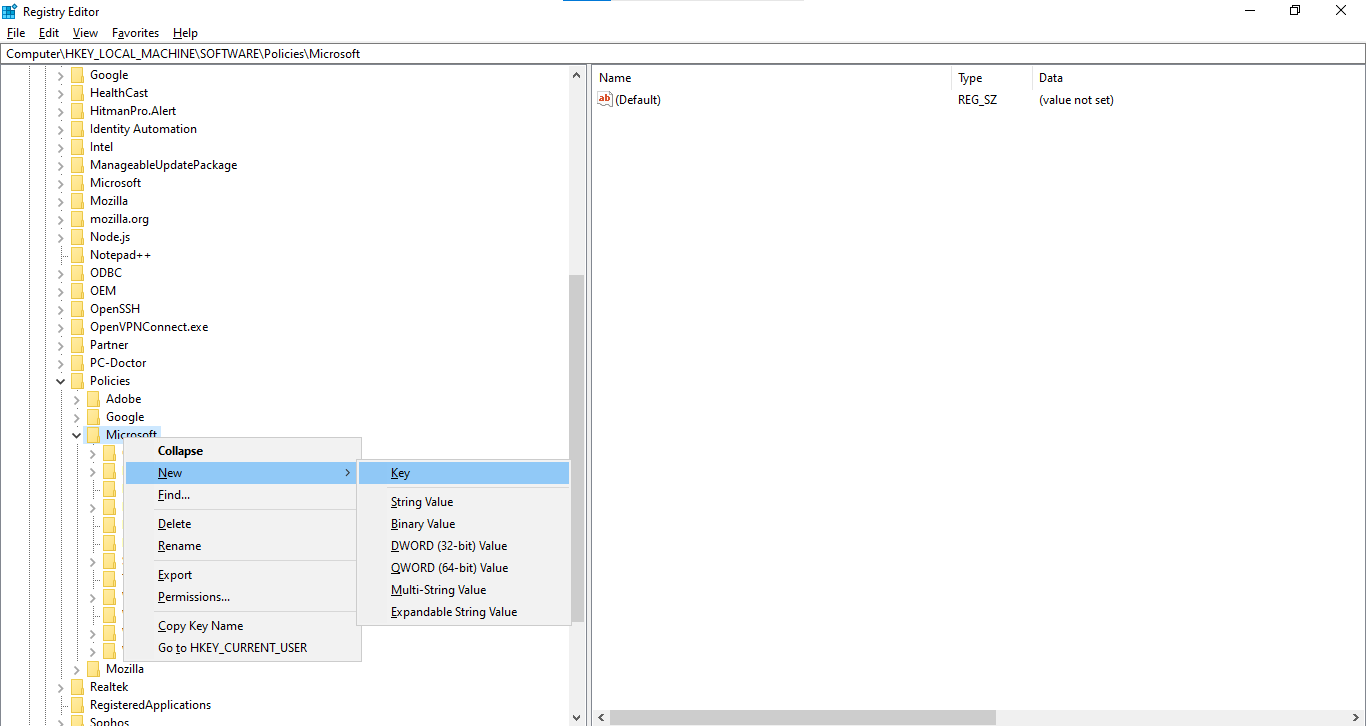
Right-click on the Edge key, select New > Key, and name it Recommended.
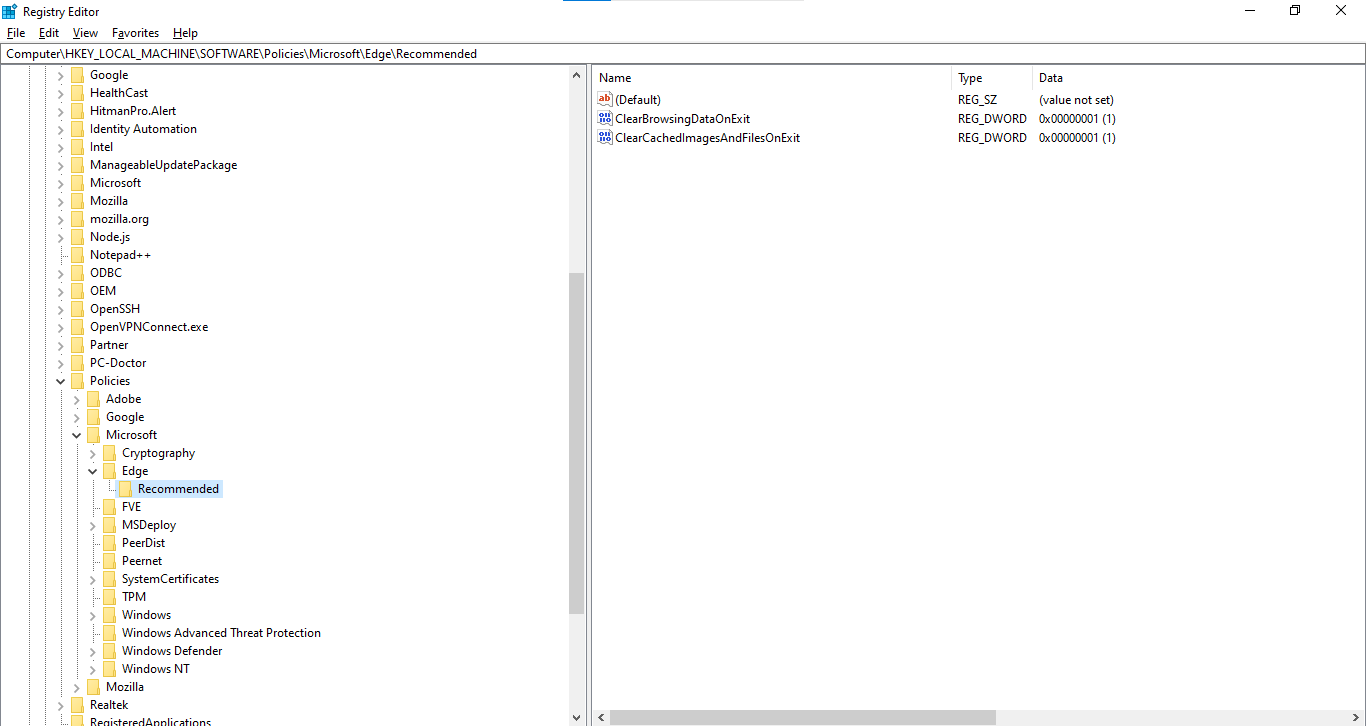
Create a DWORD value inside the Recommended key by right-clicking on Recommended > New > DWORD (32-bit) Value, and naming it ClearBrowsingDataOnExit.
By default, it comes with 0 as the Value data. Double-click on it and enter 1 as the Value data and click OK.
Similarly, to delete cached images and files when Edge exits automatically, create a DWORD value ClearCachedImagesAndFilesOnExit and set the Value data to 1. If you want to keep your browsing data, open ClearBrowsingDataOnExit and set the Value data as 0.
Note
The minimum setting recommended by Identity Automation is ClearBrowsingDataOnExit.
Note
The minimum setting recommended by Identity Automation is ClearBrowsingDataOnExit.
Press Win+R, type
gpedit.msc, and press Enter. Then navigate to Computer Configuration > Administrative Templates> Classic Administrative Templates > Microsoft Edge - Default Settings.Double-click Clear Browsing Data when Microsoft Edge closes setting and select Enabled.
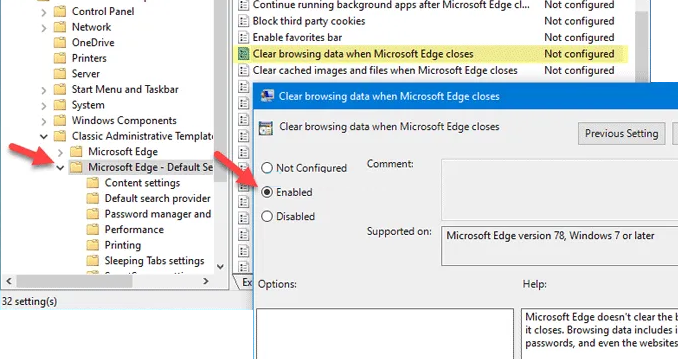
Click OK to save the change.
It is also possible to delete cached images and files on exit. For that, enable the Clear cached images and files when Microsoft Edge closes setting.
If you do not want to clear the browsing data on exit, open the same setting and choose either Not Configured or Disabled.
Using this solution means you do not need to use Private browsing mode and can keep using the Normal mode. Also, you do not have to worry about deleting browsing data manually.
Delete Data when Firefox Closes
Open the Local Group Policy Editor by pressing Win+R, typing
gpedit.msc, and hitting Enter. Once open, navigate to Computer Configuration > Administrative Templates > Mozilla > Firefox.Find the setting called Clear Data when Browser is Closed. Double-click on this setting and Enable it.
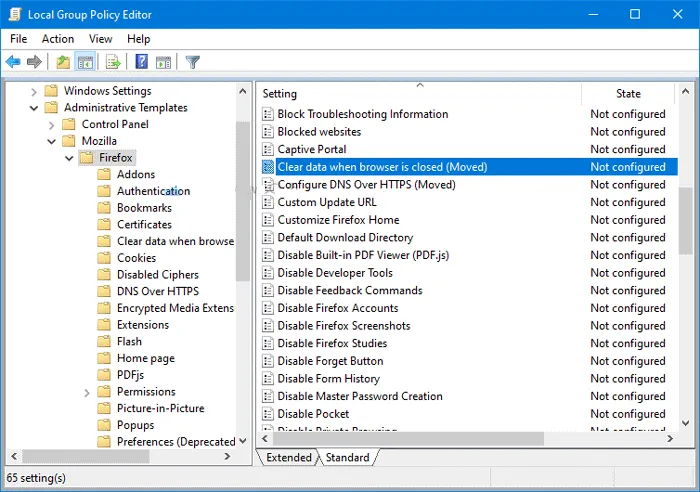
Then you will see some checkboxes. These options are:
Cache
Cookies
Download History
Form Search History
Active Logins
Site Preferences
Offline Website Data
Make a tick in every corresponding checkbox you want to clear. For example, if you want to delete only Cache and Cookies, tick those two checkboxes. However, if you want to clear everything when Firefox closes, tick all the checkboxes.
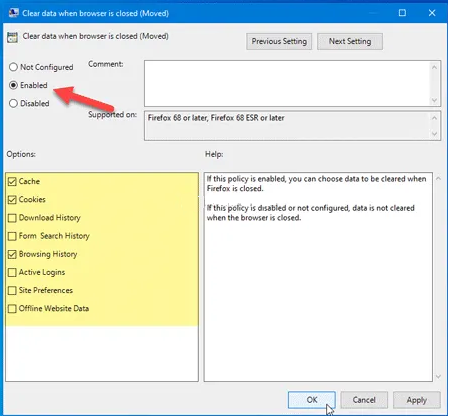
Click OK.
Note
Minimum settings recommended by Identity Automation are Cookies, FormData, Sessions, and SiteSettings.
Open the Registry Editor by pressing Win+R, typing
regedit, and clicking Enter then Yes. Navigate toHKEY_LOCAL_MACHINE\SOFTWARE\Policies.Right-click on Policies and select New > Key, then name it Mozilla. Right-click on Mozilla > New > Key, and name it Firefox.
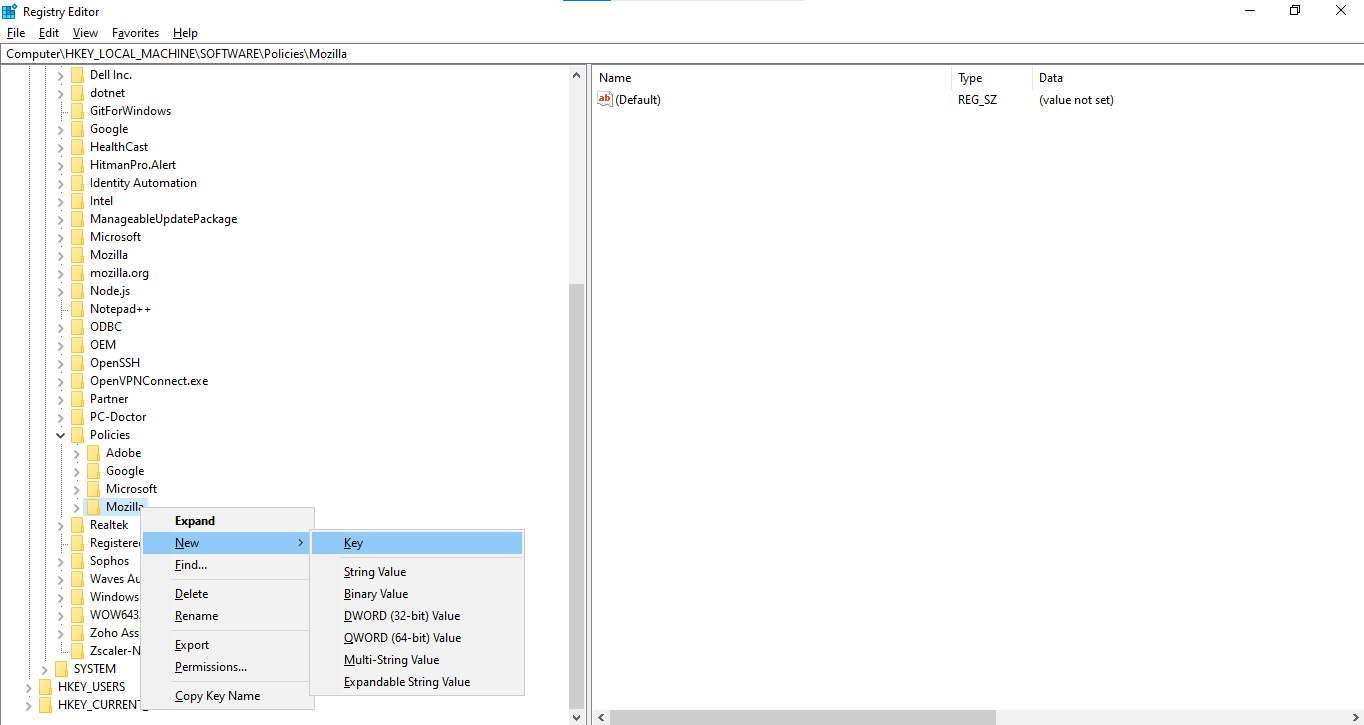
Right-click on the Firefox key, choose New > Key and name it SanitizeOnShutdown.
Right-click SanitizeOnShutdown, and select New > DWORD (32-bit) Value, and name it Cache. In other words, name this REG_DWORD value as the data you want to clear. If you only want to clear Cache, then only call it Cache. Otherwise, you can use the following names as required:
Cache
Cookies
Downloads
FormData
History
OfflineApps
Sessions
SiteSettings
All the properties can be set as shown:
