HCI Deploy Console
Purpose
The purpose of the HCIDeploy Console is to provide a visual interface to determine the current package deployment state of the client workstation. Package state for the current workstation is displayed in a color coded list so that help desk personnel may mange package deployments. Using the Console, help desk personnel may also update the client deployment schedule.
Warning
The 4.11 HCIDeploy server is not compatible with 4.10 and older clients. In addition, the 4.11 HCIDeploy client is not compatible with 4.10 and older servers.
Note
The Console application requires that the XA Client is installed on the workstation and you must be given permission to use it. You also must be an XA user (you will be authenticated to use the tool through XA).
Required Permissions
The console application is intended for help desk personnel only, but can be run by any user that has been granted permissions to the application within ExactAccess.
When connected to a workstation with the HCIDeploy Console all commands will be processed by the HCIDeploy service and do not rely on the local user account permissions to perform the update functions. To perform management with the console, ensure that port 26100 is not blocked by a firewall on any client workstation. The HCIDeploy service acts as a server on each client workstation to provide remote management capabilities.
Usage
There are several options for running the Console application:
Info
The Console now requires the user be logged into ExactAccess, and be granted access to run the application. It is no longer necessary to be an administrator on the local machine to run the application.
From the local workstation
No shortcuts are available unless one is created manually.
The application can be manually launched from Windows Explorer by navigating to the HealthCast directory where the application is installed.
From the local workstation using the HealthCast ExactAccess Desktop
However the application is accessed and executed, the following interface will be displayed:
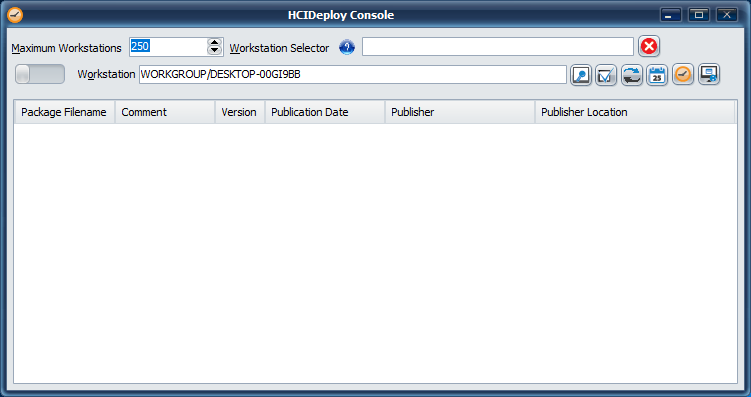
Use the Maximum Workstations to limit the number of workstations returned from the server that match the workstation selector filter.
Use the workstation selector to limit the number of workstations returned in the query for management. This works like a filter in the HCIDeploy Publisher, and on the workstation selection screen (below). Enter a prtial name or other workstaiton information that will filter workstations by this information. For example: enter *11.576* to retrieve only workstations that have Internet Explorer (IE) vesion 11.576 installed. enter Windows 10* to retrieve only workstations that have Windows 10 installed
Selecting the computer browse icon next to location will retrieve a list of all HCIDeploy registered workstations from the server, limited to the Maximum Workstations count, and containing only those that match the Workstation Selector filter. Choose a workstation to connect to from the list, or further filter the list with the filter box at the bottom.
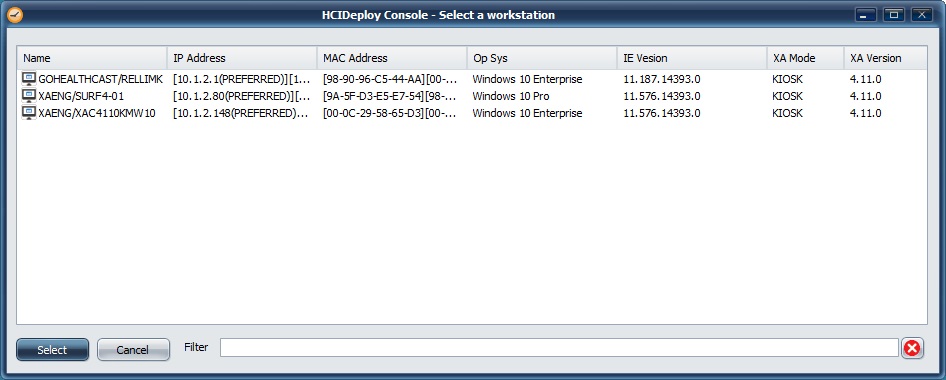
You may filter the list of workstations by entering information from any of the displayed fields, such as "KIOSK", or "4.11", or even filter by IP or MAC address, as well as a partial operating system such as Windows 8.1, or IE version like "11.0" or "11.576"
Tip
Only workstations running ExactAccess client 4.10 and above will provide operating system, IE version, XA mode, and XA version values. Once older clients have been upgraded, they will re-register with the server to provide this information.
Requires ExactAccess 4.10 server for these additional fields to be available.
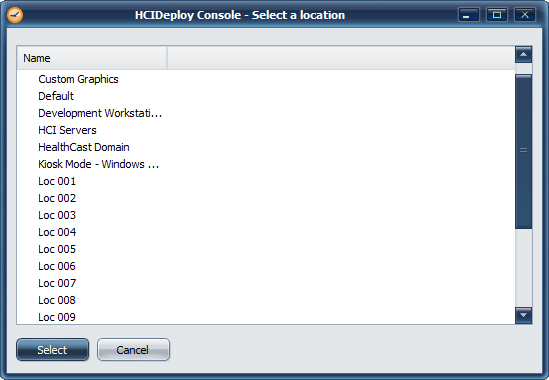
The toggle button next to the Workstations label allows the console to switch modes to operate on locations (or groups of workstations) instead of a single workstation. This allows for batch processing of all workstations associated with a location using the console.

Synchronization is the only location based operation allowed at this time.
Selecting the browse button will now show locations to operate on instead of workstations
Evaluation
The evaluation button will perform a client analysis to determine the state of the workstation.
Items listed in RED indicate the package is available on the server, but has not yet been deployed.
Items listed in GREEN indicate the package has been downloaded, but has not yet been deployed.
Items listed in ORANGE indicate the package is no longer applicable to the local workstation, but has not yet been uninstalled.
Items listed in LIGHT BLUE indicate the package has been removed from the local vault, and the package information is still present in the registry.
The package will be re-downloaded and deployed, even if the package had previously been deployed (or is currently still present in the Wrapper deployment folder).
Items listed in WHITE are up to date and do not require processing.
Synchronization
The synchronization button will perform a client analysis and update of the local workstation. No further action is necessary from the administrator unless a package does not install correctly due to install script errors.
If a location has been chosen, the synchronization button will retrieve the list of workstations associated with the location and perform synchronization on each of the workstations. A status screen will display the progress to synchronization. The number of workstations synchronized at the same time is limited by the number of cores on the machine performing the synchronization call. A system with 4 CPU cores will synchronize 4 workstations at a time from the list of workstations in a location.
Updating the Client Schedule
The schedule button allows the administrator to adjust the frequency of automatic updates on the client workstation. Setting a schedule is much like the Windows Scheduled Task operations, or setting a reoccurring appointment using Microsoft Outlook.
Simply select the frequency (daily or weekly), pick a start time (time interval at which update checks will begin) and a time interval (how often the system will check for updates).
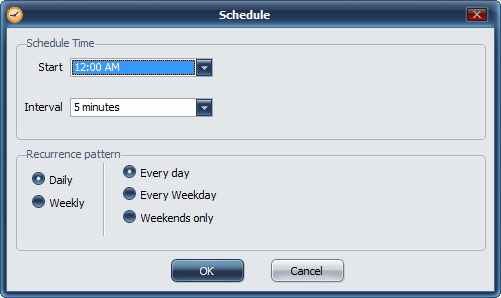
Administrators may also choose to have the schedule performed on a weekly basis, or only on specific days of the week. Choose the Weekly option for more choices.
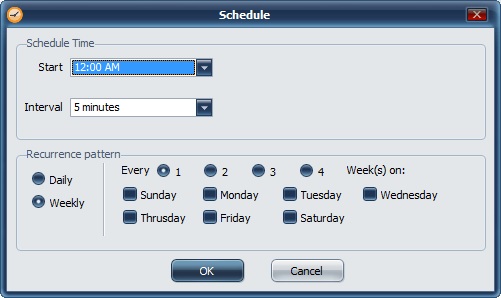
Choosing the 1 week option means that the schedule will happen every week, while weeks 2-4 options means that the schedule will happen on the 2nd, 3rd or 4th week of every month respectively. This has special significance where occasionally, a month can have 5 or even 6 weeks. These instances are rare, but they do occur, so in that instance, there would be a gap in automatically downloading updates during that period. Considering the frequency at the point where the schedule is 2-4 weeks out, months with the extra week would only delay the schedule by a maximum of two weeks.
The following registry key may be exported and applied to workstations after updating the schedule. This allows administrators to properly configure a single machine, then make updates to all machines in the organization to use the same schedule.
HKLM\Software\HealthCast\HCIDeployClient\Schedule
Schedule: reg_sz = "DAILY=TRUE,WEEKLY=FALSE,TIME=0,INT=6,DAY=TRUE, WEEKDAY=FALSE,WEEKEND=FALSE, "DAYS=SUN=FALSE,MON=FALSE,TUE=FALSE,WED=FALSE,THR=FALSE,FRI=FALSE,SAT=FALSE", 1=TRUE,2=FALSE,3=FALSE,4=FALSE"
The "schedule" registry contains a text representation of the configured time schedule for the workstation.
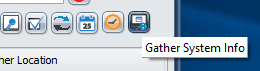
Remote HCI Sys Info
To make gathering HCISysinfo reports easier, it is now possible to use the console to issue a command on the remote machine to publish a sysinfo report for the machine. Click the "Gather System Info" button.
 |
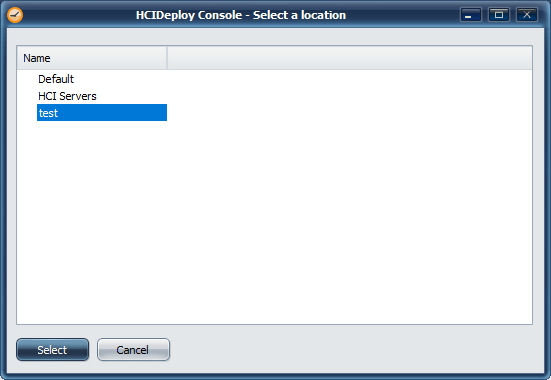
Select the location the info will be published to.
Tip
The location must already exist. Use the HCIDeploy publisher to create a location such as System Info to indicate the purpose of the location.
The system information will be gathered on a supported client and packaged on the server. Machines that are associated with this location will receive the info like any other package. If no workstations are associated with the location, use the publisher tool and export the package for upload to support.
Using regedit from an install.bat will allow a companion .REG file to be merged
Example
regedit.exe /s ".\myregfile.reg"
It is also possible to use the REG.exe command to directly add or update registry entries. See HCIDeploy Examples below for a script example using reg.exe
Sample Scripts
install.bat
rem REMOVE USERS and POWER USERS group access to the deployed folder contents
cacls . /E /C /R users
cacls . /E /C /R "power users"
install.bat
regedit.exe /s ".\myregfile.reg"
install.vbs
rem Make "Lock" appear on the context menu of XAUCM in the system tray icon
dim strKeyPath
dim path
dim objShell
Set objShell = CreateObject("WScript.Shell")
on error resume next
rem ----read registry for install path so we know where XA Lock is installed----
strKeyPath = "HKLM\Software\HealthCast\ExactAccess\LockPath"
path=objShell.RegRead(strKeyPath)
rem ----save the path to xalock.exe into the registry----
strKeyPath="HKLM\Software\HealthCast\ExactAccess\XAUCM\Lock"
call objShell.RegWrite(strKeyPath,path,"REG_SZ")
install.bat
rem enter an autolaunch application
if "%CURDIR%Z"=="Z" set CURDIR=%~d0%~p0
rem note: the following is meant to be entered on a single line
reg add HKLM\Software\HealthCast\ExactAccess\AutoLaunch /v Launch /t REG_SZ /d "\"%CURDIR%mywrapper.exe\"" /f
install.bat
rem Remove "Lock" from the XA Application Desktop
rem note: the following is meant to be entered on a single line
reg delete HKLM\Software\HealthCast\ExactAccess\applications /v xalock.exe /f
install.bat
rem To send a message, changing the tile as well as the message if the message contains spaces:
"c:\program files (x86)\healthcast\ExactAccess\hcsendnotice" 0,"title with spaces","message with spaces"
"c:\program files (x86)\healthcast\ExactAccess\hcsendnotice" 0,title,"message with spaces"
rem to send a message, changing the title, but only need a one word message
"c:\program files (x86)\healthcast\ExactAccess\hcsendnotice" "title with spaces",message
rem To send a message with the default title "Notice":
"c:\program files (x86)\healthcast\ExactAccess\hcsendnotice" message with spaces
"c:\program files (x86)\healthcast\ExactAccess\hcsendnotice" "message with spaces"