Kiosk Mode Workspace
The Kiosk Mode can be configured to optimize efficiency in various performance aspects.
The following sections of the Kiosk Mode can be tailored to the organization's needs.
Authentication
The various authentication options allow for their own, unique customization.
Proximity Card
Proximity card login is used in conjunction with the Username and Password login dialog. There are options that can be customized to also require the user to use a PIN in response to the badge tap to complete the login to the ExactAccess SSO solution, in addition to Proximity Card authentication.
(available through HealthCast)
Card Type | RFIdeas Reader Models 1 | HID Global/OmniKey | |||||
|---|---|---|---|---|---|---|---|
HID® cards |
|
| |||||
iCLASS® cards |
|
| |||||
Indala® cards |
| ||||||
MiFARE® cards |
|
1 Reader models cannot be mixed in the same environment.
2 Card serial number (CSN) do not support Parity Checking, Facility ID filtering, or Badge ID range checking features provided by ExactAccess.
Warning
Card readers that only read the card serial number (CSN) cannot be configured with these advanced features such as Parity Checking, Facility ID filtering, and Badge ID range checking.
Note
Card readers supporting card serial number (CSN) typically read 64-bit serial number values.
3 Reader must be pre-configured for compatibility with card type and data type, as the reader supports dual band communications. Only a single band can be utilized at a time 1.
4 Parity Checking, Facility ID filtering, or Badge ID range checking features are not available with this reader model.
Configuration
There are various configurations that will need to be implemented for various functionality outcomes.
Log-in as a Local Administrator to the workstation you would like to make changes on.
The Client Configuration Tool will only run under an account with Local Administrator privileges.
Navigate to the Windows® Start menu> All Programs > HealthCast > ExactAccess > Utilities > Configuration > Client Configuration.
and choose ProxCard Support.
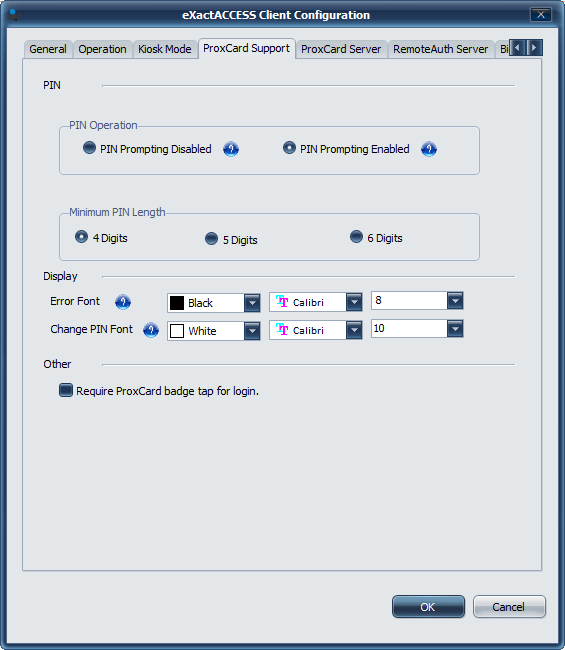
In the PIN Operation section select to either enable or disable prompting for PIN during authentication.
Set the minimum length PIN a user must choose during enrollment.
Click OK.
The PIN functionality is now set and will take effect without a reboot.
HKLM\Software\HealthCast\ProxCardClient\PIN
The following registry settings can be configured for PIN support:
AllowPinEnrollment: reg_dword = 1
A setting of 0 will disable PIN enrollment
MinPinLength: reg_dword = 4
Minimum PIN length is 4, but can be as long as 6
PinPromptInMinutes: reg_dword = 0
PIN Prompting can be disabled by setting this to hex: 0xFFFFFF or decimal: 4294967295. The setting is either enabled or disabled.
Various Reader Types
HKLM\Software\HealthCast\ProxCardClient
ReaderType: reg_sz = USB
HKLM\Software\HealthCast\ProxCardClient
ReaderType: reg_sz = SCARD
Server Connectivity
This section contains a list of registry settings that must be present and configured, as well as directions on how to handle a client side fail over.
HKLM\Software\HealthCast\ProxCardClient\Indy
Registry Setting | Configuration |
|---|---|
CompressionClass | reg_sz = one of the following values:
|
EncryptionClass | reg_sz = one of the following values:
|
0000 | reg_sz = The server DNS name or IP address where HealthCast ProxCard Server has been installed and configured. |
EnabledServerIDs | reg_sz = "0000" - this must contain at least one active server number |
Port | reg_dword = 30000 - the default port for communications. If you have altered the default listening port during the server installation, update this for the correct port number. |
If there is client side fail over configured for Remote Authentication, it is recommended to configure fail over for ProxCard. This is accomplished the same way as for Remote Authentication.
0001: reg_sz - add the secondary server DNS name or IP address
Update the EnabledServerIDs as a comma separated list of active servers:
EnabledServerIDs: reg_sz = "0000,0001"
Tip
When using client side fail-over, DNS lookup failure could cause excessive time for failure detection. If this happens, the client will not test all available servers. Use the following setting to extend the detection time (setting is specified in seconds):
HKEY_LOCAL_MACHINE\SOFTWARE\HealthCast\ProxCardClient
ConnectionTimeout: reg_dword = 8
If the setting doesn't exist, the default timeout is 1 second, so if DNS takes longer than this, secondary servers won't be attempted.
Proximity Card Self Enrollment
Open regedit and navigate to the following key:
HKEY_LOCAL_MACHINE\SOFTWARE\HealthCast\
ProxCardClient
BlankBadgeScan: reg_dword = 0
This can also be modified to display a message to the user that self-enrollment has been disabled with the setting "SelfEnrollmentDisabledMessage".
Tip
If self enrollment is disabled, then the ProxCard Administrator must be used to pre-enroll cards before they are issued to users.
Bitcount and Parity Checking
Caution
Not all badge readers or IDs will function with this feature. See System requirements for details.
These instructions are intended for XA solutions utilizing badge tap functionality. You must have badges and compatible badge readers in your environment in order to successfully monitor the bit count.
You can set the bit count in the registry to reflect the number of bits in your proximity card identification data. This is advisable if you wish to minimize the possibility that badge reads will be in error. This is a custom security measure that will minimize the possibility that bad badge reads will cause unwanted outcomes in your environment.
Once the bit count has been set to a specific value, all cards with values that are not specified will not be allowed. These types of values will be rejected and will not be able to create or connect to a user session.
Go to Start >Run >Regedit.
In the Registry Editor, locate the ValidBitCount value located at:
HKLM\Software\HealthCast\ProxCardClient The ValidBitcount value may not be present. You may need to add this value as a string in the ProxCardClient folder located in the directory path above.
Modify the value to indicate the allowed bit count(s): 26, 35, or 37.
Multiple values may be used. Please put a comma between each value to separate them. We do support values other than 26, 35, or 37. If you have a bit count value that is not one of the standards listed above, please follow the instructions in the next section, Creating a New Bit Count Value.
Example: If the bitcount for your card type is 26, your final registry setting will look like this:
ValidBitCount:reg_sz="26"
If you have multiple cards with varying bit counts, your final registry setting may look similar to this:
ValidBitCount:reg_sz="26,35,37"
In the Registry Editor, locate the Bitcount key located at: HKLM\Software\HealthCast\ProxCardClient\Bitcount.
Create a new key within the Bitcount key. Use the number of your badges bits as the name of the new key.
Note
Due to the availability of other configuration options based on the bit count of badges, it is necessary to create additional keys.
In the newly created key (this key should be named with the number of bit counts contained in your badges), you must create another key. Please name this key Facility.
The facility validation feature is explained in more detail on the Facility Validation section.
Example
If the bitcount for your card type is 36, you would create the following registry structure:
HKLM\Software\HealthCast\ProxCardClient\Bitcount\36\facility
You would then modify the ValidBitcount value found in in HKLM\Software\HealthCast\ProxCardClient, adding your value of 36 by either replacing all other data in this value, or by appending ",36" to the end of the current list specified within the value.
The final registry setting would be similar to this:
ValidBitCount:reg_sz="36"
or
ValidBitCount:reg_sz="26,35,37,36"
Handling Bad Badge Reads
There are custom settings that assist in handling bad badge reads.
Parity Settings assist in minimizing the possibility of unwanted outcomes in the environment from bad badge reads by stripping number of bits from the proximity badge identification data.
The Facility Code Validation feature is a means of limiting access to workstations by the user's badge code facility portion. This can also prohibit the use of unauthorized proxcards, with the added layer of security configuration.
Parity Settings
Parity stripping is turned OFF by default. The default setting ( 0 ) allows the system to collect data regarding the parity bits contained in the proximity badge identification data. Leave this setting as is if installing XA Client in the environment for the first time. It will allow for advanced troubleshooting and quicker resolution to proximity badge issues, if they occur.
Changing this setting will strip the desired number of bits from the proximity badge identification data. This changes the number of bits that is stored in the ProxCard Server database to reflect the identification data, minus the number designated to be stripped.
Upgrade
Change this setting if you are upgrading and have a ProxCard Server database that is already populated with user data from workstations that had this setting ON (1).
Users will need to re-enroll their badges when this setting is changed.
Go to Start >Run >Regedit.
In the Registry Editor, locate the ParityStripcountLeading and ParityStripCoundTrailing values located at:
HKLM\Software\HealthCast\ProxCardClient
Modify them to indicate the value of 1.
One bit stripped from the front and back of the data sequence is the most common scenario. If you feel your parity settings may be different, please contact your HealthCast Project Manager for assistance.
If the parity stripping setting is used, ensure that the final bit count is 24 bits or more. A bit count of less than 24 bits will make badges unusable.
Facility Code Validation
This is a custom setting that functions as a way to limit access to workstations based on the facility portion of a user's badge code. Validating facility code will minimize the possibility of unwanted environment outcomes due to a bad badge read.
Configuring the facility code validation feature requires adding new keys and values to the workstation's registry. This can be done via a transform or batch file during install or upgrade, or post-install/upgrade using the Registry Editor.
Instructions for configuring the facility validation feature will differ depending on your method of deployment, if you are installing XA for the first time, or if you are configuring your environment for parity stripping. Please contact your HealthCast representative before configuring facility validation if your scenario differs from those described below.
Go to Start >Run >Regedit.
In the Registry Editor, locate the ParityStripcountLeading and ParityStripCoundTrailing values located at:
HKLM\Software\HealthCast\ProxCardClient
Modify them to indicate the value of 1.
One bit stripped from the front and back of the data sequence is the most common scenario. If you feel your parity settings may be different, please contact your HealthCast Project Manager for assistance.
If you use the parity stripping setting, please ensure that your final bit count is 24 bits or more. A bit count of less than 24 bits will make badges unusable.
Have the appropriate facility codes ready before continuing. The facility codes entered in this section will be the only allowable codes once this configuration is finished.
In the Facility key, create a new reg_dword value.
Name the value 1..
Right-click the new value and select Modify.
Select the appropriate Base category.
Choose Decimal if your facility code was provided by the manufacturer of your card and it is in decimal notation. Choose Hexadecimal if you have calculated the facility mask in hexadecimal notation.
In the Edit DWORD Value box enter one of the facility codes in the Value data box.
Verify that the information in the box is correct, and select OK.
Repeat these steps for each facility code that you would like to authorize. Name the values sequentially.
Other Required Settings
Warning
If a proxcard database is in place and using parity stripping, then it is critical that the bit count settings, and other badge related registry settings, are correct.
First, verify the state of your parity settings.
You can do this by reading the parity settings instructions and following the instructions there
If your settings indicate that you are stripping bits (leading or trailing), then you must adjust your bit count to match the number of bits present AFTER parity bits have been removed.
Example: If you are removing 1 leading parity bit and 1 trailing parity bit and you have 26 bit cards, you would calculate the final bit count as 24. If you have 35 bit cards and are stripping 2 leading bits and 1 trailing bit you would calculate the final bit count as 32.
Follow the Enable Bit Count instructions to set the correct bit count in the registry.
You may need to create new keys and sub-keys that reflect the bit count in your environment.
Recalculate your facility mask using the final bit count derived from the bits remaining after parity stripping.
Follow the directions above in the fresh installation/non-parity stripping section to configure the facility code validation.
Username and Password
The Username and Password dialog for kiosk mode allows the user to type login credentials or tap a badge to initiate the login to the ExactAccess SSO solution.
Kiosk Mode can also be configured to authenticate with a remote source in instances where workstations are configured as non-domain-joined workstations. This feature requires that HealthCast ExactAccess Server be available and configured on a server that is a member of the domain to authenticate with. This will also require additional configuration on each ExactAccess Client as detailed below. If the registry key does not exist, create the key and set the appropriate values.
To use proximity cards in conjunction with the dialog, the ProxCard server must be configured, and the proxcard device service "HCI ProxCard Client" must be running. A supported reader must also be attached to the workstation.
Remote Logon Configuration
HKLM\Software\HealthCast\HCCitrixSessionDirectory
RemoteLogon: reg_dword = 0 (set to 1 to enable)
The following registry settings must also be present and configured:
CompressionClass: reg_sz = one of the following values:
NONE
VCLZIP
EncryptionClass: reg_sz = one of the following values:
RIJNDAEL
BLOWFISH
ID: reg_sz = an encryption key that must match the server configuration key.
Default server install key is "EA12G54"
This key is in addition to the connection key generated on each connection, and is not the only piece of information necessary to encrypt/decrypt the communication requests.
HKLM\Software\HealthCast\HCCitrixSessionDirectory\Indy
0000: reg_sz = The server DNS name or IP address where HealthCast Remote Session Directory has been installed and configured.
EnabledServerIDs: reg_sz = "0000" - this must contain at least one active server number
Port: reg_dword = 20000 - the default port for communications. If you have altered the default listening port during the server installation, update this for the correct port number.
Configuring Fail over for Remote Authentication
If there is a client side fail over configured for ProxCard, it is also recommended to configure fail over for Remote Authentication. This is accomplished the same way as for ProxCard.
0001: reg_sz - add the secondary server DNS name or IP address
Update the EnabledServerIDs as a comma-separated list of active servers:
EnabledServerIDs: reg_sz = "0000,0001"
Domain Dropdown Exclusions
The following information assists in creating an exclusion list of names for the dropdown.
HKEY_LOCAL_MACHINE\SOFTWARE\HealthCast\ExactAccess\domainlist\exclusions
0001: reg_sz = "excluded domain name 1"
0002: reg_sz = "excluded domain name 2"
Continue to add numbers in order for other domain names to be excluded - these exclusion values should exactly match the text as shown in the dropdown prior to being added to the exclusion list.
HKEY_LOCAL_MACHINE\SOFTWARE\HealthCast\ExactAccess\Override
ExcludeLocalComputerFromDomainList: reg_dword = 1
This section contains a list of command line install parameters that must be present and configured.
XA_MODE=KM
XA_SRV=<server name>
XA_AUDIT_SRV=<server name>
XA_PRX_SRV=<server name>
X_D_SRV=<server name>
X_RA_SRV=<server name>
X_KM_DOMVIS=0 (domain drop down visible)
X_KM_DRVMAP=0 (drive mapping enabled)
X_KM_PRTMAP=0 (print mapping enabled)
X_LUPE=0 (last user prompt enabled)
X_RARL=1 (remote authentication enabled)
X_RAID=EA12G54 (remote authentication shared key header)
XAD_ENABLED=0 (Full SSO enabled=0, Passthrough enabled=1)
Shell Replacement
Another aspect of the Kiosk Mode that can be configured is the Shell Replacement. This configuration allows the end point to act as a terminal to a remote session, while retaining the badge tap and session locking features. The startup application values can also be customized.
When configuring Kiosk mode for passthrough authentication only, it is also possible to replace the Windows shell so that the normal Windows desktop (explorer.exe) is not launched, and is not available.
Tip
To launch SSO enabled applications or WebSSO applications, passthrough authentication cannot be used.
That means that shell replacement also cannot be used on the device, and is not a supported configuration.
The "Enable ExactAccess Shell" option replaces Windows Explorer desktop as the shell. Administrative users will be able to log into the workstation to perform administrative tasks. For this operation, ExactAccess will not launch, and the administrator will be presented with the Windows default desktop. Additionally, the Windows RUN keys will not be processed for the non-administrative users. This means that a new set of registry keys must be configured to properly launch the ExactAccess components for normal operation.
Shell Replacement
Shell replacement is supported in Locking Kiosk Mode only. It prevents users from having a Windows Desktop (explorer.exe) session on the workstation, severely limiting the scope of interaction with the local workstation. If the user needs to access local resources on the workstation, it is recommend that shell replacement NOT be used so that users are presented with a familiar system to use.
AppSense
Some portions of AppSense (such as user profile customization) will not function if the shell is replaced (e.g. not set to explorer.exe)
Please contact your AppSense representative for additional details about this requirement.
XA-2394,2402—Passthrough mode shell replacement, Explorer shell may not start the desktop when logging in as an administrator
Observed: When logging into Windows as an administrative user, the default shell (explorer) is started and the standard desktop is supposed to be displayed. However, instead of the Windows desktop, only a explorer file browser is launched with no desktop. UAC may prevent replacing the appropriate registry keys for the shell because the administrative user is forced to be recognized as a normal user which denies write access to the shell key.
Workaround: Modify the permissions on the following registry key:
HKLM\Software\Microsoft\Windows NT\current version\Winlogon
Add the specific administrator account(s) to the key and set full access.
Windows 10 requires a new procedure to function properly. See the Windows 10 requirements
To establish the allowance for shell replacement enabling, configure the operation in Passthrough authentication only mode.
Log-in as a Local Administrator to the workstation you would like to change.
The Client Configuration Tool will only run under an account with Local Administrator privileges.
Navigate to the Windows® Start menu> All Programs > HealthCast > ExactAccess > Utilities > Configuration > Client Configuration.
and choose Operation.
Select one of the connection methods that are marked as installed. (Configure as necessary using the Configure... button.)
Select Kiosk Mode and ensure the "Enable ExactAccess Shell replacement" check box is checked. (it may be necessary to change modes to Kiosk Mode on the General tab if the device was not configured for Kiosk Mode during installation)
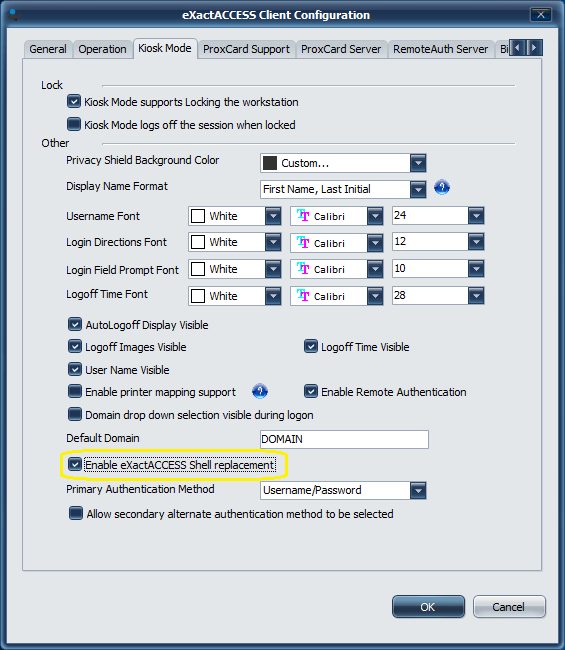
Click OK to apply the changes
Shell Replacement
The default setting as described above does not function for Windows 10. Additional configuration is required to fully enable Shell Replacement on Windows 10 systems.
For Windows 10: Modify the following PowerShell script as appropriate and run the script on the device.
Tip
This code cannot be used directly, as it shows you how to both enable and disable a custom shell via power shell script, as well as indicating the state of the configured shell. It must also be customized for your environment with your specific domain user accounts.
In addition, the power shell script has specific Windows 10 version release requirements. Please use the documentation provided by Microsoft to determine if your version of Windows 10 meets these requirements.
Powershell Script to enable Shell on Windows 10
# Check if shell launcher license is enabled
function Check-ShellLauncherLicenseEnabled
{
    [string]$source = @"
using System;
using System.Runtime.InteropServices;
static class CheckShellLauncherLicense
{
    const int S_OK = 0;
    public static bool IsShellLauncherLicenseEnabled()
    {
        int enabled = 0;
        if (NativeMethods.SLGetWindowsInformationDWORD("EmbeddedFeature-ShellLauncher-Enabled", out enabled) != S_OK) {
            enabled = 0;
        }
        return (enabled != 0);
    }

    static class NativeMethods
    {
        [DllImport("Slc.dll")]
        internal static extern int SLGetWindowsInformationDWORD([MarshalAs(UnmanagedType.LPWStr)]string valueName, out int value);
    }
}
"@
    $type = Add-Type -TypeDefinition $source -PassThru
    return $type[0]::IsShellLauncherLicenseEnabled()
}

[bool]$result = $false
$result = Check-ShellLauncherLicenseEnabled
"`nShell Launcher license enabled is set to " + $result
if (-not($result))
{
    "`nThis device doesn't have required license to use Shell Launcher"
    exit
}

$COMPUTER = "localhost"
$NAMESPACE = "root\standardcimv2\embedded"

# Create a handle to the class instance so we can call the static methods.
try {
    $ShellLauncherClass = [wmiclass]"\\$COMPUTER\${NAMESPACE}:WESL_UserSetting"
    } catch [Exception] {
    write-host $_.Exception.Message;
    write-host "Make sure Shell Launcher feature is enabled"
    exit
    }

# This well-known security identifier (SID) corresponds to the BUILTIN\Administrators group.
$Admins_SID = "S-1-5-32-544"
# Create a function to retrieve the SID for a user account on a machine.
function Get-UsernameSID($AccountName) {
    $NTUserObject = New-Object System.Security.Principal.NTAccount($AccountName)
    $NTUserSID = $NTUserObject.Translate([System.Security.Principal.SecurityIdentifier])

    return $NTUserSID.Value
}

# Get the SID for a user account named "kms". Rename "kms" to an existing account in your domain to test this script.
$Cashier_SID = Get-UsernameSID("kms")
# Define actions to take when the shell program exits.

$restart_shell = 0
$restart_device = 1
$shutdown_device = 2

# Examples. You can change these examples to use the program that you want to use as the shell.
# This example sets the HCIShell as the default shell, and restarts the device if the shell application is closed.
$ShellLauncherClass.SetDefaultShell("c:\program files (x86)\healthcast\exactaccess\hcishell.exe", $restart_device)

# Set Explorer as the shell for administrators.
$ShellLauncherClass.SetCustomShell($Admins_SID, "explorer.exe")

# View all the custom shells defined.
"`nCurrent settings for custom shells:"
Get-WmiObject -namespace $NAMESPACE -computer $COMPUTER -class WESL_UserSetting | Select Sid, Shell, DefaultAction

# Enable Shell Launcher
$ShellLauncherClass.SetEnabled($TRUE)

$IsShellLauncherEnabled = $ShellLauncherClass.IsEnabled()
"`nEnabled is set to " + $IsShellLauncherEnabled.Enabled

# Remove the new custom shells.
$ShellLauncherClass.RemoveCustomShell($Admins_SID)
$ShellLauncherClass.RemoveCustomShell($Cashier_SID)

# Disable Shell Launcher
$ShellLauncherClass.SetEnabled($FALSE)

$IsShellLauncherEnabled = $ShellLauncherClass.IsEnabled()

"`nEnabled is set to " + $IsShellLauncherEnabled.Enabled
This code snippet is taken directly from the Microsoft Web Site for enabling different shells for different user classes (administrators vs. normal users). It has only been modified as an example of which user to configure, and the name of the shell to set for the generic user. It may need to be adjusted for each workstation if the generic user is unique per workstation.
For additional information on how to enable shell replacement, please use the documentation provided by Microsoft.
Remove all registry keys from Windows|RUN registry location that pertain to ExactAccess so that when an administrative user logs in and explorer.exe launches as their shell, XA processes do not run.
To customize the startup application values, open Registry Editor (regedit) and navigate to the following registry key:
HKEY_LOCAL_MACHINE\SOFTWARE\HealthCast\ExactAccess\startup
There are several values that are pre-populated, but can be adjusted for optimal performance:
The AutoLogoff.exe entry [02] may be removed as the client is configured for Kiosk Mode.
An entry for hciNetStatus.exe may be added (in place of autologoff [02]) as the client is configured for Locking Kiosk mode, so that the network status display appears on the Privacy Shield.
To enable, add 02:reg_sz="c:\program files (x86)\healthcast\ExactAccess\hciNetStatus.exe" hcikmlock
User Drive Mapping
The user drive can be mapped in Kiosk Mode to obtain resources on a different computer on the local network and on the ExactAccess Server.
Note
When drive mapping in Kiosk Mode has been configured, users that are members of the role added to the ExactAccess Drive Mapping application will have their configured drives mapped when they log into XA, and the drives will be unmapped when they log off of XA.
Type the following into an explorer window address bar: \\server and press Enter on the keyboard.
A list of shares named “server” will load.
Select the file share to map, any name that appears labeled as a FILE share may be used (the above command may also show shared printers, and scheduled tasks).
Only File shares are supported with the xanetuse command.
If the name does not appear in this list, it cannot be used as a root share name, and is not supported.
Example
If "share" does not exist on "server" then \\server\share is not a valid share name and a drive will not be mapped.
Sub-folders of a share may be used for a mapped drive - if a folder named mydrive is under the share folder on the server as in "\\server\share\mydrive" then it can be mapped to a local drive letter
If a drive that is mapped is already in use by the local system (example: C:\ drive, or any drive that has already been mapped by the generic user), the share will not be mapped.
Warning
Each Kiosk Mode client must have the registry value isXADriveMappingEnabled set to 0. This disables the drive mapping provided by the login dialog, as it has been replaced by a drive mapping notification plug-in xadrivemapping.exe
This value can be found in the following registry key: HKLM\Software\HealthCast\ExactAccess
The following key must be set to use the _scriptpath_ drive mapping parameters and environment variable expansion capabilities provided by the plug-in.
HKEY_LOCAL_MACHINE\SOFTWARE\HealthCast\ExactAccess\notification
xadrivemapping.clsXALoginNotification: reg_sz = "ExactAccess Kiosk Mode Drive Mapping"
The file xadrivemapping_server.xml must be registered with the XA server.
This will register a new application named “ExactAccess Drive Mapping”. This is accomplished in the same manner as registering a Library connector, and must be done with the indicated XML file.
Tip
The file provided with Client version 4.11 (or higher) must be registered even if you were using a previous version of drive mapping. This will add the additional _scriptpath_ parameter that was not present in previous versions.
Tip
For instructions on registering new applications, refer to the Registering an Application instructions in the Administrator Tool Guide
Note: the XADriveMapping_server.xml file is found in
C:\Program Files (x86)\HealthCast\ExactAccess
The ExactAccess Drive Mapping application and the Generic folder child item must be placed on the organization map.
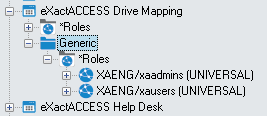
Roles must be assigned to the new application.
Each user in the role must have their drive mapping set individually if the _scriptpath_ option is NOT used. The paths must be specified as \\server\share for each drive letter to be mapped
When using the _scriptpath_ option, set the control item default parameters to point to a script file that handles both login and logoff for all users. If a _scriptpath_ is set, it overrides all other drive map settings.
An example script is included with the install here:
C:\Program Files (x86)\HealthCast\ExactAccess\examples\login.bat
The example script maps drive L to a share that is based on the logged in user name by using the xanetuse.exe command installed with the ExactAccess client. It demonstrates the available environment variables and command line parameters that will be passed to the script when it is executed.
Note
This script will need to be modified before it can be deployed, as the generic \\servers\users\%XAUserName% is used for demonstration purposes only.
If the login script is deployed to a server share example: \\mydc\netlogon then the generic kiosk mode Windows user must have read/execute permissions to this folder in order to run the batch file across the network.
Login.bat
@Echo Off
cls
rem -the command processor receives the MAPDRIVES or UNMAPDRIVES command as the first parameter
rem -the command processor receives the XA Username and Domain as parameters
rem -the command environment ALSO contains the XAUsername XAUserDomain environment variables
rem -these can be BLANK if no previous user was logged in (at log-in, XA performs an UNMAP with no user)
set XA_UserName=%2
set XA_UserDomain=%3

echo XA_Username is %XA_UserName%
echo XA_UserDomain is %XA_UserDomain%
echo XAUserName is %XAUserName%
echo XAUserDomain is %XAUserDomain%
echo XAINSTPATH is %XAINSTPATH%
echo.

if %1==MAPDRIVES goto MAP
if %1==UNMAPDRIVES goto UNMAP
echo -invalid parameters-
goto done

:UNMAP
echo Performing %1
"%XAINSTPATH%xanetuse" l: /d
echo Unmap complete
goto done

:MAP
echo Performing %1
rem use variables to choose a drive in the script
rem provide a valid share path in the line below
"%XAINSTPATH%xanetuse" l: "\\server\users\%XAUserName%"
echo.
set el=%el%
if "%el%" EQU "1219" (
echo ERROR SESSION CREDENTIAL CONFLICT
) else (
        if "%el%" EQU "1202" (
         echo ERROR DEVICE ALREADY REMEMBERED
        ) else (
                  if "%el%" EQU "85" (
                   echo ERROR ALREADY ASSIGNED
                  ) else (
                          if "%el%" NEQ "0" (
                          echo failed to map drive - error %el%
                         )
               )
        )
)
:done
echo mapping complete
Direct Drive Parameters
If not using the _scriptpath_ entry to specify a script, assign drive paths directly to the drive letter parameters. Specify drive paths using command line variables ( %XAUSERNAME% %XAUSERDOMAIN% and %XAINSTPATH% ) which will be expanded when the drive is mapped for the user.
Mapping to existing drive paths (C:\program files) is not supported.
Mapping drives for RunAs (user in a different security contexts) is not supported. (RunAs functionality is intended to be used for non-sso enabled applications that use the Windows user as the application user)
Warning
Windows requires that drives be mapped for EACH security contexts. This can be seen by running a command prompt as a different user, mapping a drive, then trying to access that drive from a command prompt of a third user - you will receive an error "The system cannot find the drive specified" This is expected and standard Windows behavior.
Example:
From a command prompt for the current Windows user:
net use x: \\server\share
Run a new command prompt as User2
attempt to access the x drive
Windows returns the indicated error - User2 doesn't have a drive mapped, so the following command will work in this context
net use x: \\differentserver\share2
Notice that there are 2 different shares mapped to drive x – starting a third command prompt as User3 results in the same error when attempting to access drive x, and would require mapping the drive in this security context for the third time - possibly to a completely different server and share.
Drives mapped from a RunAs will not display in Explorer of the generic Windows user (as indicated above, each context has its own set of drive mappings that cannot be seen from any other user context)
Tip
If you are using RunAs functionality, and need access to mapped drives, the drive must be mapped as part of running the application as the new user. This cannot be handled by ExactAccess, as the new security context does not have access to the currently logged in XA user information (again, prevented by Windows session security)
Logoff Cleanup
Logoff Cleanup is used to close any opened programs when the user logs out of ExactAccess. Any programs that are closed with this configuration are not closed gracefully and no work will be saved, to allow abandoned programs to be closed for a clean exit.
Configure ExactAccess to run Logoff Cleanup
To configure Logoff Cleanup to run when ExactAccess closes add a value named “logoffCleanup.clsEventNotify” to the notification registry key:
[HKEY_LOCAL_MACHINE\SOFTWARE\HealthCast\eXactACCES
\notification]"logoffCleanup.clsEventNotify"=""
Various applications can be added to be closed by the Logoff Cleanup by adding them to the WatchList. It can also be configured to close all opened Internet Explorer windows.
To add an application to be closed by the Logoff Cleanup, add the .exe to the WatchList. This is done by adding a key to [HKEY_LOCAL_MACHINE\SOFTWARE\HealthCast\ExactAccess\LogoffCleanup Settings\WatchList] named for the .exe to be closed. For example: To close MS Word name the key “WINWORD.EXE”.
 |
If you need an application to close, and all prompts be suppressed, add a string value to the key created above named “Force” that will force the process to close.
Warning
This is an ungraceful termination that could lead to data corruption, and should only be used when necessary.
To close all opened Internet Explorer windows you only need to add the following string value to the registry the following registry key (This is the default setting upon installation of the XA client):
[HKEY_LOCAL_MACHINE\SOFTWARE\HealthCast\ExactAccess\LogoffCleanup
Settings\InternetExplorer]"CloseIEBrowser"="True"
 |
To exclude certain URLs, such as a Tracking Board, first set the "DisableCloseIE" registry setting to "true" to stop SnapApp from automatically closing all IE processes on log off, then add string values named for the URLs you wish to exclude to the ExcludedURLs registry key:
[HKEY_LOCAL_MACHINE\SOFTWARE\HealthCast\ExactAccess\
WebSSO\Sessions\Advanced Settings]
"DisableCloseIE"="true"

[HKEY_LOCAL_MACHINE\SOFTWARE\HealthCast\ExactAccess\
LogoffCleanup Settings\InternetExplorer\ExcludedURLs]"
 |
Logoff Script
Logoff Cleanup supports launching command shell associated scripts (i.e. .bat, .vbs, .ps1) or an executable for added flexibility.
To launch a script on log off add a key to [HKEY_LOCAL_MACHINE\SOFTWARE\HealthCast\ExactAccess\LogoffCleanup Settings\LogoffScript] named for the script you wish to run.
 |
Add a string value to the key named “Path” that contains the absolute path to the script. If there are command line arguments to pass to the script add a string value named “Param” to the key that contains the parameters to pass to the script.
Caution
Logoff Cleanup uses the TaskKill command to terminate applications during logoff. If this command is not available, not all of the configured applications will close.