RapidIdentity Portal Integration
Kerberos Authentication
Kerberos authentication allows the user to log in without having to enter their username and password when they are already logged in from a domain-joined Windows workstation.
Kerberos authentication establishes the user based on the account the application is running as. In this case, when you launch the portal, the browser must be launched as the current XA user to establish the correct authentication context.
Kerberos Authentication must be initially configured in RapidIdentity Portal. For assistance with this initial setup see How to Configure Kerberos Authentication in the RapidIdentity Administrator's Guide.
Establishing a Run As Connection
Creating a New Windows Application in ExactAccess
To create a Windows Application link on ExactAccess Desktop/RapidIdentity Classroom View that does not require sign-on, the process includes the following major steps:
Enabling a New Application in ExactAccess
To enable a new application, follow the instructions below.
Log into XA as a user with permissions to use the ExactAccess Administrator application.
Select the ExactAccess Administrator link on the ExactAccess Desktop/RapidIdentity Classroom View(or click Start > Programs > HealthCast > ExactAccess > Utilities > ExactAccess Administrator).
Right-click the application in the Applications Frame.
Select Enable New Application and enter the following information:
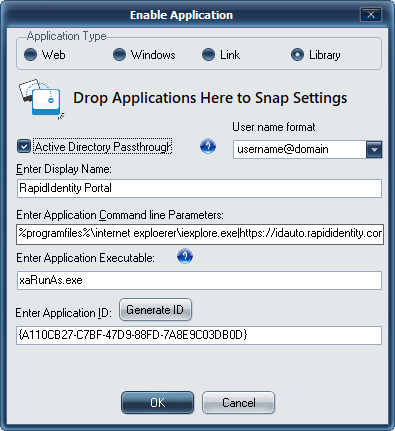
Enter Display Name: The name of the control item as it will show up in XA and on XA Desktop. This should be something meaningful to the users.
Enter Application ID: Select Generate ID.
Enter Application Executable: The exe name of the application.
Enter Application Command line Parameters: Enter here if the application requires command line parameters.
Check the box next to Active Directory Passthrough.
Select OK.
Adding an Application to the Organization Map (XA)
Once an application has been enabled and registered within ExactAccess, it will appear as a Control Item in the Applications Frame and is available to be clicked and dragged onto the Organization Map.
Select an application and drag it to the appropriate item within the Organization Map.
Click Yes to confirm.
Assigning Role to an Application
Right-click the application in the organization map, then select Add Roles(s) to this item.
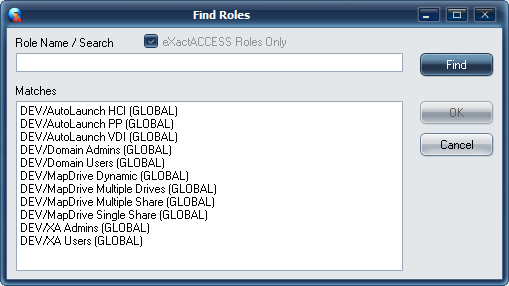
Enter the role name and select Find.
Note
Partial role names can be entered using an asterisk (*) to assist in populating roles. Depending on where the asterisk is placed, it will act like a variable and populate roles that contain additional text where it is placed.
Example:
DEV/* will populate roles that begin with "DEV/" as seen in the screenshot above.
*/xa* will populate roles that have additional text before or after "/xa" in the role name.
Using the asterisk alone will populate all available XA roles.
Highlight the correct AD Group and select OK.
All of the users within that role will have access to that application. Access to the application can be given to as many roles as needed. Additionally, single-role access can be given to as many applications as necessary.
Deploying Connector Files
Copy all the Runas Connector files to the location where the Connector is running:
64-bit: C:\Program Files (x86)\HealthCast\ExactAccess\Wrappers\ directory
32-bit: C:\Program Files\HealthCast\ExactAccess\Wrappers\ directory
Creating Link to the Connector
If ExactAccess (XA) Toolbar is utilized, for displaying Connector link(s) on the XA Toolbar, a registry entry is required for each Connector.
[HKEY_LOCAL_MACHINE\SOFTWARE\HealthCast\ExactAccess\Applications]xaRunas.exe=C:\Program Files(x86)\HealthCast\ExactAccess\Wrappers\xaRunas\xaRunas.exeLog out of XA and log back into XA. The application link should appear on the XA Toolbar.
If a shortcut on the computer’s desktop is needed, create and point the application shortcut on the desktop for users to launch the Runas Connector:
Runas Application Without Command Line Parmeters.
Example:
C:\Program Files(x86)\HealthCast\ExactAccess\Wrappers\xaRunas\xaRunas.exe

%ProgramFiles%\Internet Explorer\iexplore.exe
Runas Application With Command Line Parameters
Separate the application path executable and application’s command line parameters with the pipe “|” symbol.
Example:
C:\Program Files(x86)\HealthCast\ExactAccess\Wrappers\xaRunas\xaRunas.exe

%ProgramFiles%\Internet Explorer\iexplore.exe|http://www.microsoft.com
Modifying an Existing Windows Application in ExactAccess
To modify a Windows Application link on ExactAccess Desktop/RapidIdentity Classroom View that does not require sign-on, the process includes the following major steps:
Updating Application in ExactAccess
Displaying Application Link on ExactAccess Desktop/RapidIdentity Classroom View
Updating Application in ExactAccess
To modify an existing application, follow the instructions below.
Log into XA as a user with permissions to use the ExactAccess Administrator application.
Select the ExactAccess Administrator link on the ExactAccess Desktop/RapidIdentity Classroom View (or click Start > Programs > HealthCast > ExactAccess > Utilities > ExactAccess Administrator).
Right click the application in the Applications Frame.
Select Edit Application and enter the following information:
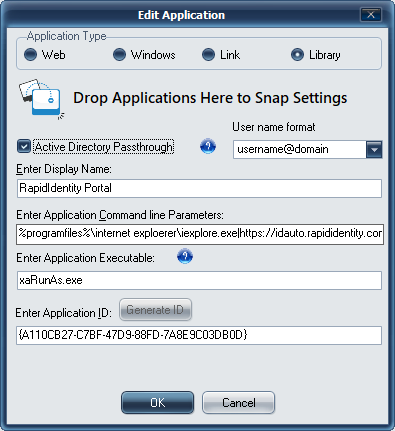
Enter Application Name: If update is required, the name of the control item as it will show up in XA and on XA Desktop. This should be something meaningful to the users.
Enter Application ID: No change.
Enter Application Executable: Update is required if the input is not the exe name of the application.
Enter Application Command line Parameters: If update is required, enter here if the application requires command line parameters.
Check the box next to Active Directory Passthrough.
Select OK.
Displaying Application Link on ExactAccess Desktop/RapidIdentity Classroom View
If the registry entry does not match the format of the following, an update needs to be made to display correct application link on the ExactAccess Desktop/RapidIdentity Classroom View. [HKEY_LOCAL_MACHINE\SOFTWARE\HealthCast\ExactAccess\Applications]
[HKEY_LOCAL_MACHINE\SOFTWARE\HealthCast\ExactAccess\Applications]

ApplicationExecutableName.exe=<full path
to the application’s executable>
Note
The ApplicationExecutableName.exe is the exe that was specified in Step #4c listed in the Updating Application in ExactAccess section above.
Log out of XA and log back into XA. The application link should appear on the ExactAccess Desktop/RapidIdentity Classroom View.