End Point
Settings Profiles
Before this release, all ThinOS endpoint settings were global, meaning that they applied to all ThinOS endpoints that connected to Lynx. In Lynx 1.6.0, it is now possible to create one or more settings profiles that each contain different settings. A settings profile can then be applied to one or more ThinOS endpoints using the Dell WMS management tool. If no settings profiles are created or specified in WMS, then a default settings profile will automatically be used.
Important
If a settings profile is not specified in WMS, then the default profile for ThinOS 8.5 - 8.6 will be used automatically. This may cause issues if you have ThinOS 9.1.1+ endpoints. Therefore, if you have ThinOS 9.1.1+ endpoints, it is highly recommended that you set the profile to use for your ThinOS 9.1.1+ endpoints within WMS (see “Using WMS to Specify a Settings Profile” below).
Create a Settings Profile
To create a settings profile for your ThinOS endpoints, sign on to the Lynx Admin console. Click Settings on the left. Click End Point and then Dell ThinOS. Next, click the version of ThinOS that corresponds to the version of the target endpoints. On the right-hand side, click on New Profile to create a new profile. (Note: It is not possible to create a new profile for ThinOS 8.5-8.6 endpoints because there is no way to specify that these endpoints should use a settings profile. Therefore, only the Default profile found under Version 8.5-8.6 is used by these endpoints).
After clicking on New Profile, a dialog box will appear which will allow you to customize the settings for this new profile. Be sure to give your profile a descriptive name in the Profile Name field at the top of the dialog box. You’ll also be able to view the version number of ThinOS to which this profile can be applied. After making changes, click Save to save your changes or Close to close the dialog without saving your changes. To deploy a settings profile to your endpoints, see Using WMS to Specify a Settings Profile.
Editing a Settings Profile
To edit an existing profile, including the Default profile, sign on to the Lynx Admin console. Click Settings on the left. Click End Point and then Dell ThinOS. Next, click the version of ThinOS that contains the profile you want to edit. On the right-hand side, find the profile you want to edit in the list of profiles. Click the Edit button next to that profile. A dialog box will appear which will allow you to change the settings for the profile. In addition to the settings, you can change the profile name if you wish.
Note
The profile ID is used to specify which profile the ThinOS endpoints should use, not the name. Therefore, you can change the name at any time without affecting the ThinOS endpoints that are using that profile.
After making changes, click Save to save your changes or Close to close the dialog without saving your changes. To deploy a settings profile to your endpoints, see Using WMS to Specify a Settings Profile.
Deleting a Settings Profile
To delete an existing profile, sign on to the Lynx Admin console. Click Settings on the left. Click End Point and then Dell ThinOS. Next, click the version of ThinOS that contains the profile you want to delete. On the right-hand side, find the profile you want to delete in the list of profiles. Click the Delete button next to that profile. A dialog box will appear which will allow you to confirm that you want to delete the profile.
Note
If the list of profiles contains a default profile, you will not be able to delete it.
Using Wyse Management Suite (WMS) to Specify a Settings Profile
Important
If a settings profile is not specified in WMS, then the default profile for ThinOS 8.5 - 8.6 will be used automatically. This may cause issues if you have ThinOS 9.1.1+ endpoints. Therefore, it is highly recommended that you use WMS to set the profile to use for ThinOS 9.1.1+ endpoints.
Note
For ThinOS 8.5-8.6 endpoints, it is not possible to specify which settings profile they should use. Therefore, a ThinOS 8.5-8.6 system will always use the Default profile that is found under Settings > End Point > Dell ThinOS > Version 8.5-8.6.
If you have Dell ThinOS 9.1.1+ endpoints, it is highly recommended that you specify which settings profile those endpoints should use by following these steps:
Sign on to the Wyse Management Suite (WMS).
On the left-hand side, select the group which contains the endpoints that you want to configure.
On the right-hand side, upper right corner, click Edit Policies and click ThinOS 9.x.
On the left-hand side, click “Advanced and then Login Experience and 3rd Party Authentication.
Under 3rd Party Authentication Settings on the right,
In the Select Authentication Type drop-down, select Identity Automation
In the Identity Automation Server field, enter the FQDN of the Identity Automation server
In the API Key field, enter the API key value. This value can be obtained by logging into the Lynx Admin web app and then clicking Settings > API.
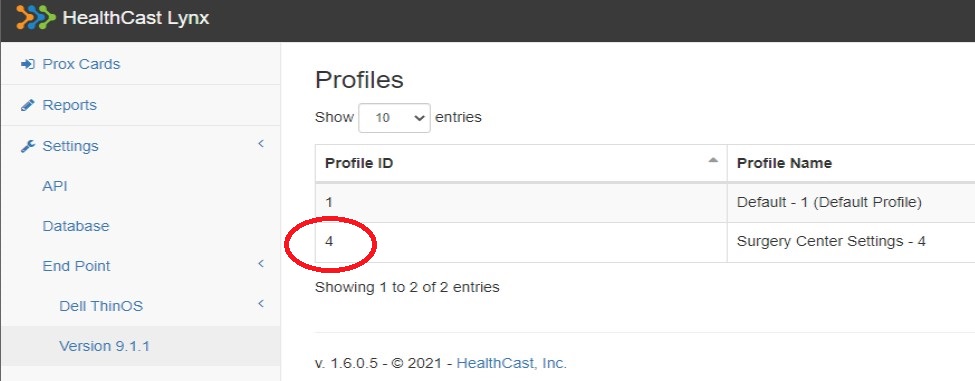
In the Configuration ID field, enter the Profile ID for the settings profile that you want this group of ThinOS endpoints to use. This Profile ID will be listed under the Settings > End Points > Dell ThinOS > Version 9.1.1 tab. See the screenshot below for an example.
Click Save & Publish to save your changes in WMS and publish the configuration to your ThinOS endpoints.
 |
Dell/Wyse
 |
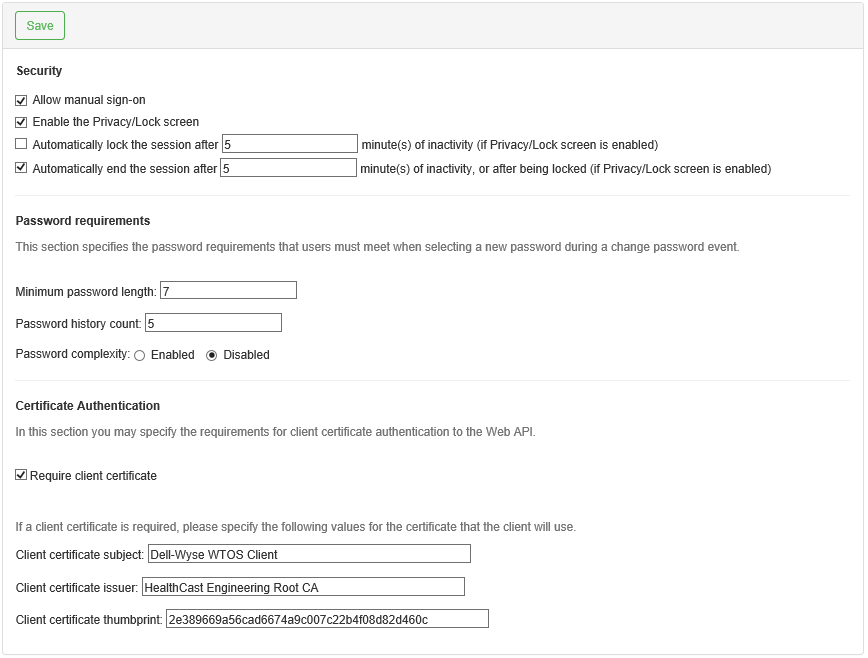
Setting | Description |
Allow manual sign-on | Enables the user to perform a manual sign-on (versus having to tap their badge to log in) |
Enable the Privacy/Lock screen | Enables a privacy screen to be displayed when the user taps out of their session |
Automatically lock the session after X minute(s) of inactivity (if Privacy/Lock screen is enabled) | Controls how many minutes elapse before the privacy/lock screen is shown due to user inactivity |
Automatically end the session after X minute(s) of inactivity, or after being locked (if Privacy/Lock screen is enabled) | Controls how many minutes elapse before the session is automatically ended due to user inactivity or after the workstation is locked (requires ‘Enable the Privacy/Lock screen’ to be enabled) |
Minimum password length | The minimum number of password characters required |
Password history count | How many password versions to keep |
Password complexity | Enforces password complexity |
Require client certificate | Enforces the need for a client certificate to be present for security purposes |
Client certificate subject | Specifies the value of the certificate subject field that must be matched |
Client certificate issuer | Specifies the value of the certificate issuer field that must be matched |
Client certificate thumbprint | Specifies the value of the certificate thumbprint field that must be matched |
Prox Card
 |
The prox card settings page allows the Lynx administrator to determine the following:
Whether users should be allowed to register their prox card badges
The types of prox cards that users will be allowed to use with the system (determined by the card bit count)
Import or Export Encrypted Key Files

Click Import.
Enter the required password for the key.
Click the Browse button to select the text file containing the encrypted database key.
Click Upload.

Click Export.
Choose a password.
Note
Keep track of this password, as you will need this password to import the file.
Click OK.
The file will be downloaded to your machine's default download folder, and you are free to copy or import it to another Lynx server instance.
Note
You will not be able to import this file into the XA server, nor will you be able to import a file that came from the XA server.
SSPR
Self-Service Password Reset (SSPR) is now available in this Lynx version. By default, SSPR capability is turned off and must be configured in the Settings menu.
Self-Service Password Reset (SSPR) Settings
 |
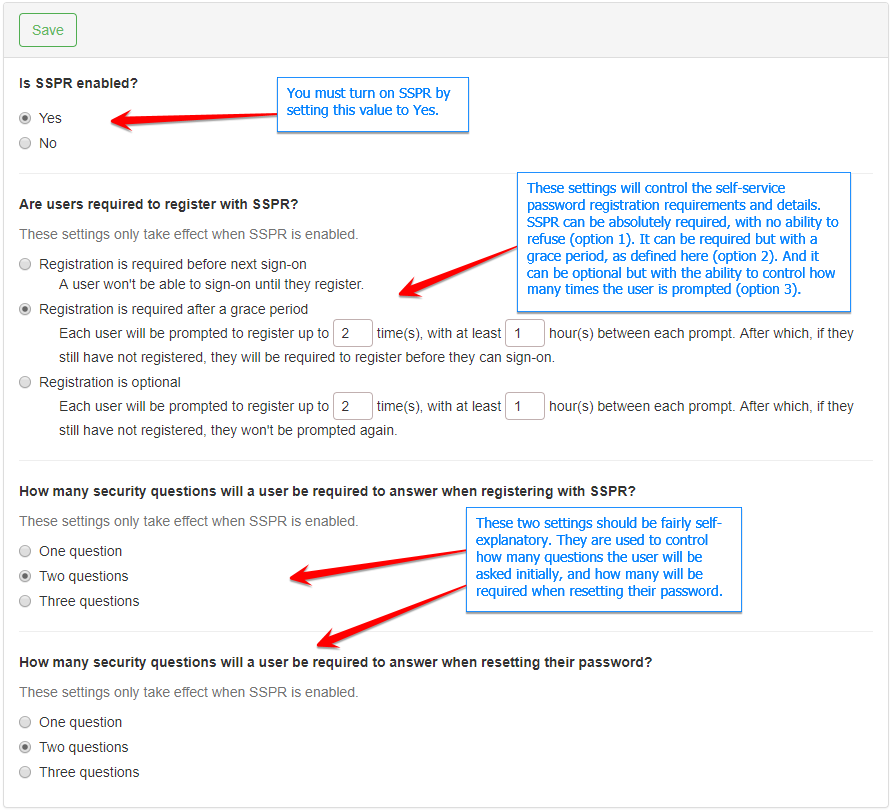
Is SSPR enabled?
If you wish to use the self-service password reset feature you will need to change this setting to Yes.
Are users required to register with SSPR?
These settings control whether SSPR is required, or optional. If required, you can determine the total number and time between registration prompts.
Registration is required before next sign-on
This setting is the most restrictive and no grace period is allowed.
Registration is required after a grace period
The two user-defined settings allow you to set the maximum number of times the user will be prompted to register, as well as how much time will pass between prompts. If they have declined the maximum number of times they will be forced to register the next time they sign on.
Registration is optional
The two user-defined settings allow you to set the maximum number of times the user will be prompted to register, as well as how much time will pass between prompts. If they have declined the maximum number of times they will not be forced to register the next time they sign on and no further prompts to register will be shown.
How many security questions will a user be required to answer when registering with SSPR?
Choose the total number of questions that the user will be required to answer when registering for self-service password reset. The questions and (encrypted) answers will be saved in the Lynx database for each user.
How many security questions will a user be required to answer when resetting their password?
Choose the total number of questions that the user will be required to answer when resetting their password.
Note: When you are done making your SSPR setting changes, you will need to click the Save button to persist your settings in the Lynx database.
License
 |
You will need to contact HealthCast (please be sure to contact your HealthCast Account Manager) to obtain a Lynx license for your organization. You will not be able to use Lynx unless you have uploaded a valid license file. And, if any of the following conditions are true you will not be able to use Lynx until you correct the issue:
You exceed the number of available licenses.
Your license expires.