Installation
(Install Name is HealthCast ProxCard Epic Login Device version 3.x)
This section covers the various installation requirements and steps for the following architecture pieces of the Epic Authentication Plug-in.
Environment
Prerequisite Installs:
HEALTHCAST® ExactAccess® or HEALTHCAST® ProxAuth Server
Epic® Hyperspace®
Citrix® Target Platform
Note
Please see the Citrix Server and Endpoint Install section for specific details.
Epic Hyperspace
Prerequisite Configuration
Configure a Primary Authentication Device (Required)
Note
Click the above links to be directed to installation instructions.
Citrix Server
Prerequisite Installs / Configurations:
.NET 4.6.1
To support a Citrix Storefront Configuration
HTTP Basic Authentication method is enabled on the Storefront server
Epic Hyperspace published using Citrix Access management or Delivery Services Console
To support an Epic Warp Drive Configuration
Follow Epic’s recommendations
Citrix Server Authentication Plugin Install
There are two methods to configure the Primary Authentication Device installation:
Note
It is necessary to run the following installations using elevated permissions.
Use MSI properties passed into the install by command line at installation; or
Update registry settings after installation. Based on your configuration, look through the properties and determine if the defaults will work or if you need to modify these for your configuration.
EPIC 2018 and up install settings:
Example:
Hyperspace 2018
%systemroot%\system32\msiexec/i "HealthCast
ProxCard Epic Login Device.msi"
Optional setting, set TFA_USEREMOTE to True if the ExactAccess Client is installed on the Citrix Server and you want the plugin to connect to the endpoint.
Note
This will also support interacting with a local instance of XA if the running a published desktop or published XAUCM with a publish instance of Hyperspace.
Optional setting, after install, LoginDeviceBackgroundImage is used to customize the background image of the primary authentication screen background image. By default, this setting is not added. After the install, the following registry setting can be added with the path and filename of the background image file to change the background image:
[HKEY_LOCAL_MACHINE\SOFTWARE\
HealthCast\ExactAccess\TFA Settings]
"LoginDeviceBackgroundImage"="C:\\
MyImageFiles\\login-background.png"
The file and location will need to be accessible by all windows users running Hyperspace. The file also needs to be a PNG or JPG file format and sized 560 x 574 (width x height pixels).
Optional setting, after install, InitialLoginMessage is used to customize the message text on the initial login form displayed. The default text is “tap your badge”.
[HKEY_LOCAL_MACHINE\SOFTWARE\
HealthCast\ExactAccess\TFA Settings]
" InitialLoginMessage"="my
login message"
Non-Authentication Device configuration not supported for 2018.
To upgrade a Citrix Server from 2.3.x or 3.x to support 2017 and 2018 on the same Citrix server, apply the MSI properties required for 2017, see the examples listed above.
To use Logoff Cleanup from the Published Hyperspace session running on the Citrix server, perform the following configurations and setting updates.
To use Logoff Cleanup, the settings in xaLogoffCleanup.xml file in the plugin install folder on the Citrix server will need to be updated. See Logoff Cleanup documentation.
In addition, there are three settings to consider configuring on the Citrix Server:
TFA_LOGOFFCLEANUP_ONLOCK
Use this setting to set Logoff Cleanup to be called on XA lock and if "DisableOnBeforeLock" is set to "True". Using these two settings will allow Logoff Cleanup to be called without securing or logging off Hyperspace.
TFA_LOGOFFCLEANUP_SEC
Use this setting to set Logoff Cleanup to be called on Hyperspace secure.
TFA_LOGOFFCLEANUP
Use this setting to set Logoff Cleanup to be called on Hyperspace logoff.
TFA_ACTIVECONNECTOR
TFA_AIE
TFA_EDMANAGERENABLED
Examples (Primary Authentication Device Configured):
Hyperspace 2017
%systemroot%\system32\msiexec /i "HealthCast ProxCard Epic
Login Device.msi" TFA_ACTIVECONNECTOR=
"HCIE83Connect.cls83E2016" TFA_AIE=0
TFA_EDMANAGERENABLED=False
Hyperspace 2015
%systemroot%\system32\msiexec /i
"HealthCast ProxCard Epic Login Device.msi"
TFA_ACTIVECONNECTOR="HCIE82Connect.cls82E2015" TFA_AIE=0
TFA_EDMANAGERENABLED=False
Examples (Warp Drive with Primary Authentication Device Configured):
Hyperspace 2017
%systemroot%\system32\msiexec /i
"HealthCast ProxCard Epic Login Device.msi"
TFA_ACTIVECONNECTOR="HCIE83Connect.cls83E2016"
TFA_AIE=1 TFA_EDMANAGERENABLED=False
Hyperspace 2015
%systemroot%\system32\msiexec /i
"HealthCast ProxCard Epic Login Device.msi"
TFA_ACTIVECONNECTOR="HCIE82Connect.cls82E2015"
TFA_AIE=1 TFA_EDMANAGERENABLED=False
Examples (Primary Authentication Device NOT Configured):
Hyperspace 2017
%systemroot%\system32\msiexec /i
"HealthCast ProxCard Epic Login Device.msi"
TFA_ACTIVECONNECTOR="HCIE83Connect.cls83E2016"
TFA_AIE=1 TFA_EDMANAGERENABLED=True
Hyperspace 2015
%systemroot%\system32\msiexec /i
"HealthCast ProxCard Epic Login Device.msi"
TFA_ACTIVECONNECTOR="HCIE82Connect.cls82E2015"
TFA_AIE=1 TFA_EDMANAGERENABLED=True
Optional Setting for Endpoint Connection
Set TFA_USEREMOTE to True if the ExactAccess Client is installed on the Citrix Server and ensure the plugin connects to the endpoint.
Endpoint
Note
It is necessary to run the following installations using elevated permissions.
Prerequisite Installs
NET 4.6.1
Citrix client configured for environment providing Epic Hyperspace
HealthCast ExactAccess client installed and configured for environment
Epic Hyperspace has been configured to load the Primary Authentication Device, see How to Configure Primary Authentication Device in Epic.
Install
There are two methods to configure the Primary Authentication Device installation:
Use MSI properties passed into the install by command line at installation; or
Update registry settings after installation. Based on your configuration, look through the properties and determine if the defaults will work or if you need to modify these for your configuration.
Depending on which Hyperspace configuration used, go to that section for installing.
Storefront is used to launch Hyperspace
Warp Drive is used to launch Hyperspace
Hyperspace is started from a locally installed instance
Storefront is used to launch Hyperspace
The following settings are required to configure pubLauncherSF.exe to launch Hyperspace published via Storefront:
TFA_HYPERSPACE_WINDOW_TITLE
%systemroot%\system32\msiexec
/i "HealthCast ProxCard Epic Login Device.msi"
TFA_SF_URL=https://servername/citrix/web
TFA_HYPERSPACE_WINDOW_TITLE="Hyperspace
-" TFA_LAUNCHTYPE=4
TFA_SF_Resource_Name=PublishedAppName
TFA_SF_AUTHTYPE=2
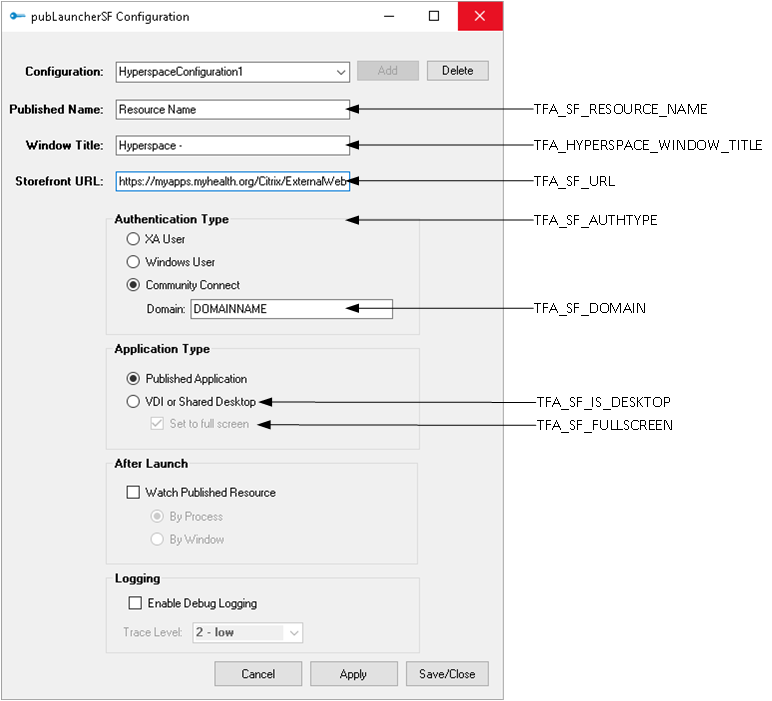
To determine additional pubLauncherSF settings for the Citrix environment, run the following command as an administrator to startup the configuration GUI:
"C:\Program Files (x86)\HealthCast\ExactAccess\pubLauncherSF.exe" /config
After the "pubLauncherSF Configuration" window is displayed, select "HyperspaceConfiguration1" in the "Configuration" dropdown list.
Use the following graphic to determine the additional MSI properties or registry settings you need to modify:
Warp Drive is used to launch Hyperspace
First, verify that Warp Drive is configured to use a generic Windows account to interact with Citrix. This can be verified using the Warp Drive Admin tool.
In Warp Drive Admin, in the “Persistent/Credentials” Tab check the “Always use generic Windows account” is checked.
Warp Drive Admin can be found here on an endpoint where Warp Drive is installed:
2018: "C:\Program Files (x86)\Epic\v8.4\Shared Files\EpicEWarpDriveAdmin84.exe"
2017: “C:\Program Files (x86)\Epic\v8.3\Shared Files\EpicEWarpDriveAdmin83.exe"
2015: "C:\Program Files (x86)\Epic\v8.2\Shared Files\EpicEWarpDriveAdmin82.exe"
Use the following settings to use Warp Drive directly to launch Hyperspace:
If you are reluctant to update the endpoint or if the integrated connector is not working as expected, use the following properties to configure warp drive settings:
TFA_LAUNCHTYPE
TFA_HYPERSPACE_WINDOW_TITLE
TFA_AUTOLAUNCH
Example Command Line:
%systemroot%\system32\msiexec
/i "HealthCast ProxCard Epic Login Device.msi"
TFA_LAUNCHTYPE=2 TFA_HYPERSPACE_WINDOW_TITLE="Hyperspace -"
TFA_AUTOLAUNCH="False”
After installing the plugin, configure Warp Drive to be launched on Windows startup. If necessary, follow Epic recommendations for other Warp Drive settings. In addition, configure Warp Drive to be started using autostart=true and the alwayshide=true command line settings.
Note
Make sure that the TFA_LAUNCHTYPE MSI property is set to 2 when installing. If the property is not set, the install will register the plug-in on the endpoint breaking EpicDICAWrapperxx.exe, keeping Hyperspace from loading our plug-in or cause it to close.
If the MSI property is not set at install, the endpoint can be fixed by removing the following registry key: HKEY_CLASSES_ROOT\HCILoginDeviceNET.ProxCard
Optional Settings for integrated connector to launch Warp Drive:
Optional, use the following settings to use our integrated connector to launch Warp Drive:
TFA_LAUNCHTYPE
TFA_HYPERSPACE_WINDOW_TITLE
TFA_WARPDRIVE_CONNECTOR
Example Command Line (Hyperspace 2018):
%systemroot%\system32\msiexec /i
"HealthCast ProxCard Epic Login Device.msi" TFA_LAUNCHTYPE=2
TFA_HYPERSPACE_WINDOW_TITLE="Hyperspace -"
TFA_WARPDRIVE_CONNECTOR="Epic2018\HCI.WarpDriveLauncher.exe"
%systemroot%\system32\msiexec /i
"HealthCast ProxCard Epic Login Device.msi"
TFA_LAUNCHTYPE=2 TFA_HYPERSPACE_WINDOW_TITLE="Hyperspace -"
TFA_WARPDRIVE_CONNECTOR="hciwd83.exe"
%systemroot%\system32\msiexec /i
"HealthCast ProxCard Epic Login Device.msi"
TFA_LAUNCHTYPE=2 TFA_HYPERSPACE_WINDOW_TITLE="Hyperspace -"
TFA_WARPDRIVE_CONNECTOR="hciwd82.exe"
Hyperspace is started from a locally installed instance
Use the following to configure the Primary Authentication Device to use a locally installed instance of Hyperspace. This configuration would be used for VDI configurations where Hyperspace is installed on the VDI desktop.
For 2018 Hyperspace implementations use the following command line settings:
TFA_LAUNCHTYPE
TFA_HYPERSPACE_PATH
TFA_HYPERSPACE_PARAMS
TFA_HYPERSPACE_WINDOW_TITLE
Example Command Line (Hyperspace 2018):
%systemroot%\system32\msiexec
/i "HealthCast ProxCard Epic Login Device.msi" TFA_LAUNCHTYPE=1
TFA_HYPERSPACE_PATH= "C:\Program Files
(x86)\Epic\v8.4\Shared Files\EpicD84.exe"
TFA_HYPERSPACE_PARAMS=" EDAppServers84.EpicApp Name=Desktop84 env=PRD"
TFA_HYPERSPACE_WINDOW_TITLE="Hyperspace -"
TFA_ACTIVECONNECTOR
TFA_LAUNCHTYPE
TFA_HYPERSPACE_PATH
TFA_HYPERSPACE_PARAMS
TFA_NOCLOSE
TFA_HYPERSPACE_WINDOW_TITLE
%systemroot%\system32\msiexec
/i "HealthCast ProxCard Epic Login Device.msi"
TFA_ACTIVECONNECTOR="HCIE83Connect.cls83E2016"
TFA_HYPERSPACE_SECURE=True TFA_LAUNCHTYPE=1 TFA_HYPERSPACE_PATH=
"C:\Program Files (x86)\Epic\v8.3\Shared Files\EpicD83.exe"
TFA_HYPERSPACE_PARAMS=" EDAppServers83.EpicApp Name=Desktop83
env=PRD" TFA_NOCLOSE=True TFA_HYPERSPACE_WINDOW_TITLE="Hyperspace
-"
%systemroot%\system32\msiexec
/i "HealthCast ProxCard Epic Login Device.msi"
TFA_ACTIVECONNECTOR="HCIE82Connect.cls82E2015"
TFA_HYPERSPACE_SECURE=True TFA_LAUNCHTYPE=1 TFA_HYPERSPACE_PATH=
"C:\Program Files (x86)\Epic\v8.2\Shared Files\EpicD82.exe"
TFA_HYPERSPACE_PARAMS=" EDAppServers82.EpicApp Name=Desktop82
env=PRD" TFA_NOCLOSE=True TFA_HYPERSPACE_WINDOW_TITLE="Hyperspace
-"
Additional Settings to Consider for all Endpoint Configurations:
Below is a list of settings to aid in endpoint configuration. For more information about each individual setting, see MSI Properties and Registry Settings.
Hyperspace workflow
Secure Hyperspace when locking (tap-out) the ExactAccess client.
TFA_HYPERSPACE_SECURE
Logoff Hyperspace when locking (tap-out) the ExactAccess client.
TFA_HYPERSPACE_SECURE
Logoff or lock the ExactAccess client when a user secures or logs off Hyperspace.
TFA_LOGOFF_XA_ON_EPIC_SECURE_LOGOUT
Set Hyperspace to not be secured or logged out on ExactAccess client lock.
TFA_DISABLE_ONBEFORELOCK
Set Hyperspace to not be secured or logged out on ExactAccess client lock if triggered by inactivity timeout.
TFA_ENABLE_ONBEFORELOCKTIMEOUT
Start Hyperspace at user login and unlock.
TFA_AUTOLAUNCH
Start Hyperspace at user logout or lock.
TFA_AUTORESTART
TFA_AUTORESTARTDELAY
Configure to use ExactAccess stored credentials to support Community Connect configurations.
TFA_EPICUSERCIID
TFA_EPICUSERCIID_CAPTION
TFA_EPICUSERCIID_PROMPT
ExactAccess client configuration.
Non-locking Kiosk mode
TFA_ENABLE_ONBEFOREQUITUSER
Secondary authentication, cosign or re-authentication.
TFA_UITIMEOUTSECONDS