Installation (Passthrough)
Installation Requirements
These instructions will guide you through a complete Healthcast ProxAuth setup using Windows Authentication mode.
These instructions are also valuable tools in troubleshooting possible ProxAuth server issues. For troubleshooting, use this document to ensure that the two ProXAuth servers have been correctly configured. The source of a problem may be quickly identified by reviewing the high-level steps to confirm that they have been properly followed.
Warning
DO ALL STEPS IN THE ORDER IN WHICH THEY APPEAR. In this configuration, ProxAuth and Microsoft SQL will be installed in the same server. For ease of use, this document reflects only the instructions for this standard configuration. Start with a clean server or server image to ensure all software is optimally configured.
Load Balance the two ProxAuth Servers.
Install ProxAuth Server.
Configure failover for the Prox server service.
Configure replication for server database.
Test the entire setup to ensure it is functioning as intended.
Ensure that your environment meets the Passthrough Target System Requirements Log in to the server, on which you will install ProxAuth Server, as an administrator with permissions to write/read/modify system folders. Locate the installation files provided by HealthCast and have them saved in an accessible location.
Active Directory
Necessary Active Directory Account
An AD user named xaserver. This user account should be a member of the local Administrators group on each server in which XA is installed. It should also be set so that the user cannot change the password and the account never expires.
Create an XA Server Account
Login to your network Domain Controller.
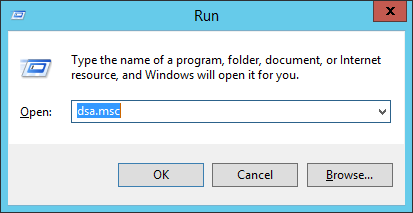
Open Active Directory Users and Computers (ADUC). This can be done quickly by selecting Start > Run and entering dsa.msc (the ADUC MMC snap-in) into the Run dialog box.
Create a user account in the domain with a User logon name of xaserver. This account can be named something else, but this document assumes that it is named xaserver.
Set the password for this account (this password will be used later in these instructions). Important: The password on this account must be set to never expire. If this password is allowed to expire, ProxAuth Server will stop working.
Add the xaserver domain user account to the local Administrators group on the ProxAuth Server computer. The xaserver user must be in the local administrators group on each server that ProxAuth will be installed on.
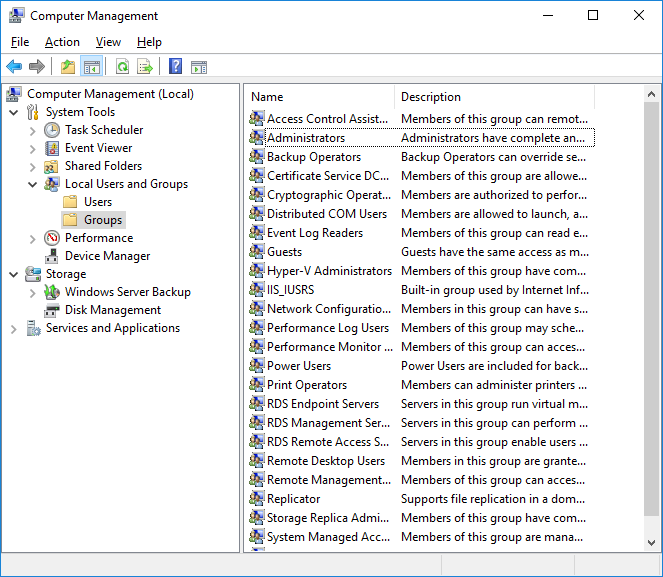
Go to Start > Administrative Tools > Computer Management to open the Computer Management window.
In the Computer Management window expand the Local Users folder. Then expand the Groups folder within it.
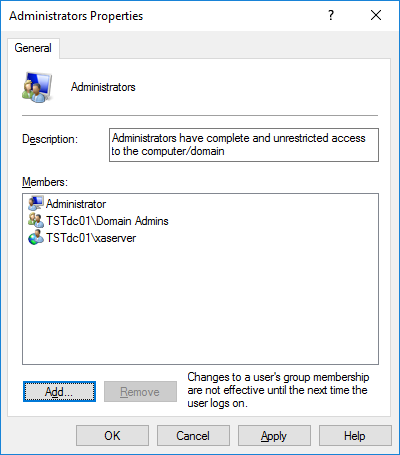
Double-click Administrators to open the list of members.
Click Add to add xaserver to the group.
Ensure that the proper location is selected and type xaserver in the text field. This could be the domain if there is more than one or it could be the Entire Directory as shown in the example.
Select OK. The xaserver user should now be visible as a group member.
Click OK and close the Computer Management window.

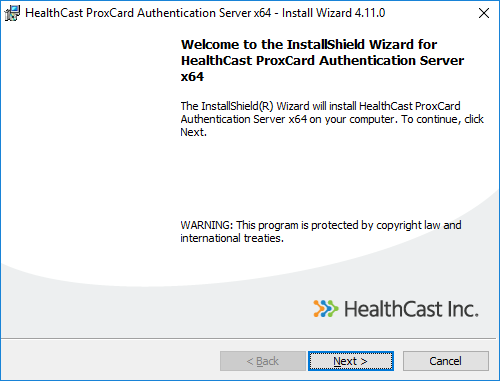
Run the HC ProxAuth Install File
Double-click the ProxCard-Auth-Server-x64.msi for Pass-through only installation to open the wizard, then click the Next button on the ExactAccess Setup screen.
Note
Choose the correct installation file for the appropriate Configuration. Use ProxCard-Auth-Server-x64.msi (Passthrough).
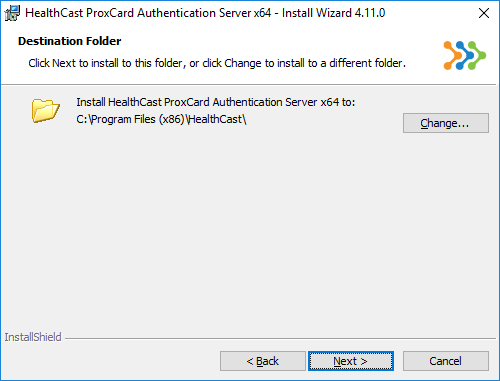
Click Next to continue. Click Change... to change the Destination Folder, if desired (we recommend that you use the directory path provided), then click Next to continue.
Note
The install path will automatically default to C:\Program Files (x86)\HealthCast\
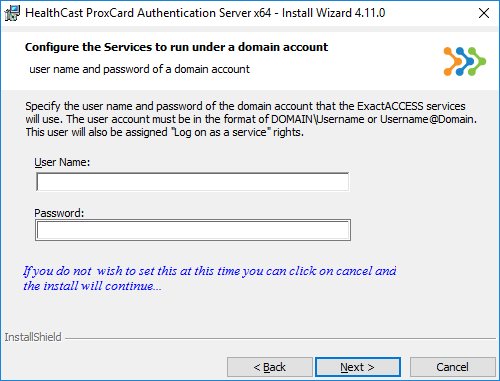
Fill in the username and password for the account that will be used for the ProxAuth service then click Next to continue or Click Cancel... the installation will continue without entering the username and password.
Note
If the domain account is used (xaserver is the account used in this guide) in this step it will not be necessary to Manually configure the services. As the, default settings configure the services for a Full SSO server installation. Selecting cancel will require the sevices be configured manually. See Manually enable ProxAuth Server Services and Manually Configuring Services Logon.
Create and configure the Database(s) for the desired services
Using SQL Server Management Studio (or a similar tool), connect to the database server on which you wish to create the ProxAuth database.
Create a new database on the database server and name it. You may use a different name if you wish, but these instructions assume that the database name is hcproxcard.
Use SQL Server Management Studio to open the file called HCProxCardScript.SQL. This file is included in the installation folder, typically: C:\Program Files\HealthCast\ExactAccess\SQL\<DB Server Type>\<XA Service>. Choose the appropriate version for the correct database server type from the folder.
In SQL Server Management Studio, select the hcproxcard database and execute the HCProxCardScript.SQL file. This file will create objects in the hcproxcard database. SQL Server Management Studio will indicate the query executed successfully.
Grant AD Account Permissions for the Database
You must grant the appropriate AD domain user account permissions to access and communicate with the new ProxAuth database. Please use the AD User account xaserver you created in the step Active Directory of the instructions.
In SQL Server Management Studio locate the server you have just installed XA Server on.
Under the server name, expand the Security folder.
Right click on the Logins folder and select New Login...
Ensure the Windows authentication radial button has been selected and enter the appropriate user name ( xaserver ).
Select User Mapping.
Check the box for hcproxcard database then check the box for db_owner. Choosing the db_owner role prevents possible permissions problems from occurring in the future.
Select OK when you are finished.
Note
Note: If the user is already a member of the local Administrators group on the SQL Server, that user should already have permissions in excess of what is required to ensure proper operation of ProxAuth.
Server Service Dependencies
Note
This step can be skipped if the database servers are not installed on the ProxAuth servers in your configuration.
If SQL server has been installed on the same server as the ProxAuth server product, the services must be set to depend on the SQL service so that SQL server will start before the XA services request database operations.
Open the Registry Editor tool.
Locate the appropriate service name.
HKEY_LOCAL_MACHINE\SYSTEM\CurrentControlSet\Services\hchidserverservice
Create the following registry name/value pair.
DependOnService: REG_MULTI_SZ = MSSQLSERVER
Manually enable ProxAuth Server Service
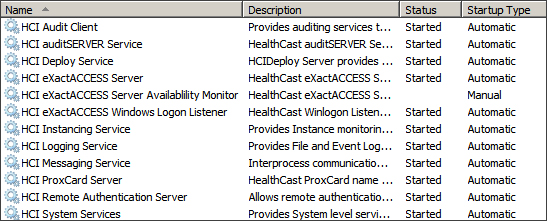
To enable services, open the Service Control Manager and scroll down to the section for HealthCast services. These services are prefixed with HCI and appear as a group. Choose the services that will be enabled in your environment and ensure that they are set for automatic startup.
HCI ProxCard Server - This provides ProxCard services to client workstations.
Manually Configuring Service Logon
If using Integrated Security for MS-SQL for any of the following server functions, then each service must be configured with a domain account.
ProxCard Server services [HCI ProxCard Server]
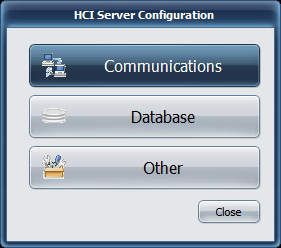
Server Configuration Tool
The server configuration tool allows for setting the most common configuration options for each of the server services.
ProxCard Server
Communications
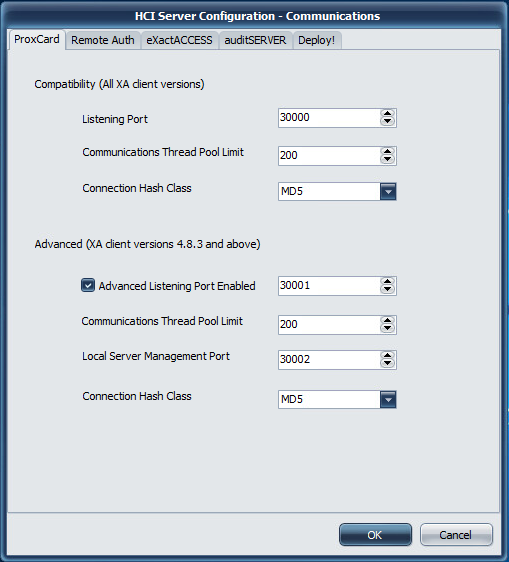 |
Communications Settings
Compatibility (All XA Client versions)
Info
This communication port does not support QwickACCESS client connectivity.
Listening Port
Port 30000 is used as the default port for ProxCard Server operations. If this port is updated on the server, a corresponding update must be made to the client workstations using this server.
Communications Thread Pool Limit
This protocol allows for selecting the thread cache limit for connections to help improve performance. The default 200 is sufficient for most installations, but can be configured as needed in high load environments, or may be lowered for low load environments. The number specified here means that the server will (pre)allocate this number of threads in the server process to handle incoming requests.
Connection Hash Class
The available options are MD5 and WHIRLPOOL.
MD5 is a lightweight hash algorithm that generates 128 bit hashes, but is only recommended if the client workstations connecting to the system are slow (less than 2GHz).
WHIRLPOOL is a hash algorithm that generates 512 bit hashes. The larger number of bits means it is more secure, but it also requires slightly more CPU cycles to generate. WHIRLPOOL is the recommended choice if your workstations are 2GHz or better.
Warning
Not all HealthCast products support the Whirlpool hash algorithm. Ensure that the client product you are deploying supports the feature configuration for the server.
Advanced (XA client versions 4.8.3 and above)
Info
This communication port supports ExactAccess and QwickACCESS client connectivity.
Listening Port
Port 30001 is used as the port for ProxCard Server operations when QwickACCESS clients are deployed. If this port is updated on the server, a corresponding update must be made to the client workstations using this server. This communication protocol supports the unicode character set for directory service names.
Communications Thread Pool Limit
This protocol allows for selecting the thread cache limit for connections to help improve performance. The default 200 is sufficient for most installations, but can be configured as needed in high load environments, or may be lowered for low load environments. The number specified here means that the server will (pre)allocate this number of threads in the server process to handle incoming requests.
Local Server Management Port
This is the port bound to only the local address (127.0.0.1 or ::1) that the ExactAccess Server Monitor tool will use to query server status of the service.
Connection Hash Class
The available options are MD5 and WHIRLPOOL.
MD5 is a lightweight hash algorithm that generates 128 bit hashes, but is only recommended if the client workstations connecting to the system are slow (less than 2GHz).
WHIRLPOOL is a hash algorithm that generates 512 bit hashes. The larger number of bits means it is more secure, but it also requires slightly more CPU cycles to generate. WHIRLPOOL is the recommended choice if your workstations are 2GHz or better.
Warning
Not all HealthCast products support the Whirlpool hash algorithm. Ensure that the client product you are deploying supports the feature configuration for the server.
Database
 |
 |
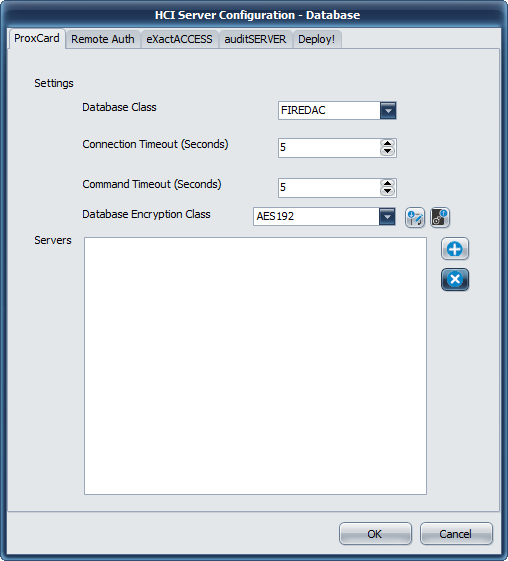
Database Settings
Database Class
The only available database provider for this version of ExactAccess server services is FireDAC. It provides connectivity to Microsoft SQL Server using Microsoft Native Drivers or Microsoft SQL ODBC drivers.
Connection Timeout
This indicates how long the drivers will wait for a successful connection to a SQL server. If this ExactAccess installation will be using service database fail-over connection strings (multiple database connection strings are configured for the service), this number should be set as low as possible to improve fail-over responsiveness to secondary connections. For high availability configurations (SQL clustering, Active Group Listener configurations), this number should be set high enough for the drivers to allow clustering fail-over logic to promote a SQL server to the active state when the primary server has failed and not immediately return a connection failure to the service.
Command Timeout
This indicates how long any single transaction made by the service can take to complete. For highly stressed SQL servers, this number should be configured to allow for the appropriate workload to be completed even if the server is at maximum capacity. If there is excess capacity on the server, all service operations are expected to take less than 10 seconds to complete for normal operations.
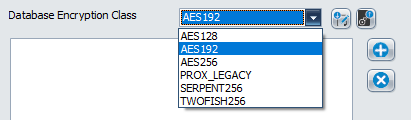
Database Encryption Class
For those server services that support updated database encryption, choose an encryption method to use to protect the data. During upgrades, choose the LEGACY or PROX_LEGACY option. After upgrade has been completed for all servers, choose a method other than LEGACY or PROX_LEGACY. AES192 is recommended, but any of the other options are valid. Consult your security officer for recommendations for your organization.
Important
During an upgrade scenario, the first server to be upgraded should be considered the "master" server. From this server, click the EXPORT button to save the auto-generated database encryption keys for each of the services (SSO and Prox) and save them to separate files (ProxDBKeys.key and XADBKeys.key) - provide a password to protect these files when prompted. It is a good idea to have more than one person export these keys, and keep them in a secure offsite location for disaster recovery.
Once these keys have been exported, they will need to be imported on each of the servers during the upgrade.
To import the keys to an existing server, Open the configuration tool, select Database, then choose the appropriate TAB (Prox or SSO/ExactAccess). Click the IMPORT button. Locate the correct file (ProxDBKeys.key for ProxCard, XADBKeys.key for SSO/ExactAccess keys) and click OK to open the file. Provide the password used to secure the exported keys. A message will indicate the success or failure of the import. Repeat this step for each server to be upgraded.
Servers
This lists the currently configured connection string for each configured SQL server in the organization. The ExactAccess server services support as many fail-over connection strings as desired. The first connection string entered in this list will be considered the primary server. The remaining servers listed will not be utilized unless the primary server Connection Timeout is reached and the server is deemed off-line. In primary server fail conditions, each of the servers will be attempted in the order in which they are entered in this list until a connection is made or all servers have been attempted and an error is returned to the client
Adding a new connection
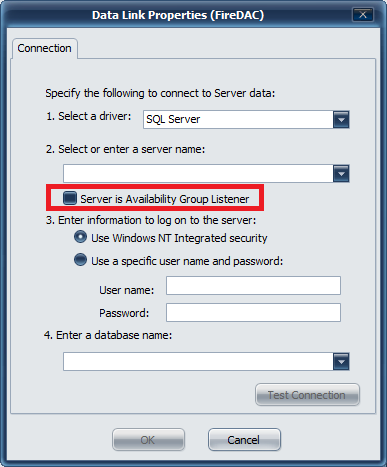
Click the plus ( ) button to bring up the Data Link Properties (FireDAC) window
 |
Connections
Select a driver
Microsoft provides several connectivity drivers for SQL server. You may choose SQL server as the driver (which is available by default on Windows 2012 R2 and above) - or optionally, install one of the later Microsoft SQL Server Native Drivers which will provide other connectivity options (such as ODBC)
Info
it may be necessary to install the Native SQL drivers. This is typically only necessary for Windows 2008 R2, but newer SQL drivers may also improve performance. See the note below on downloading an appropriate driver.
Driver Download
Check with the Microsoft Site for newer or additional drivers for supporting the latest versions of SQL server.
You may also use version 12 drivers
SQL 2012 Native Drivers Direct Download
It may also be necessary to use the latest version of the Microsoft Drivers, depending on the SQL server version being connected to:
This page allows you to download the latest (as of this writing) ODBC 13.1 drivers for use with SQL 2017 (also functions with 2008 and above SQL servers)
https://www.microsoft.com/en-us/download/details.aspx?id=53339

Select a server (by using the browsing service) or manually enter a SQL server database name and instance.
If this SQL server is part of the High Availability Group configuration (available in SQL server 2012 and above), check the box for Server is Availability Group Listener. This will notify the Microsoft Driver to expect multiple IP addresses from multiple SQL servers configured in this group/cluster so that the driver can provide appropriate fail-over if the primary node fails.
Authentication Type
If the service has been configured to run under a service account, that service account must have been granted DB Owner permissions for the service database (SSO, Prox, Deploy, Audit) when choosing to use Windows NT Integrated Security. In this case, a password does not need to be supplied in this configuration, as the security credentials are configured on the service using MMC services management tools provided by Windows.
Warning
When choosing to use Windows NT Integrated security during configuration, please note that the user account to launch the tool MUST match the account that is to be used for authentication to ensure the proper permissions and connectivity tests can be completed. The tool also requires UAC elevation, so this user must also be a local administrator on the server for configuration to be completed.
If you choose to use SQL server authentication, then pick the "Use a specific user name and password" that has been configured in SQL server as the DB owner of the service database (SSO, Prox, Deploy, Audit). This username and password will become part of the connection string and will be stored encrypted in the registry.
Enter a database name
Manually type if the name for the database associated with this service, or click the drop down to show a list of available databases to connect to.
Warning
If the current user (that the tool is running under) does not have access to the SQL server, the browse function will fail, as the tool is unable to connect to the SQL server with the current user. This is only applicable when using Windows NT Integrated Security.
When using SQL server authentication by supplying a user name and password, the browse feature for the database will only fail if the user has not been granted access to any databases, or the account information is not valid.
Other
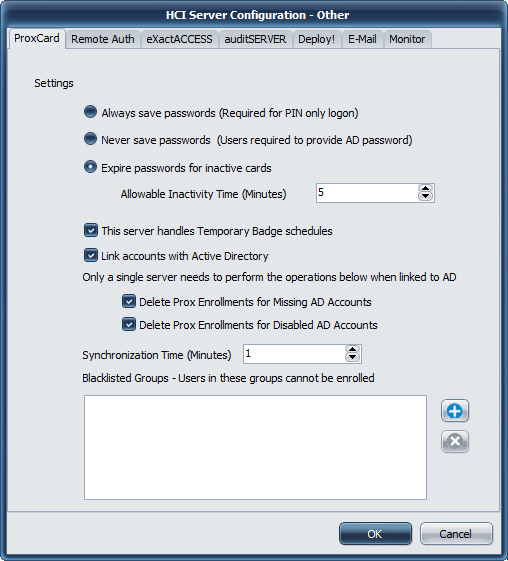 |
Password Expiration Options
Always save passwords
If you have PIN login enabled, then the users password must always be available in the server to allow a user to log in using a badge tap and PIN prompt authentication without having to enter a password.
Never save passwords
This option forces users to always enter a password after tapping a card. It is similar to a Card+PIN workflow, but more secure as the password is also validated against active directory, and can be enforced to have a certain character requirement such as must contain an uppercase, lowercase or numeric letter with a certain minimum length.
Expire passwords for inactive cards
This option indicates how often in minutes a users password will be deleted if the card has been used recently. This is the most secure option, as the encrypted password is physically removed from the database if the user has not tapped a card within the interval specified here. The lower this time can be set, the more secure the users passwords will be. This corresponds to the time the user may tap-out of one workstation and move to another workstation and not have to enter a password to log in.
License Count Automated Management Options
These features are intended to automate the process of removing prox card enrollments for users that are not active. There are 3 ways a user can be considered inactive.
The user enrollment is a temporary thing only intended to be active for a short amount of time (1 hr minimum) or up to a month.
The user is an AD account that is created and used while the user is employed at the organization and deleted when the user leaves employment.
The user is an AD account that is created and used while the user is employed at the organization and disabled when the user leaves employment, but may some day return to be re-activated.
This server handles Temporary Badge Schedule
Temporary Badge schedules are intended for handling high turnover situations where a set number of cards will be frequently changing enrollment from one user to another. These schedules allow the badges to be unregistered (deleted) over shifts (Daily schedule by hour, weekly, or monthly) so that they may be re-enrolled with a different user name. Normally, once a card is enrolled to a user, it may not be enrolled with a different user name, even if a new name is supplied after taping an unauthenticated card on the client. Temporary badge schedules also overcome this limitation.
Tip
At least one server must be configured to handle temporary badge schedules for the feature to function. Prox card enrollments are physically deleted from the database by the server(s) that have this setting enabled. If no server has this setting enabled, temporary badge schedules are disabled.
Link accounts with Active Directory
The Proxcard server may synchronize active directory accounts so that if a user is renamed in AD, the badge enrollment can be automatically updated to use the currently enrolled users updated name. If this setting is not enabled, the user must call the help desk and have their badge manually deleted using the ProxCard Administrator so that they can re-enroll with their correct name.
Tip
At least one server must be configured to be linked to Active Directory for name change synchronization to function. If no server has this setting enabled, then name changes are not synchronized with Active Directory. Users that have a name change must be manually deleted to allow for re-enrolling their card.
Delete Prox Enrollments for Missing AD Accounts.
If the server has the Link accounts with AD feature enabled, the server can also remove prox card enrollments for user accounts that have been deleted from active directory. This automates the removal of accounts that are no longer valid for sign-on at the organization.
Info
This feature is only helpful when a limited number of ProxCard user license have been purchased. Enterprise licenses do not enforce user enrollment restrictions and will not reject a user enrollment.
Delete Prox Enrollments for Disabled AD Accounts.
If the server has the Link accounts with AD feature enabled, the server can also remove prox card enrollments for user accounts that are present, but have been disabled in active directory. This automates the removal of accounts that are no longer valid for sign-on at the organization.
Info
This feature is only helpful when a limited number of ProxCard user license have been purchased. Enterprise licenses do not enforce user enrollment restrictions and will not reject a user enrollment.
Black listing domain groups to prevent enrollment
To prevent users from being able to enroll credentials to a card for sensitive accounts, add a group to the Blacklisted Groups section of the configuration tool.
Click the plus () button and enter the domain/group name of the group of users to be prevented from enrolling. To remove a previously defined group, select it in the list and click the delete ( ) button.
Access Control for ProxCard Administration
To enable limited access control for the ProxCard Administrative tool, the associated ProxCardAdmin_server.xml must be registered with ExactAccess.
Registering the ProxCard Administrator Control Item
Import the registration file c:\program files (x86)\HealthCast\ExactAccess\ProxCardAdmin_server.xml using the XA Administrator.
After the file has been registered, ensure that the control item "ExactAccess ProxCard Administrator" has been added to the Organization Map. Also, ensure that the sub-items registered with the application have been added under the ExactAccess ProxCard Administrator. Then, drag and drop the appropriate roles onto the ExactAccess ProxCard Administrator control item for all Administrative users. Drag and Drop Help Desk users onto the appropriate sub-items: Allow Delete, Allow Enrollment, Allow Search, and Modify Temporary Schedules.
Supporting Temporary Badge view
The ProxCard database must be updated with the Update4111.sql script to allow the administrative tool to query the schedules associated with a badge.
Updating the ProxCard database
Using SQL Server Management Studio (or a similar tool), connect to the database server on which you wish to upgrade the Prox database.
This upgrade will need to be completed on each SQL instance that hosts a Prox database.
Connect to the existing database on the database server (ensure any scripts will be executed against this existing database)
Use SQL Server Management Studio to open the file called Update4111.sql and execute the update against the Prox database.
Located in c:\program files\healthcast\ExactAccess\SQL\MSSQL\prox.
New for 4.11.1
Remote Authentication
Communications
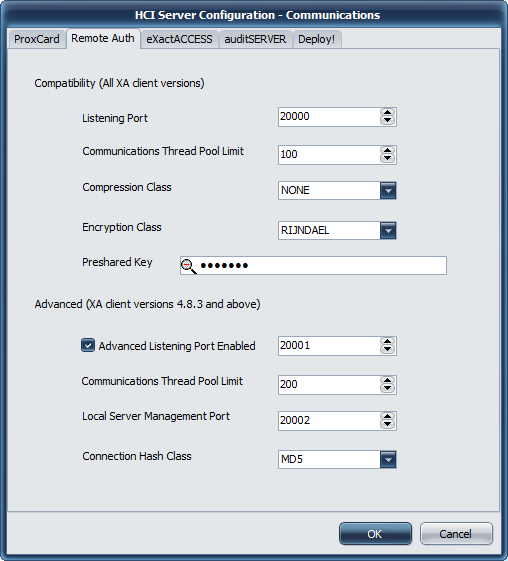 |
Communications Settings
Compatibility (All XA Client versions)
Info
This communication port does not support QwickACCESS client connectivity.
Recommended
It is recommended that when configuring client workstations for remote authentication to change the client port (on the end point, not in this server configuration) to 20001 to use the advanced communications. The default ExactAccess client installation will use Compatibility communications (on this port: 20000) which is less secure than using the advanced settings.
Listening Port
Port 20000 is used as the default port for Remote Authentication Server operations. If this port is updated on the server, a corresponding update must be made to the client workstations using this server.
Communications Thread Pool Limit
This protocol allows for selecting the thread cache limit for connections to help improve performance. The default 200 is sufficient for most installations, but can be configured as needed in high load environments, or may be lowered for low load environments. The number specified here means that the server will (pre)allocate this number of threads in the server process to handle incoming requests.
Warning
When using this protocol and port configuration, the following settings must also be configured to exactly match on the client workstation.
Compression Class
This may be either NONE or VCLZIP
Encryption Class
This may be either RIJNDAEL (which is AES 192 bit) or Blowfish. Older client versions support only these options.
Preshared Key
This is the encryption key that will be used to encrypt the data for client/server communications. It must be configured on the end point.
Advanced (XA client version 4.8.3 and above)
Info
This communication port supports ExactAccess and QwickACCESS client connectivity.
Listening Port
Port 20001 is used as the port for Remote Authentication Server operations when QwickACCESS clients are deployed. If this port is updated on the server, a corresponding update must be made to the client workstations using this server. This communication protocol supports the unicode character set for directory service names.
Communications Thread Pool Limit
This protocol allows for selecting the thread cache limit for connections to help improve performance. The default 200 is sufficient for most installations, but can be configured as needed in high load environments, or may be lowered for low load environments. The number specified here means that the server will (pre)allocate this number of threads in the server process to handle incoming requests.
Local Server Management Port
This is the port bound to only the local address (127.0.0.1 or ::1) that the ExactAccess Server Monitor tool will use to query server status of the service.
Connection Hash Class
The available options are MD5 and WHIRLPOOL.
MD5 is a lightweight hash algorithm that generates 128 bit hashes, but is only recommended if the client workstations connecting to the system are slow (less than 2GHz).
WHIRLPOOL is a hash algorithm that generates 512 bit hashes. The larger number of bits means it is more secure, but it also requires slightly more CPU cycles to generate. WHIRLPOOL is the recommended choice if your workstations are 2GHz or better.
Warning
Not all HealthCast products support the Whirlpool hash algorithm. Ensure that the client product you are deploying supports the feature configuration for the server.
Database
 |
Database Settings
There are no database settings for Remote Authentication
Other
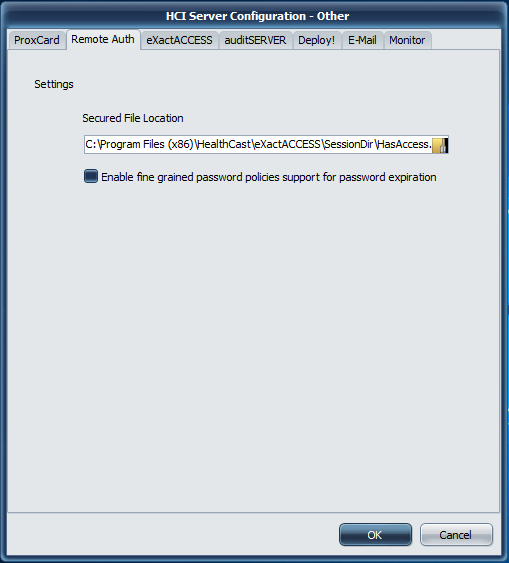 |
Access Settings
Secured File Location
In order for Remote Authentication to function, you must configure the secured file location using Windows File Security
The secured file location is the full path and file name to the HasAccess.txt text file where security permissions are defined for users. Any user that is denied access to read this file will be denied access to log into ExactAccess Kiosk Mode. If desired, apply the domain users full permissions to this file using standard Window security procedures. Then add users or groups that should never be allowed to remote authenticate and set the deny permissions on this file.
Note
This allows restrictions to be placed such that only certain users may authenticate via the Remote Authentication service. This is useful in situations such as when not all users (e.g. domain users) have access to a TS/RDS/Citrix server, and you want to limit connecting to the remote machine by requiring a remote authentication first - thus preventing unauthorized users from even attempting the connection to the TS/RDS/Citrix server.
Best practice is to create an Active Directory security group that includes non-specific AD user accounts such as service and generic accounts. This group is then given explicit deny permissions to network resources including "HasAccess.txt". This prevents unauthorized anonymous access to network resources and prevents users from associating their badge with an account not explicitly provided to them. Ensure that a group with the authorized users has been given READ permission to this folder/file. Domain Users group can be used along with the specific group for DENY permissions. The security with the most restrictive permissions will be used in the case the user exists with both READ and DENY permissions, meaning the user account will be denied access.
Enable fine grained password
When using Windows 2012 and above, it is possible for different users in different organizational units to have different password expiration policies. If your domain has been configured with this feature in Active Directory, and you want ExactAccess to prompt users at their correct expiration times, ensure this check box is checked.
Local Security Policies
To complete configuration, the following Local Security Policies must be applied:
For information regarding Local vs. Remote authentication see the linked document. XA Authentication Local vs Remote_Q3 2016 This document addresses the benefits, limitations and security concerns around these types of authentications.
Domain Users (or the restricted set of users allowed to perform remote authentication) must be added to "Log on as Batch Job"
Start the Local Security Policy application (click Start, Run and open secpol.msc).
In the left hand pane, select Security Settings > Local Policies > User Rights Assignment.
In the right hand pane, right click Log on as a batch job and select Properties.
Click Add User or Group... and enter the group, such as Domain Users, that will log onto the remote session through a HealthCast client product. Click OK.
Deny rules may also be added at this time. These users/groups can also be denied access to the file using file permissions rather than log-on permissions as indicated above.
In the left hand pane, select Security Settings > Local Policies > User Rights Assignment.
In the right hand pane, right click Deny Log on as a batch job and select Properties.
Click Add User or Group... and enter the group, that will be DENIED log-on rights. Click OK.
It may also be necessary to add the SERVICE ACCOUNT in the Act as part of Operating System and Impersonate a client after authentication policies.
In the right hand pane, right click Impersonate a client after authentication and select Properties.
Click Add User or Group... and enter the domain account that the service is running as in the “Enter the object names to select” box. Click OK.
In the right hand pane, right click Act as part of the operating system and select Properties.
Click Add User or Group... and enter the domain account that the service is running as in the “Enter the object names to select” box. Click OK.
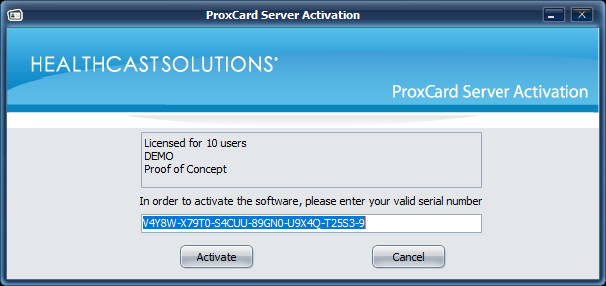
License Activation
After purchasing new or additional licenses, you must apply your new Serial Number to your HC ProxAuth Server.
Activating the Server with your Serial Number
Open the Activation Application (Start -> All programs > HealthCast > ExactAccess > Configuration > ProxCard Server Activation).
In the space provided, enter your serial number.
Click the Activate button.
Click the Cancel button to exit the application.
Note
In the event the server is unavailable, you will be given the option to activate by loading a license file. License files may be obtained by contacting your reseller.
Once the server is successfully activated, the text will change to indicate the number of user licenses available.
If you need to view the number of licenses, or if you later need to upgrade the number of licenses, return to this application and repeat the process with your new serial number.
To complete installation, reboot the server now.
Test your installation
Configure a client to use the server, then tap a badge. (QwickACCESS Client - QAW)
If prompted, enroll a badge.
Verify that the user was enrolled in the database using SQL Server Management Studio.
If you have configured replication, verify the data appears in all subscriber databases.