ExactAccess Administrator
This guide explains how to use the ExactAccess ("XA") Administrator application, which is intended for use by IT personnel to manage XA user access to those software applications that have been integrated into the XA Single Sign-On (SSO) solution. It assumes you are comfortable with Windows® and your organization’s Directory Services and that you are familiar with XA (logging in, application parameters, XA desktop, and XA functionality).
Prerequisites
The Administrator application requires that you must be given permission to use it. You also must be an XA user (you will be authenticated with the XA server to use the tool through XA).
Using the Administrator Application
To open the Administrator Application:
Log into XA as a user with the permissions to use the application.
Select the XA Administrator link on the desktop (or click Start >Programs > HealthCast > ExactAccess > Utilities > ExactAccess Administrator).
The user interface is divided into four frames (described below).
Tip
This version of the tool may differ from a previous version you may have used. It is now REQUIRED for you to enter search criteria for users and roles before performing operations in those frames.
Info
This tool is also available on any installed XA Client workstation, but may have different features than described here, depending on the client version installed.
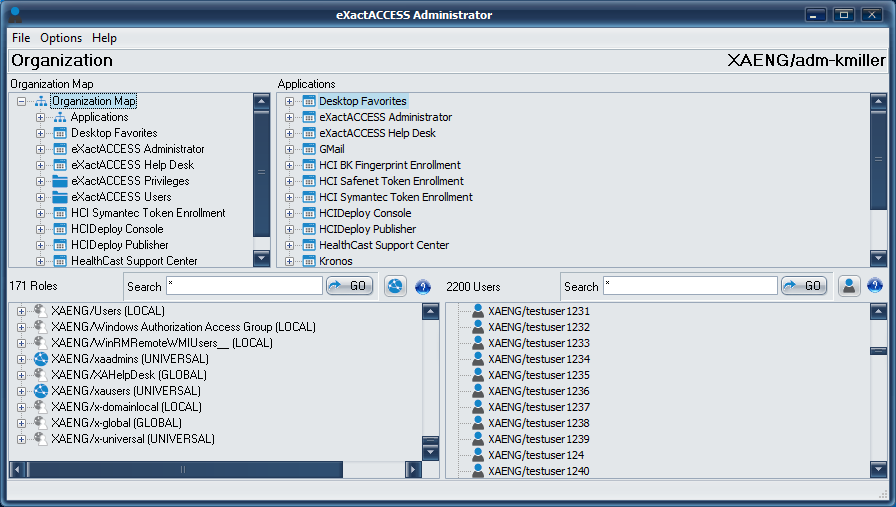
Organization Map
The Organization Map frame is located in the upper left-hand portion of the application screen. This frame contains the Organization Map, which lists the control items (applications) and the roles that have access to them.
Typically, only one level of control items is used. Each application can be listed separately under the root level. Roles can then be associated with each application. Alternatively, a number of applications can be put under a larger control item (access privileges cascade down to the lower level control items). The way the Organization Map is set up must be carefully considered in regard to how your organization works.
Click on the (+) to expand the list. Sub-items will be displayed. Under each control item or application is an item named “Roles”. Control items under the “Roles” item are the roles that have access to this application. Click on the (+) beside the “Roles” item to see these roles. For each role listed, you can click on the (+) to see the users associated with the role. Both XA and non-XA users are displayed.
Non-XA users are users who are associated with the Directory Service that have not been added to ExactAccess.
.NET Core framework Windows Desktop 3.1.x or higher is already installed at the correct bit for the browsers supported
e.g.,
windowsdesktop-runtime-3.1.9-win-x64.exe
.NET Core framework ASP.net 3.1.x or higher is already installed at the correct bit for the browsers supported
e.g.,
aspnetcore-runtime-3.1.9-win-x64.exe
Cross-browser extension features for this update:
The Registry needs to be updated for supporting different browsers through XA Admin "Supported Browser Executable" field value.
[HKEY_LOCAL_MACHINE\SOFTWARE\HealthCast\ExactAccess\Applications]
"iexplore.exe"="C:\\Program Files (x86)\\Internet Explorer\\iexplore.exe"
"firefox.exe"="C:\Program Files\Mozilla Firefox\firefox.exe\\InvalidPath\\firefox.exe"
"DEFAULTBROWSER.EXE"="\\InvalidPath\\DEFAULTBROWSER.EXE"
"msedge.exe"="C:\\Program Files (x86)\\Microsoft\\Edge\\Application\\msedge.exe"
"chrome.exe"="C:\\Program Files (x86)\\Google\\Chrome\\Application\\chrome.exe"
Note
For Chrome browsers, simply replace the path to
firefox.exewith the path tochrome.exe.The
GroupIdfield value displays as third field value (if saved) even when AD Passthrough is checked in cases of Chrome, Edge, and Firefox.To exclude certain URLs opened in Chrome, Edge, and Firefox from closing, or to alter the behavior of browsers, follow the steps in Logoff Cleanup Configuration.
Applications Frame
The Applications frame is located in the upper right-hand portion of the application screen. It contains the list of applications that are registered in XA.Applications must be registered in XA before they can be used within the Administrator tool. Register all appropriate applications before continuing. If sub-control items are available, they may be displayed by clicking on the (+). Using the mouse, applications may be dragged over to the Organization Map frame and dropped into place.
Options are available to create application links from the context menu of the Organization Map. Right click on the Applications frame to view available options.
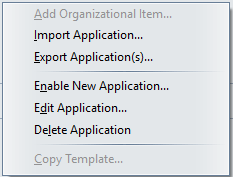
Select "Enable New Application..." to add a new application to the list.
Tip
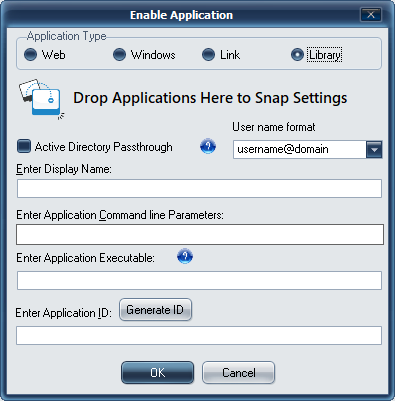
New for XA Administrator: Snap App
Four application types have been added to the Snap App window (Enable Application):
Web: HealthCast SnapAPP applications - typically URLs configured to be launched with supported browsers.
Windows: Desktop SSO applications - any application that can be launched from the desktop (not all apps will function) - uses the generic WinConnector.exe for launching from the XA desktop, but applications may be launched directly from Windows and receive SSO functionality. Requires pipe | delimited parameter list to identify the application to be SSO enabled.
Link: Any direct link to an application or published application - typically applications that do not need SSO functionality or application published via Citrix®.
Library: HealthCast Connector application that provides SSO to special applications that do not work with the other methods available.
The new functions of Snap App allows for shortcuts, file links and executable applications to be dropped on the configuration window. This enables them to be configured with default information respective of the type selected (Web, Windows, Link and Library).
Registering a published application with PubLancherSF
Create New Snap Application.
Options are available to create application links from the context menu of the Organization Map. Right click on the Applications frame to view available options.
Select "Enable New Application..." to add a new application to the list.
Select link and configure the fields as shown in the example making sure to call Publaunchersf.exe in the application line.
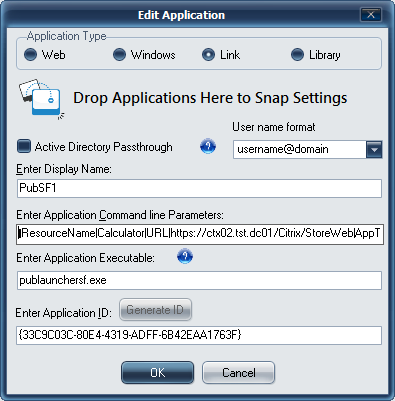
See Snap-App in action.
Example of creating a Web Snap-App
Example of creating a Windows Snap-App
Check "Active Directory Passthrough" to indicate that the username and password will use the passthrough credentials for the application, rather than storing them in the ExactAccess server.
This defines the way in which a user name will be passed to an application that requires Active Directory Passthrough.
The display name is what will appear on the ExactAccess Desktop presentation. You may specify a short and long name by separating them with the pipe (|) character. Ex: Short|Followed by a long name. The short name will be displayed directly on the desktop, while the long name will be used as a hover hint that will pop up when the mouse is placed over the link. See Application Registration for importing an XML file for Connectors that have been modified with these properties.
For Snap-App applications, this field will change depending on the type of application being defined:
Web applications require a URL
Windows applications require application data in the form AppPath|<path to the application|AppExeName|Name.exe
Tip
A custom icon can be specified for the ExactAccess Desktop by adding the /ICON:<path to icon file> parameter to this field.
Note
There are several ways to specify the path or icon to associate with an application.
In the case of the generic WinConnector.exe - which will be used by all Windows Snap-App applications, the icons may be placed (with unique names) in the ExactAccess install folder. The path can be omitted in this case.
Icon paths may be specified with the following options
The path can be omitted when the icon is present in the same location as the application being launched.
You may specify the icon path with an environment variable %xaucm% when the application is in a folder other than the installation folder, but the icons are present within this folder.
You may specify a full path (as long as this is consistent across all workstations) such as c:\icons\iconfile.ico
You may use a mapped drive designation if the generic Windows account, as well as explicit user accounts (or kiosk mode mapped drive support maps a drive) all have the same mapped drive designation.
You may also specify a network UNC path \\server\share\iconfile.ico as long as all users have read permissions to this file location
The /ICON designation can be omitted if the icon has the same name as the connector and is in the same directory as the connector:
example:
The following path contains a Connector called xaGeneric.exe
c:\program files (x86)\HealthCast\ExactAccess\Wrappers\xaGeneric\
Place the icon file xaGeneric.ico in this folder and it will automatically be used to display the link to the xaGeneric application
Links do not require additional data, but can be passed command line parameters if needed
Library applications for HealthCast Connectors may have unique parameters that need to be specified here. Each Connector may require different information. Refer to the document accompanying the Connector for registration requirements.
The application executable is the name and extension of the file to be launched without the path specified. Ex: xaGeneric.exe
Tip
This field may automatically update depending on the type of application chosen:
When selecting the Web type, the application executable will be the supported browser executable: iexplore.exe
When selecting the Windows type, the application executable will be the supported windows executable: winconnector.exe
Links will specify the direct application executable to the application that will be launched: example: notepad.exe
Library executable will be the executable name of the Connector: example: xaGeneric.exe
The Application ID is a Globally Unique Identifier (GUID) that will uniquely identify this application in the system. If you are creating a Connector for a specific application, and the application requires parameters such as username and password, your Connector must know this value in order to retrieve the associated parameter values for a user at log-in time. Snap-App applications automatically handle acquiring this ID during startup.
Similar to the Create application option above, an administrator may edit the application. All fields with the exception of the application ID be edited after the application information has been created. Once defined and saved, the ID cannot be modified.
Applications may be deleted, but they first must be removed from the Organization map. Once there are no further links to the application on the organization map, the application and parameters can be deleted from the applications list.
Roles Frame
The Roles frame is located in the lower left-hand portion of the application screen. It shows the roles that are associated with the Directory Service. Using the mouse, roles may be dragged to the Organization Map frame to associate groups of users with applications. The count above the frame is the number of roles found in the configured directories.
Info
You must enter search criteria for the role using the search box and click the GO button to populate the role list.
All Users Frame
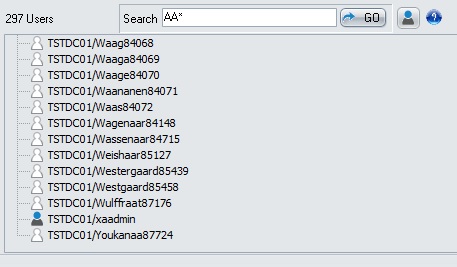
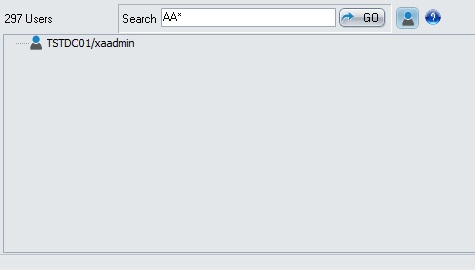
The All Users frame is located in the lower right-hand portion of the application screen. It shows the users that are associated with the Directory Service. Right-clicking on a portion of the list will display a pop-up menu with several options. The count above the frame is the number of users found in the configured directories.
Users may be filtered to show only those users that have been activated in ExactAccess. Press the filter button to the right of the GO button.
Search Without user filtering
 |
Search after user filtering applied
 |
Info
You must enter search criteria for the user using the search box and click the GO button to populate the user list.
Administering Applications
To be available for XA users, applications must be registered with XA. The registration process includes:
Registering the application.
Adding the application to the Organization Map (XA).
Assigning role(s) to the application.
Setting required application parameters (i.e. username, password).
Setting default values for required parameters, if applicable.
Application Registration
Right click the application in the Applications Frame.
Select Register Application.
Select the appropriate Connector's "server.xml" file.
Click OK.
The below is a typical example of an XML document used to register an application with ExactAccess. The "name" attribute may be modified to provide both a short and a long name.
Example XML Expand source
<!-- SERVER XML FILE; Used for registering wrapper with XA. -->
<controlitems>
   <!--
    CONTROL ITEM:
      id: Uniquely identifies application with XA;
      name: The name that is displayed on the XA desktop;
      desktoplink: The exe that is launched by XA, which in turn launches the application.
    -->
   <controlitem id="{41763644-DE4C-4D30-BDC5-D07489689E16}" name="short|long name designation" kind="" desktoplink="application.exe">
      <params>
         <param name="username" ismasked="False" default=""/>
         <param name="password" ismasked="True" default=""/>
      </params>
   </controlitem>
</controlitems>
Adding an Application to the Organization Map (XA)
Once an application has been enabled and registered within ExactAccess, it will appear as a Control Item in the Applications Frame and is available to click-and-drag onto the Organization Map.
Select an application and drag it to the appropriate item within the Organization Map.
Click Yes to confirm.
Repeat with this process until all applications XA users need access to appear under the nodes you have defined in the Organization Map.
Assigning a Role to an Application
To assign a role to an application:
If you have not already done so, search for a role by entering search criteria for the role name using the search box and click the GO button.
Drag and drop the role from the Roles Frame to an application in the Organization Map Frame.
Click Yes to confirm.
All of the users within that role will have access to that application. Continue to give access to that application to as many roles as desired. Also, you may give a single role access to as many applications as desired.
Info
If you are adding a new role to an application, users will not see the new application on the XA desktop until they log out of XA and log back in.
Tip
Users may selectively refresh their desktop without the need to log off and log back in.
Right click on the ExactAccess User Context Manager in the task tray
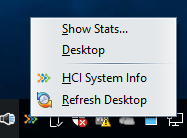
Select "Refresh Desktop" from the popup menu
Setting an Application’s Parameters
Application parameters are established at the time an enabled application is registered within ExactAccess. Application parameters are any information that an application needs in order to login (or log off) a user. Parameters include items such as username, password, group identifiers, URLs, etc.
Application parameter values can be configured at the application level as “default values” in which case these values will apply to all users/roles that are granted access to the application.
Right-click the application in the Organization Map frame.
Select Properties from the menu.
To change a value, double-click on the parameter.
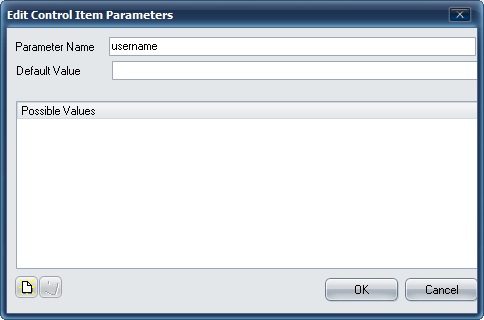
Select any of the possible values in the list.
To add a new value to the Possible Values list:
Click on the “New” icon.
Enter the new value.
Click OK.
To remove a value from the Possible Values list:
Select the value you wish to remove.
Click on the “Remove” icon search criteria.
Click OK.
Administering Roles/Users
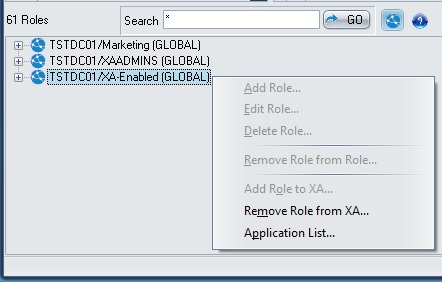
Adding a Role to ExactAccess
All of the roles associated with the Directory Service are available in the Roles frame of the Administrator application. To add a role to ExactAccess:
If you have not already done so, search for a role by entering search criteria for the role name using the search box and click the GO button.
Right click on the role name and select Add Role to XA.
Click Yes.
Info
The icon in the Roles frame will turn blue to indicate it has been added. Typically, a clear/grey icon indicates the role exists but is not enabled in XA. A blue icon indicates the role exists and is enabled in XA.

Removing a Role from ExactAccess
Tip
Removing a role from ExactAccess does not remove it from the Directory Service.
If you have not already done so, search for a role by entering search criteria for the role name using the search box and click the GO button.
Right-click the role name and select Remove Role from XA.
You will be shown all control items that will be affected by this deletion. These are the applications that can be accessed by these users in this role.
Click OK to proceed or Cancel to leave the role as it was.
Info
The icon turns from blue to clear/grey to indicate it has been removed.
Adding a User to ExactAccess
Users that are set up in your Directory Service are displayed in the All Users frame. To have access to XA-registered applications, users will need to be added to XA.
If you have not already done so, search for a user by entering the user name using the search box and click the GO button.
Right-click on the user’s name in the All Users frame and select Add User to XA.
Click Yes
Info
The icon turns from clear/grey to blue to indicate it has been added.
Tip
This may not be necessary if "auto-Add" has been enabled on the XA Server.
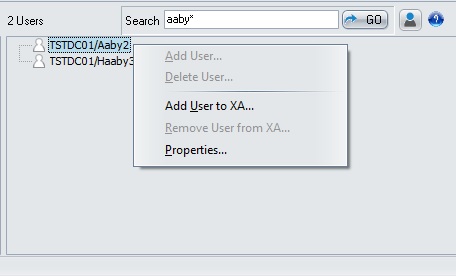
Removing a User from ExactAccess
If you have not already done so, search for a user by entering search criteria for the user name using the search box and click the GO button.
Right-click on the user’s name in the All Users frame and select Remove User from XA.
Select Yes to confirm.
Tip
You may also remove a user by using the right-click menu in the Organization Map frame.
Default User Access
Users need to be assigned permissions within the Administration area to access their applications and certain features within ExactAccess. For example, a user’s role could be added to the “SDK: Edit a Control Item Parameters” control item to give them permission to change/update their passwords within the application when prompted to do so. ExactAccess users need to be a part of this control item. Without it, they cannot perform general functions such as retrieving parameters for their applications, locking, and logging off.
Giving a user access to general functionality
From the Organization Map frame, expand “ExactAccess Users”.
Drag the ExactAccess-enabled role (group) onto the “Roles” folder under ExactAccess Users.
Ensure that all XA enabled roles have been dropped on the ExactAccess Users Folder
Warning
Do not use the "Apply Roles to Children..." menu option on this item. Doing so will grant users the permissions to run and access the ExactAccess Administrator application.
This operation re-applies all groups associated with all child control items to parent items and this includes items that are shared (
 ) and their parent application.
To reapply groups, drag and drop them from the Role frame onto the ExactAccess Users item. If the role is already present on an item, it will not be added. If there is a child item that the role has either been removed from, or was never applied to child item, it will be added.
Individual features may be targeted by expanding the child items. For instance, "Manage Users and Control Items: View" may be expanded to show normal SDK functions that a user must be able to perform during login in order to request their application list for the ExactAccess Desktop. "SDK: Edit a Control Item Parameters" must be granted for users to be allowed to save credentials for Connectors the user has been granted access to.
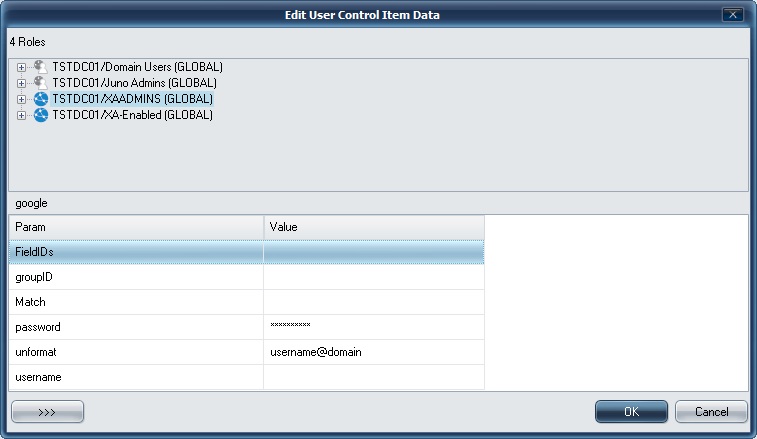
Setting User Parameters
User parameter values are required for a user to login to an application. For example, passwords and usernames are values that a user would need to access an application. Application parameters are defaults for all users that have access to an application. User parameters are specific to each user.
The application Connector determines whether or not the ExactAccess Administrator is required to enter the actual values in the administration environment for first-time use.
Setting User Parameter Values
Right-click the Username within the Application node in the Organization Map frame.
Select Properties.
Double click on the Property to set the value.
Click OK.
Refreshing the Server
User and role values are cached within the ExactAccess Administrator application. When users or roles are added to the Directory Service and you want the changes to be reflected immediately within the Administrator application, you must refresh the server. To do so:
Select Options (from the menu bar).
Select Refresh Server.
Info
Keep in mind the server will refresh itself every few minutes.
Organizational Items
Organizational items are control items created by the administrator (using the administrator tool) for the purpose of organizing applications into logical groupings. These items may only be created in the Applications frame under the “ExactAccess Administrator” application control item.
Creating a New Organizational Item:
Right-click on the ExactAccess Administrator in the Applications Frame.
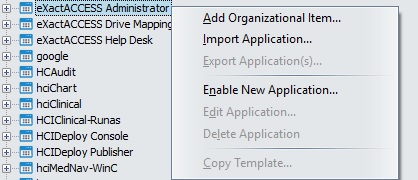
Select “Add Organizational Item…”.
Enter a name for this item. This name can be anything that makes sense for managing access to applications based on your organization. This could be as simple as "Applications" for organizations with only a few SSO-enabled applications, or for more complex organizations, might include a site name. In our example, we will use a simple structure and name the item "Applications."
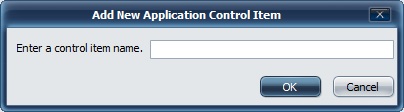
Click OK.
Once a name has been entered, it will appear under the ExactAccess Administrator application with a tree icon. Administrators may create as many of these items as desired.
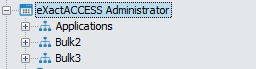
The administrator can add applications to the new organizational item by dragging the applications from the application frame and dropping them on the new organizational item.
Search Criteria
When entering search criteria, the wildcard asterisk (*) can be placed at the beginning or end of the data to indicate finding any item containing the specified string.
Search strings are not case-sensitive.
Given the domain names as ADDOMAIN, DOMTEST the following examples show searching for roles or users in these domains:
*IN/* - this will return all roles or all users in ADDOMAIN.
Note
Enter a combination of letters from your specific domain name for your search.
ADDOMAIN/some* - this will find any user or role beginning with "some" in ADDOMAIN only.
*test* - this will find all roles or users with the word "test" in them - which would return every role or user in the DOMTEST domain, and any role or user from ADDOMAIN with
testas part of the name.*users - this will find roles or users that END with the word "users" - for instance, role: Domain Users from all domains.
Troubleshooting
User does not have the application link on their ExactAccess Desktop after being configured.
Check that the group in which the user is a member has been added to the application.
Check that the user is an ExactAccess user. (User icon is non-white - as shown in the user search image above)
Check the ":View" and ":Edit" privileges of the group(s) to ensure the user has appropriate permissions to the API. See Giving a user access to general functionality above for additional details on where to look for these settings.
Check that the location of the application is correct. When adding applications using the administrator, it is important that a PATH to the application is NOT specified, as it may be different on each workstation. Review the registry on workstations under HKLM\Software\HealthCast\ExactAccess\Applications to ensure the application path is correct for that workstation for each application or connector installed. Applications or executable(s) not listed here will no be visible on the desktop, even if the user has been given permission to launch them. Additionally, if a deployment has not been completed for the connector, the registry may need to be updated to indicate the install path of the connector. In this case, the application may be listed, but be indicated similar to this: "\InvalidPath\<executable name>.exe" Correct the registry and have the user perform a refresh desktop operation or have the user logoff and log in again.
Note
Also, review the XML settings files for each connector to ensure the application path (app path) parameter is correct for the application the connector is intended to launch. While this will not prevent the link from displaying on the ExactAccess Desktop, it will prevent the application from launching when clicked on. The connector may launch, but it will be unable to locate the application to launch for sign on. This is not necessary for applications enabled through SnapAPP, as there is no associated XML file.
The user is not a member of ExactAccess (but you know they are on the domain). User is unable to log into ExactAccess or does not receive an ExactAccess Desktop
Verify that the user (non-white) and the group (blue globe) have been added to ExactAccess.
Ensure the appropriate desktop is configured on the workstation or the remote server. See Desktop Presentation for further details.
In the case of "Local" application desktops, ensure the client is configured for FullSSO and is not configured for "no desktop" as the Desktop Presentation. Workstations configured to connect to remote systems typically do not display an ExactAccess Desktop (e.g. Passthrough configurations such as publauncher, publauncherSF, icaConnect, rdpConnect, viewConnect, or other remote/VDI technology).
User does not have access to a Connector after being configured. The SSO enabled application is not launching, or the application does not receive SSO/Login after launching.
Check that the group the user is a member of has been added to the application.
Check the ":View" and ":Edit" privileges of the group(s) to ensure the user has appropriate permissions to the API. See Giving a user access to general functionality Giving a user access to general functionality above for additional details on where to look for these settings.
Check that the location of the application is correct. When adding applications using the administrator, it is important that a PATH to the application is NOT specified, as it may be different on each workstation. Review the registry on workstations under HKLM\Software\HealthCast\ExactAccess\Applications to ensure the application path is correct for that workstation for each application or connector installed. Applications or executable(s) not listed here will no be visible on the desktop, even if the user has been given permission to launch them. Additionally, if a deployment has not been completed for the connector, the registry may need to be updated to indicate the install path of the connector. In this case, the application may be listed, but be indicated similar to this: "\InvalidPath\<executable name>.exe" Correct the registry and have the user perform a refresh desktop operation or have the user log off and log in again.
Note
Also, review the XML settings files for each connector to ensure the application path (app path) parameter is correct for the application the connector is intended to launch. While this will not prevent the link from displaying on the ExactAccess Desktop, it will prevent the application from launching when clicked on. The connector may launch, but it will be unable to locate the application to launch for sign-on. This is not necessary for applications enabled through SnapAPP, as there is no associated XML file.
Editing Toolbar Favorites
Using the ExactAccess Administrator or ExactAccess HelpDesk tools, an administrator can remove favorites for a user.
If for some reason, a user has a favorite pinned that they no longer have access to, or the application does not exist on the current workstation, the favorite button will display, but be disabled (unusable). This item can be deleted only by an administrative user.
As shown here, the user does not have access to the Epic Session Manager application, and is unable to remove it. The application is disabled.
 |
Tip
Instead of showing applications that are disabled, the toolbar can be configured to hide invalid links. See customizing the toolbar for how to configure this option.
ExactAccess Administrator
Favorites can be added and removed using the ExactAccess Administrator.
Adding Favorites to a Group
Favorites can be added and removed using the ExactAccess Administrator. The favorites can be added to a group using Roles or Default Parameters.
Assigning Favorites Using Roles
Using the ExactAccess Administrator, an administrator can add favorites for a group of users using roles with the following procedure:
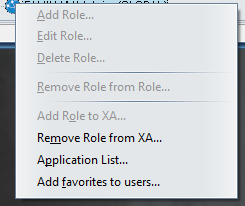
Locate the XA Role that contains the users that will receive the added favorite(s).
Right click the Role and select Add favorites to users....
In the window that appears, select the applications that will be displayed as favorites from the left list, and click the plus
 button to add them to the right list.
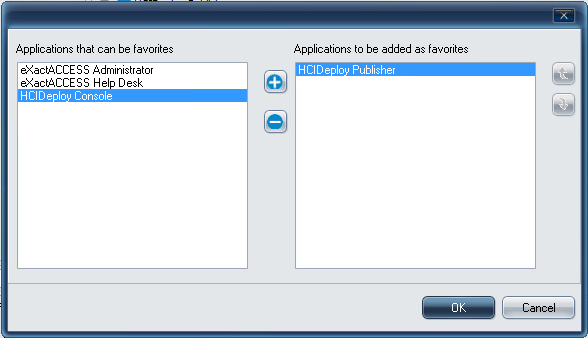
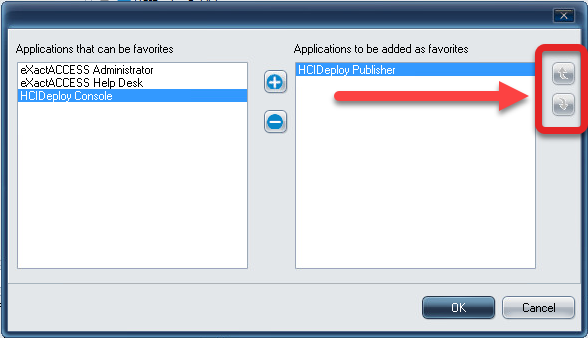
If needed, the order of multiple favorites that are being added can be changed by using the arrow buttons next to the list on the right.
Note
If a user belonging to the group already has a particular application set as a favorite, adding the same favorite will not re-order or duplicate the application on the favorites bar.
Click the OK button to save changes.
Note
To see changes, users belonging to this group will need to perform a Refresh Desktop, or logoff and log back on.
Adding Favorites Using Default Parameters
Using the ExactAccess Administrator, an administrator can add favorites for a group of users using default parameters with the following procedure:
Click on Desktop Favorites from the Organization Map frame.
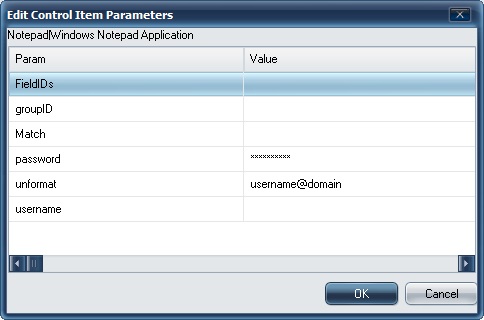
Select the appropriate Favorite parameter to bring up the Edit Control Item Parameters options.
Add a comma-separated list of application control item IDs as a default value for the parameter.
Note
Up to ten items can be added per favorite parameter.

To obtain the an application control item ID, right-click the application from the applications frame.
Select Edit Application and the application ID can be found in the Enter Application ID field.
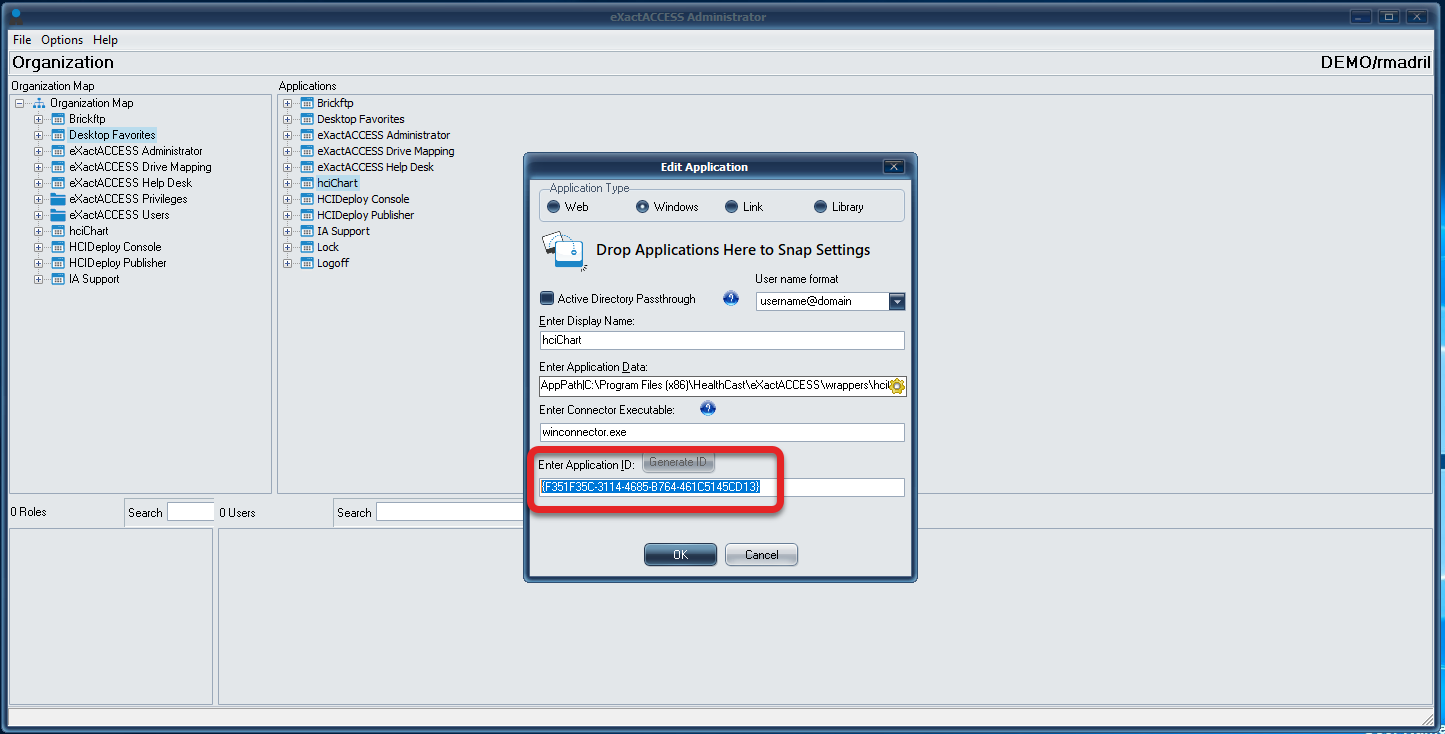
Once all application control item IDs have been added, click OK to save the list.
Removing Favorites for a User
The following steps assist the ExactAccess Administrator in removing favorites for a user.
From the Administrative tool, perform a user search.
Tip
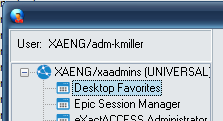
Optionally, the Desktop Favorites can be located in the Organization Map, expand the item, expand the role, then locate the user - select Properties
However, the method outlined using the user search is faster as the assigned role does not need to be queried to display a list of all users.
Right click the user and select Properties.
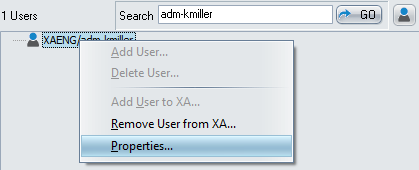
Locate the Role that has been assigned the Desktop Favorites item and select it.
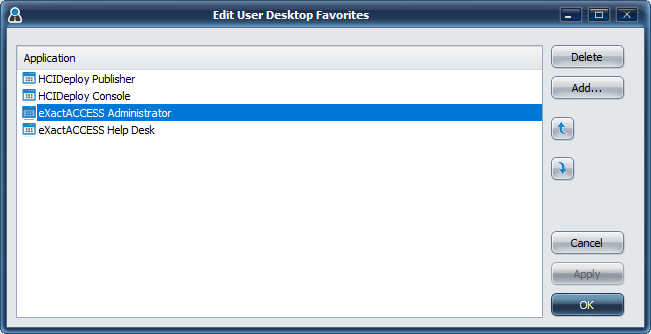
The current user pinned favorites will then be presented.
Tip
In the case where a user no longer has access to the application (they do not belong to a role that has been assigned to an application they previously had pinned, the display will indicate that with a different icon.
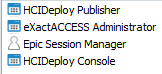
As shown here, the Epic Session Manager has been removed from the users applications - so it does not display with the application icon.
Select a favorite, then click the Delete button.
Optionally, the ordering of the favorites may be changed by selecting an item, then pressing the up or down arrows below the Add button.
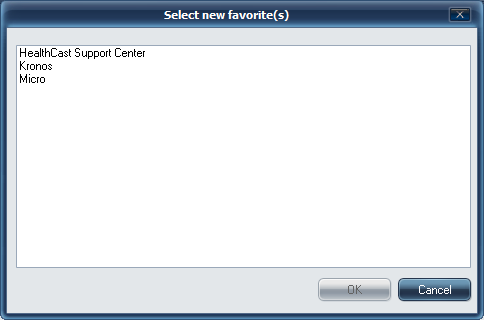
Optionally, new items may be added by clicking the ADD button. This will present a screen of all registered applications that the user currently has access to, but that are not already pinned as a favorite.
Click the Apply or OK button to commit the changes to the favorites.
ExactAccess Help Desk
Using the ExactAccess HelpDesk tools, a help desk user can review or edit user favorites as well as add favorites for a group.
The following steps detail how to remove or edit favorites.
Note
If for some reason, a user has a favorite pinned that they no longer have access to, the favorite button will still display, but it will be disabled (unusable). This item can only be deleted by a help desk user.
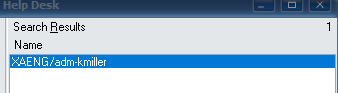
From the Help Desk tool, perform a user search.
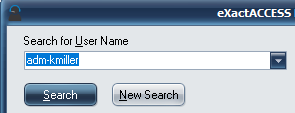
Select the user from the Search Results
From the Control Items list, select Desktop Favorites.

The current user pinned favorites will then be presented

Tip
In the case where a user no longer has access to the application (they do not belong to a role that has been assigned to an application they previously had pinned), the display will include a different icon.
As shown here, the Epic Session Manager has been removed from the users applications, so it does not display with the usual application icon.
Select a favorite, then click the Delete button.
Optionally, the ordering of the favorites may be changed by selecting an item, then pressing the up or down arrows below the Add button
Optionally, new items may be added by clicking the ADD button. This will present a screen of all registered applications that the user currently has access to, but that are not already pinned as a favorite.
Click the Apply button to commit the changes to the favorites.