ProxCard Administration
Installed with the server is a tool for managing the ProxCards associated with users. To start this tool, navigate to Start > Programs > HealthCast > ExactAccess > Utilities > ProxCard Administrator.
Tip
The Prox Card Administrator tool may be run from the server or from a Windows workstation where ExactAccess has been installed. It will not function from workstations where QwickACCESS is installed, or from non-Windows environments.
To perform badge tapping with the tool, rather than manually entering badge IDs, it must be run from a client workstation with ExactAccess installed and configured.
Warning
The Prox Card Administrator tool will intercept badge taps, disabling workflow functionality on a client system. Ensure that the tool is closed to allow the ExactAccess client to function once management functions have been completed.
Note
To run the tool from a client, it is necessary to either start it over a network share or UNC path, or copy the executable to the workstation, as it is not installed with the client software. The executable name is XARFIdeasAdmin.exe found under c:\program files (x86)\HealthCast\ExactAccess
Finding a Badge
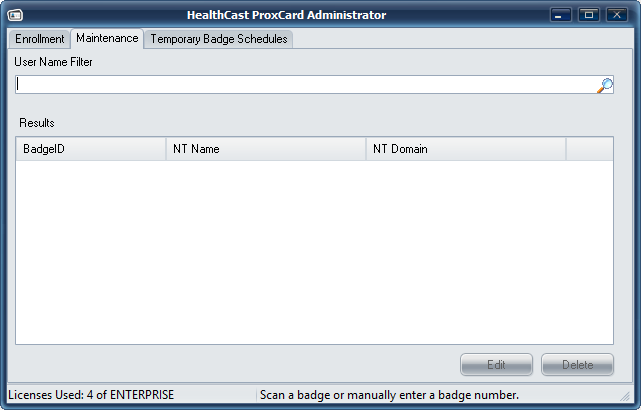
Typically, self enrollment is enabled on the client workstations, so users may tap a non-enrolled badge that they have been issued and associate that badge with their personal network log-on. There may be instances where the user has incorrectly enrolled, or other reasons that the enrollment may need to be deleted. From the maintenance tab, the administrator may search for a user and un-register a badge. Enter a partial user name and click the search button.
Info
Maintenance and Temporary Badge Schedule tabs will only be displayed when connected to a server version that supports those features. If you do not see these tabs, check the version of the server (this can be viewed with he server monitor tool).
If the server version is appropriate, verify the setting for the Proximity Card Configuration (See ProxCard Administrator in the ExactAccess Client section) for server name/IP and port on the workstation the tool is being run on are correct to connect to your server.
Info
Maintenance tab will only show up on 4.6.0 servers or higher.
Delete a badge enrollment
Once the user has been located, select the row in the results list and press the delete button. The user is then deleted - this can be confirmed by pressing the search button to refresh the list of users.
Edit a badge enrollment
Select the row and press the edit button or double click the row to perform an edit. This will allow the administrator to change the account name associated with the badge.
Reset a users PIN
After locating a user, select the checkbox to clear the users PIN and allow the user to re-enroll the next time they tap their card.
Note
PIN reset feature requires ProxCard Server 4.8.3 or later.
Important
Not all HealthCast products or versions support prompting for PIN. Ensure the client product you are deploying supports the appropriate features.
Enroll a badge
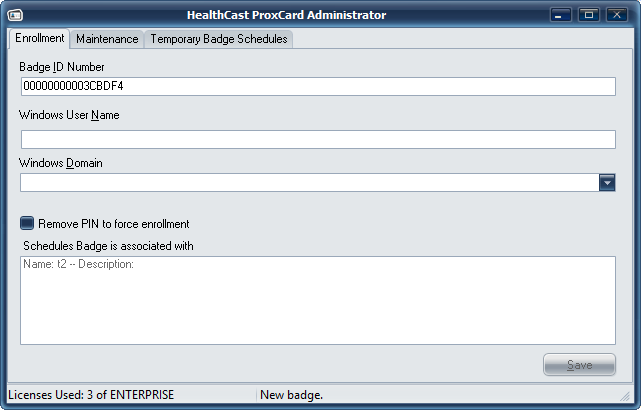
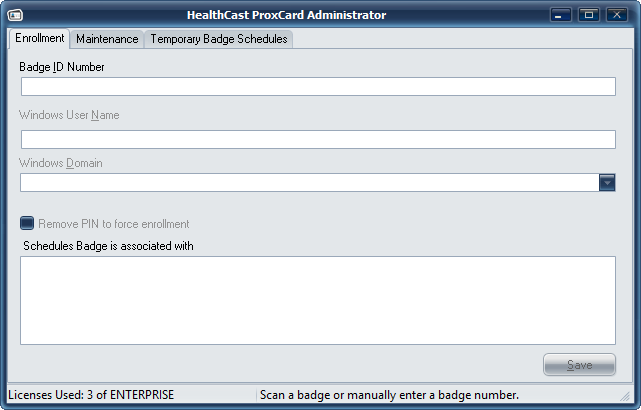
If self enrollment is disabled, this tool may also be used to manually enroll a badge. To perform badge enrollment, it is recommended that this tool be copied to an XA client workstation so that a badge may be scanned into the application. If executed directly from a server session, badge scanning is not available. Either manually enter the full Badge ID (this is the full 64-bit badge ID (represented with hexadecimal numbers, including leading zeros), or scan the badge from the client workstation to display the current enrollment data. Enter the appropriate information for badge enrollment and press the save button.
Temporary Badge Schedules
Temporary Badge schedules are intended for handling high turnover situations where a set number of cards will be frequently changing enrollment from one user to another. These schedules allow the badges to be unregistered (deleted) over shifts (Daily schedule by hour, weekly, or monthly) so that they may be re-enrolled with a different user name.
Note
Temporary Badge Schedules feature requires ProxCard Server 4.11.0 or later.
Setting up a schedule
To add a new schedule, follow the steps below:
Click the plus button and enter a schedule name.
A dialog is presented, fill in the start time, comment (description) and the desired schedule.
Once the schedule is created, select the desired schedule from the Schedules list
Tap a badge to be associated with this schedule
The Badge ID will appear to the "Associated Badge IDs" in the lower right portion of the window, next to the plus button
Click the plus button next to the Badge ID.
Tip
The plus button will become enabled when a badge is tapped. When attempting to perform this operation from a server, it is not possible to tap a badge. In this case:
Make sure the user is already enrolled (via self enrollment from a client workstation)
Search for the user in the Maintenance tab
Double click on the returned badge information in the results portion after searching for the user.
Switch back to the temporary badge schedules tab - the button should be enabled, click the plus button to add that badge to the schedule.
The ID will now appear in the list under the "Associated Badge IDs" field for this schedule.
Info
A badge may only be associated with a single schedule. If it was previously associated with a different schedule, it will be moved to the new schedule.
Editing a schedule.
Double click the schedule listed under Schedules - this will present the timing edit dialog
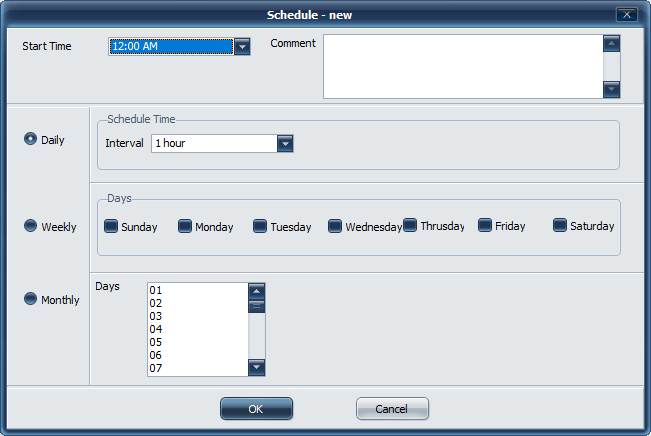
Set a start time
Choose how often the badge should be unregistered (daily, weekly, or monthly)
Select the appropriate timing interval (1, 2, 4, 8 or 12 hours)
Select the appropriate day interval (daily, weekly or monthly)
For weekly, choose the appropriate days to run the schedule
For monthly, choose the appropriate days in the month to run the schedule.
Enter the Comment/Description in the Comment field (typically indicating the schedule details, but can be any comment that helps administrators identify the purpose of this schedule)
Click the OK button.
The schedule will be updated, and the comment will now be displayed on the Temporary Badge Schedules page for the edited schedule.
Deleting a badge from a schedule
Switch to the Temporary Badge Schedules tab.
Select the schedule by clicking the name
Under Associated Badge IDs, locate and select the badge by clicking it.
Click the Delete

button to the right of the Associated Badge IDs (it will become enabled when a badge is selected from the list)
Deleting a Schedule
Switch to the Temporary Badge Schedule tab.
Select the schedule by clicking the name
Click the Delete
button above the schedule.
Warning
Deleting a schedule will remove all badges from the schedule and cannot be undone.
Access Control for ProxCard Administration
To enable limited access control for the ProxCard Administrative tool, the associated ProxCardAdmin_server.xml must be registered with ExactAccess.
Registering the ProxCard Administrator Control Item
Import the registration file c:\program files (x86)\HealthCast\ExactAccess\ProxCardAdmin_server.xml using the XA Administrator. See Application Registration in the ExactAccess Administrator section for importing the XML file.
After the file has been registered, ensure that the control item "ExactAccess ProxCard Administrator" has been added to the Organization Map. Also, ensure that the sub-items registered with the application have been added under the ExactAccess ProxCard Administrator. Then, drag and drop the appropriate roles onto the ExactAccess ProxCard Administrator control item for all Administrative users. Drag and Drop Help Desk users onto the appropriate sub-items: Allow Delete, Allow Enrollment, Allow Search, and Modify Temporary Schedules.
Supporting Temporary Badge view
The ProxCard database must be updated with the Update4111.sql script to allow the administrative tool to query the schedules associated with a badge.
Updating the ProxCard database
Using SQL Server Management Studio (or a similar tool), connect to the database server on which you wish to upgrade the Prox database.
This upgrade will need to be completed on each SQL instance that hosts a Prox database.
Connect to the existing database on the database server (ensure any scripts will be executed against this existing database)
Use SQL Server Management Studio to open the file called Update4111.sql and execute the update against the Prox database.
Located in c:\program files\healthcast\ExactAccess\SQL\MSSQL\prox.
New for 4.11.1
Viewing associated schedules
Using the Administrative tool, tap a card - the associated schedule(s) will be displayed in the list "Schedules Badge is associated with"
Note
This feature requires ProxCard Server 4.11.1 or later.