RapidIdentity SnapAPP
What it Does
SnapAPP (formally known as Web SSO) provides a way to rapidly create and manage sign-on functions to many common Web and Windows applications for customers who have deployed ExactAccess® (XA).
Key Features
Easy identification of SSO enabled web sites
Support for Windows desktop applications (NEW IN 4.11)
Customizable web site field highlighting
Website credential registration
On the fly credential changes
Support for Active Directory pass-through authenticated sites
Access to websites managed using XA roles
Supported Environments
Internet Explorer 11 with Enhanced Security Disabled
Google Chrome 87.0.4280.88 or higher (NEW IN 4.13)
Mozilla Firefox 84.0.1 or higher (NEW IN 4.13)
Microsoft Edge (Chromium Based) 87.0.664.66 or higher (NEW IN 4.13)
Microsoft® Windows 10 (x86 and x64) (NEW IN 4.11)
Microsoft Windows 2016 and 2019 (x64 only) (NEW IN 4.11)
How Do I Use It for Web Integration?
Step 1
Register a website application and assign user permissions with ExactAccess.
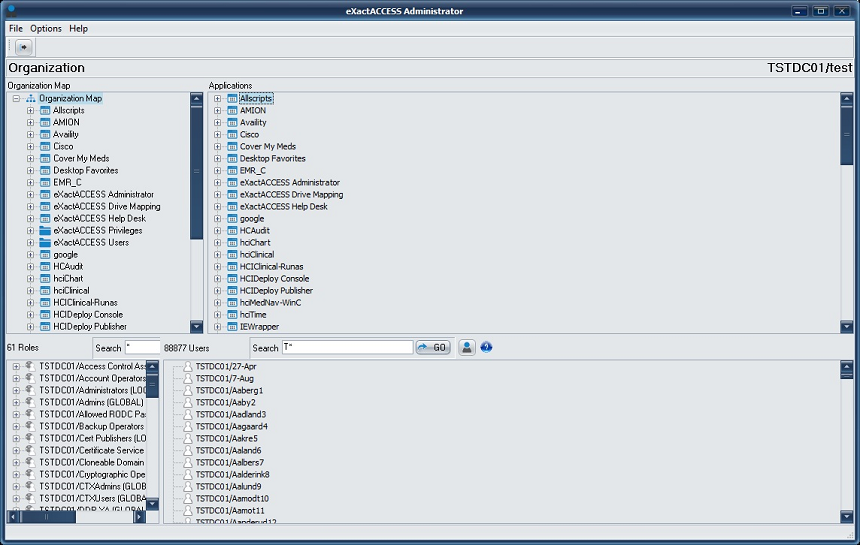
Open the XA Administrator.
Right-click the "Application " pane on the right-hand side.
Select "Create Application".
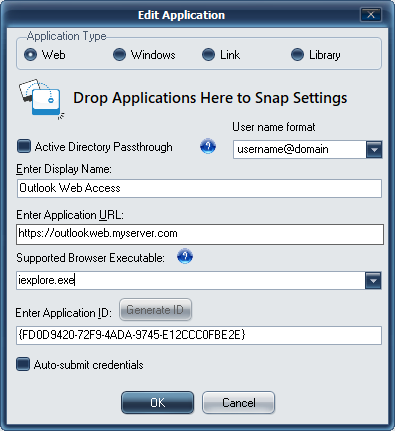
Select the "Type" of application "Web".
Check the Active Directory® Passthrough and appropriate username format if applicable.
Enter the Display Name.
Enter the Application URL.
Choose the browser to be used to launch the link. The dropdown offers options for Google Chrome, Mozilla Firefox, Microsoft Internet Explorer, and Microsoft Edge, as well as a Default Browser option. This selection will launch in whichever browser is set as the default on the user's machine.

Click Generate ID.
Click OK to create the XA control item.
Note
When entering the website URL do not include the full URL, but enough characters to make the URL unique to the site you would like to enable via SnapAPP.
For example, if you would like SnapAPP to enable http://mail.google.com , and the website redirects to https://www.gmail.com/intl/en/mail/about.html, You would enter https://www.gmail.com as the URL.
Step 2
Assign AD Groups to enable SnapAPP access to the website application.
Open XA Administrator.
Locate the Application created in the previous step, located in the "Applications" pane.
Drag the "Application" to the Organization Map on the left hand pane, and drop it. The "Application" once dropped into the organization map is now an XA Control Item. This allows AD Groups\Roles to be assigned.
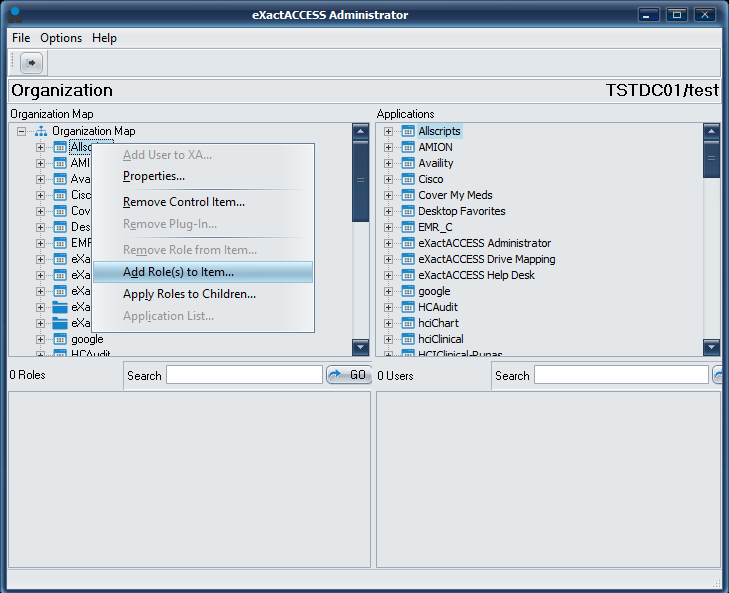
Right-click the newly dropped control item, and select "Add Role(s) to Item". Add the appropriate AD Groups for access to the web application.
Logoff XA and log back in for the changes to take effect. (Optionally, use the Desktop Refresh menu item from the XA tray icon)
Note
Refer to the following documentation for more details on user permission assignments with ExactAccess:
See how easy it is to integrate an application using SnapAPP
Example of creating a Web Snap-App
Step 3
Using Internet Explorer, navigate to the configured website application.
On opening Internet Explorer a prompt to enable hciwebplugin.BHOPlugin add-on, enable the add-on.
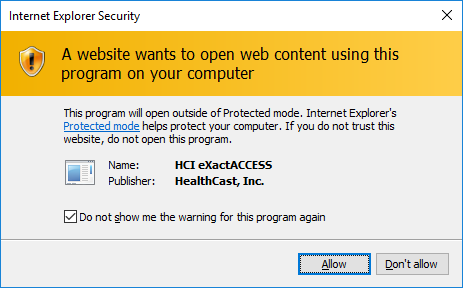
Close and restart Internet Explorer. An Internet Explorer Security warning will be present after restarting the browser. Select the check box "Do not show me this warning for this program again" and the "Allow" button.
Enter the URL for the web application(s) configured into Internet Explorer®.
To do this in Google Chrome, download the RapidIdentity SnapApp extension, then set the app and extension policies for users.
For Mozilla Firefox deployments, download the ExactAccess Client extension for Firefox, then deploy Firefox with extensions.

Step 4
Enter your credentials and press the Enter key or click the submit button.
SnapAPP is now configured for this web application. When any user with permissions navigates to the web application, the credentials will be automatically entered. The credential fields are highlighted (default color is yellow) for ease of identification.
Note
You can customize the color of the highlighted fields by modifying the following registry key:
[HKLM\SOFTWARE\HealthCast\ExactAccess\WebSSO] “InputFieldBGColor”=”#f8ee9a”
To change the login credentials, users simply type over the entered values and submit. The credentials will be automatically updated.
Required
To display a link on the XA Desktop add the following to the registry:
x64 workstations
Internet Explorer: [HKEY_LOCAL_MACHINE\SOFTWARE\HealthCast\ExactAccess\Applications] “iexplore.exe”=” C:\Program Files (x86)\Internet Explorer\iexplore.exe”
Google Chrome: [HKEY_LOCAL_MACHINE\SOFTWARE\HealthCast\ExactAccess\Applications] "chrome.exe" = "C:\Program Files (x86)\Google\Chrome\Application\chrome.exe
Note
The 64-bit version of chrome is installed in C:\Program Files (x86) on a 64-bit operating system.
Microsoft Edge: [HKEY_LOCAL_MACHINE\SOFTWARE\HealthCast\ExactAccess\Applications] "msedge.exe" = "C:\Program Files (x86)\Microsoft\Edge\Application\msedge.exe"
Mozilla Firefox: [HKEY_LOCAL_MACHINE\SOFTWARE\HealthCast\ExactAccess\Applications] "firefox.exe" = "C:\Program Files\Mozilla Firefox\firefox.exe"
Note
This is the 64-bit version of Firefox installed on 64-bit OS - if the 32-bit version is used, the path will be c:\program files (x86)\Mozilla Firefox\firefox.exe
x86 workstations
Internet Explorer:[HKEY_LOCAL_MACHINE\SOFTWARE\HealthCast\ExactAccess\Applications] “iexplore.exe”=” C:\Program Files\Internet Explorer\iexplore.exe”
Google Chrome: [HKEY_LOCAL_MACHINE\SOFTWARE\HealthCast\ExactAccess\Applications] "chrome.exe" = "C:\Program Files\Google\Chrome\Application\chrome.exe"
Microsoft Edge: [HKEY_LOCAL_MACHINE\SOFTWARE\HealthCast\ExactAccess\Applications] "msedge.exe" = "C:\Program Files\Microsoft\Edge\Application\msedge.exe"
Mozilla Firefox: [HKEY_LOCAL_MACHINE\SOFTWARE\HealthCast\ExactAccess\Applications] "firefox.exe" = "C:\Program Files\Mozilla Firefox\firefox.exe"
Advanced Features: Enhanced Website URL Detection
SnapAPP provides the ability to add wildcard matching for improved website URL detection.
Step 1
Adding Website Match values with ExactAccess.
Open the XA Administrator.
Right-Click a Website from the Organization Map, located on the left hand side.
Select "Properties".
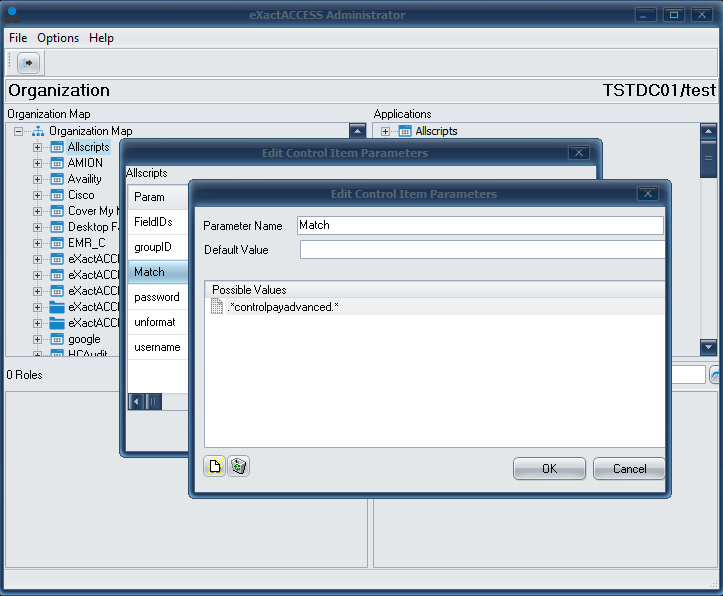
Once the "Edit Control Item Parameters" dialog appears, Double-click the Match Parameter.
Enter the URL with wildcard values in the textbox, where a ".*" indicates a wildcard.
For example, enter ".*controlpayadvanced.*" if you would like to SSO enable all website URLs that contain the keyword "controlpayadvanced" .
Close the XA Administrator and Logoff ExactAccess® for the changes to take effect.
Advanced Features: Adding Custom Input Fields
SnapAPP provides the ability to add custom input fields if the fields are not automatically detected.
Step 1
Adding Custom Input Fields using ExactAccess.
Open XA Administrator.
Right-Click a Website from the Organization Map, located on the left hand side.
Select "Properties".
Once the "Edit Control Item Parameters" dialog appears, Double-click
Find the input fields id or name attributes from the website, which can be found by viewing the page source.
Click the "Add a select value" button, located at the bottom left.
Enter the username input field for the website, such as userfield.id=username, then click "OK". (where username is the ID located from the page source in step 5)
Click the "Add a select value" button, and add the password input field, such as passwordfield.id=password, then click "OK". (where password is the ID located from the page source in step 5)
Close the XA Administrator and Logoff ExactAccess® for the changes to take affect.
Note
You must define both username and password fields when adding custom fields. Any fields not defined will be ignored by the plugin. The format for defining input fields are as follows:
Example
userfield.id=
userfield.name=
passwordfield.id=
passwordfield.name=
otherfield.id=
otherfield.name=
How do I use it for Windows Application Integration?
Step 1
Register an application and assign user permissions with ExactAccess
Open the XA Administrator.
Right Click the "Application " pane on the right hand side.
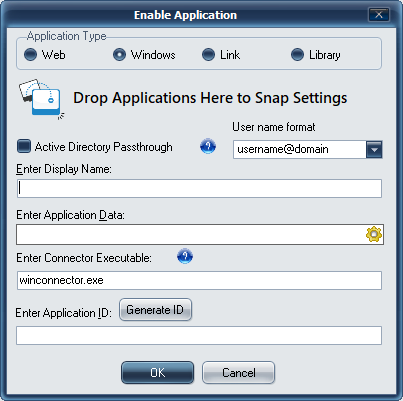
Select "Create Application".
Select the "Type" of application "Windows".
Check the Active Directory® Passthrough and appropriate username format if applicable.
Enter the Display Name.
Drag and Drop an application executable onto the Enable Application window to have settings automatically filled in
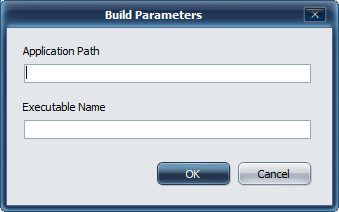
Optionally, use these steps to define the application being enabled.
Click on the Gear icon

and enter the path to the application and the application executable.
Click OK to confirm the application data.
Click Generate ID.
Click OK to create the XA control item.
Step 2
Assign AD Groups to enable SnapAPP access to the application.
Open XA Administrator.
Locate the Application created in the previous step, located in the "Applications" pane.
Drag the "Application" to the Organization Map on the left hand pane, and drop it. The "Application" once dropped into the organization map is now an XA Control Item. This allows AD Groups\Roles to be assigned.
Right-click the newly dropped control item, and select "Add Role(s) to Item". Add the appropriate AD Groups for access to the web application.
Logoff XA and log back in for the changes to take effect. (Optionally, use the Desktop Refresh menu item from the XA tray icon)
Step 3 - Optional
To display a link on the XA Desktop ensure the following value is present in the registry:
x64 workstations[HKEY_LOCAL_MACHINE\SOFTWARE\HealthCast\ExactAccess\Applications] “WinConnector.exe”=”c:\program files (x86)\HealthCast\ExactAccess\wrappers\WinConnector\Winconnector.exe”
x86 workstations[HKEY_LOCAL_MACHINE\SOFTWARE\HealthCast\ExactAccess\Applications] “WinConnector.exe”=”c:\program files\HealthCast\ExactAccess\wrappers\WinConnector\winconnector.exe”
See how easy it is to integrate an application using SnapAPP
Example of creating a Windows Snap-App

 |

Known Issues:
Not all websites are supported with SnapAPP.
Not all Windows applications are supported with SnapAPP.
Web applications containing drop down fields will not automatically populate.
Some websites containing Java or ActiveX controls may not be supported.
Default credentials ("username", "********") are saved when the browser is refreshed.
Troubleshooting Items
SnapAPP does not highlight fields for the Websites that should be SSO enabled. If a web address has been SSO enabled, but the fields are NOT highlighted to allow the user to enroll, the following settings should be verified:
Has the user been assigned access in the XA Administrator?
Is the correct supported version of XA installed on the End Point?
If so, is Full SSO enabled?
If the web application is published, is the full version of ExactAccess installed on the Citrix® server?
If all of the above has been verified:
Does the web address enabled in the ExactAccess Administrator tool match the URL displayed in the address bar?
Ensure the website doesn't redirect to another URL. For example, mail.live.com will fail to highlight the login and password fields when the browser redirects to login.live.com. This can be solved by entering a Match field of .*live.* or the redirected address.
If multiple websites are enabled from the same domain, you must enter a website Match value for each SSO enabled website. See the Advanced Features: Enhanced Website URL Detection section.
Is the plug-in enabled in the following registry key: HKLM\Software\HealthCast\ExactAccess\notification - should contain a name/value "webConnect.EventNotify"
The user's credentials are not saved when new credentials are entered. Ensure Active Directory passthrough is not enabled (this is the check box on the SnapAPP link creation screen shown above). Credentials are not updated or saved when Active Directory pass-through is enabled.
Required
SnapAPP does not function when XA Passthrough is enabled, as the web addresses and other application parameters are stored in the ExactAccess server. Ensure that Full SSO is configured for the workstation where SnapAPP is being used. See Kiosk Mode - Full SSO for configuration of this setting.
The username and password input fields do not display initial values when a user is enrolling in a new SSO-enabled website. SnapAPP sets the focus to the username and password inputs, which clears any default values.
How do I provide the correct domain when using pass-through when my login domain NETBIOS name does not match the Fully Qualified Domain Name (FQDN)? E.g., if my FQDN is fqdnexample.com, but the domain name is example. For Internet Explorer, the domain name is taken from the URL - if the FQDN of the domain does not match the NETBIOS name (e.g., they are different), the IE plugin will use FQDNEXAMPLE as the domain portion of the user's login, providing the login dialog FQDNEXAMPLE\username which will fail.
Therefore, the pass-through will not function for the Internet Explorer plugin. Instead, uncheck the Active Directory Passthrough option and have XA store the user's credentials. The user will then enter the correct format for the login EXAMPLE\username.
For Chrome, Edge, and Firefox, the machine the plugin is running must be domain joined. The browser plugin will translate the FQDN of the internal website into the NETBIOS name to provide the login credentials.
If the machine is not joined to a domain, then the Windows API that performs the translation will be unable to provide the correct domain name and will function similarly to the Internet Explorer plugin. As with Internet Explorer, the only option is to uncheck the Active Directory Passthrough option and have XA store the user's credentials.
Enter Button Press Event on Login Screen Fixed in XA 4.14.0
Description: Add a feature in SnapAPP to submit the login page by pressing Enter button on username, password, or third field text boxes.
Issue: When a user would enter login credentials such as username, password, or third field textboxes in SnapAPP and press the Enter key on the login form was not functioning as expected.
Fix: To resolve this issue, we have made an improvement in SnapAPP which is SiteAllowsEnterKeyToSubmitForm. This is a registry setting by which users can specify some URLs for a site that should not be treated with the Enter key as default behavior. Those URLs would be added in the registry for SnapAPP for that particular site, and the Enter key will not work on those login pages.
Steps to Add SiteAllowsEnterKeyToSubmitForm Setting in the Registry Editor
Open the registry editor and open this path:
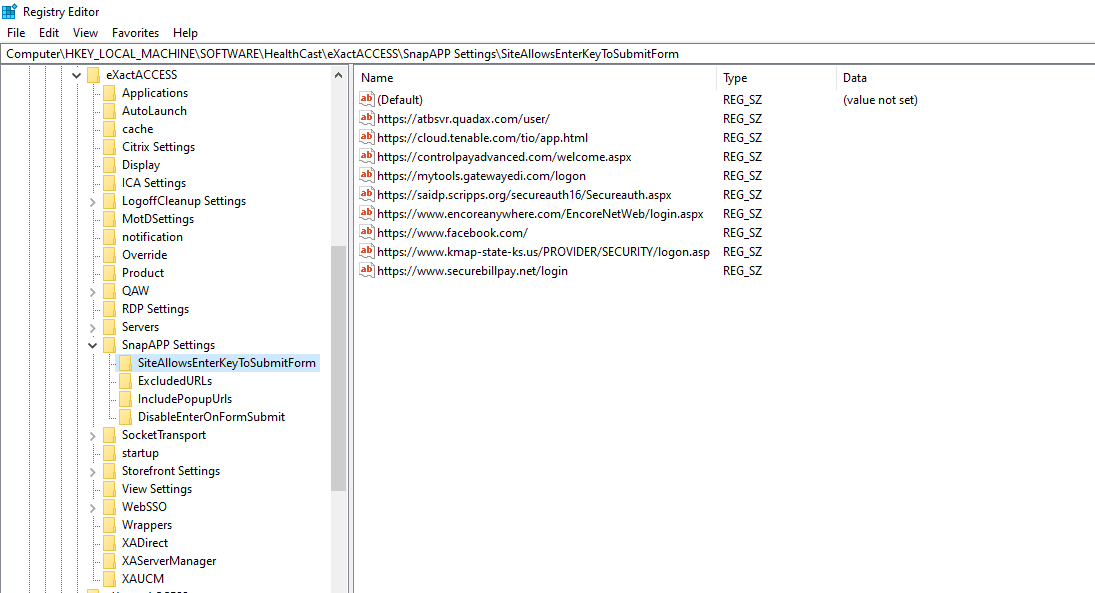
Computer\HKEY_LOCAL_MACHINE\SOFTWARE\HealthCast\eXactACCESS\SnapAPP Settings
Create a new key under SnapAPP Settings by right-clicking and naming it
SiteAllowsEnterKeyToSubmitForm.Next, add those URLs as a string value in the right panel as shown.
Note
URLs added here should not include dynamic parts, such as a query string value or any parameters for username or ID.
SnapAPP will check for the
SiteAllowsEnterKeyToSubmitFormsetting in the registry, then checks for the site URL. If the site URL exists in this list, then SnapAPP will check if the Enter key is disabled for that specific URL.This process uses Wild Card Pattern Matching to match the current URL with the partial URLs specified here.
We have a URL such as https://controlpayadvanced.com/welcome.aspx for which we want to disable the Enter key.
We have the Login Page URL as https://controlpayadvanced.com/welcome.aspx.
Note that in the above login URL, there is a dynamic part after filling in the login credentials and pressing the Enter key. It could be anything from user ID, some category information, or any GUID. We have to exclude that part of the URL while adding it in the SiteAllowsEnterKeyToSubmitForm setting in the registry.
Case 1: When a user enters the login page URL and the URL does not match the registry, the Enter key acts as the default behavior.
Case 2: When a user enters the login page URL and the URL does match to the registry with the help of Wild Card Pattern Matching (this is because the registry URL is checked with an asterisk (*) at the end for the wild card matching) with the URL the user has entered. In this case, the user's URL will match with the existing one and SnapAPP will disable the Enter key.
Note
SiteAllowsEnterKeyToSubmitForm setting is an advanced setting for SnapAPP. It should not exist in the registry by default and must be added manually under SnapAPP Settings in the registry.
How to Disable the SnapApp Extension for Specific URLs in 4.13.2
To disable the SnapApp extension to ignore a specific webpage (e.g., password reset, forgot password, etc.), we have to add a DisablePageSSO registry setting. Follow these steps to cause SnapApp to ignore a specific webpage:
 |
On a client system with XA Client installed, open the registry editor and navigate to this path:
Computer\HKEY_LOCAL_MACHINE\SOFTWARE\HealthCast\eXactACCESS\SnapAPP Settings
Create a new key under SnapApp Settings and set its name to DisablePageSSO.
Next, under DisablePageSSO, create a new key with the name of the domain of the relevant site.
Note
Ensure you only use the domain name without any www, HTTP, or https.
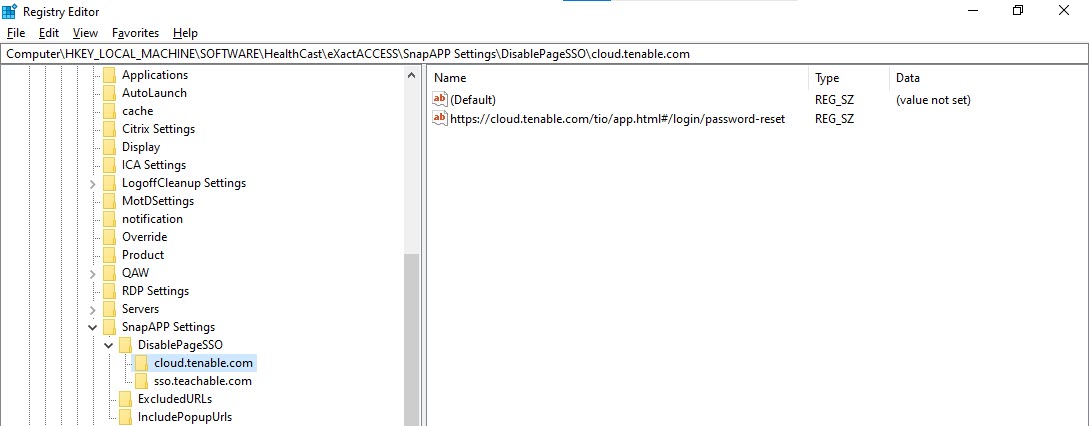
Next, for the domain name key, add the specific URLs as string values in the right panel as shown below.
Note
URLs added here should NOT contain the dynamic part, like any query string value or any parameter for username or ID.
SnapApp will check for the DisablePageSSO setting in the registry and then will check for the domains. If the domain of the current URL exists in this list, then SnapApp will check for the blocked URLs for that specific domain and will exclude those URLs from its default behavior, meaning it will not fetch and set credentials for that URL.
This process uses Wild Card Pattern Matching to match the current URL with the partial URLs specified here.
In this example, we have a domain cloud.tenable.com on which we want to disable the SnapApp extension for some pages/URLs.
We have two URLs: a Login Page URL and a Forgot/Reset Password Page URL.
Login Page URL: https://cloud.tenable.com/tio/app.html#/login
Forgot/Reset Password Page: https://cloud.tenable.com/tio/app.html#/login/password-reset/e3894099254792fb83f4f354bcd1354687335e8b1df0918
Note
There is a dynamic part after the word "password-reset" on this URL. This could be anything like a user ID, category info, or a GUID. We have to exclude that part of the URL when adding it to the
DisablePageSSOsetting in the registry.
Case 1: When a user enters the login page URL, it will not match the existing URL in the registry. So SnapApp will work as usual.
Case 2: When a user enters the password reset page URL, it will match with the existing URL in the registry with the help of the Wild Card Pattern Matching process. We check the registry URL with an asterisk (*-the wildcard used in matching) included at the end of the URL that the user has entered. In this case, the user's URL will match with the existing one, and SnapApp will disable for that page and will not fetch & set credentials there.
Note
DisablePageSSO setting is an advanced setting for SnapApp and will not be in the registry by default. If we want this feature, we have to add this setting under SnapAPP Settings in the registry.
SnapAPP Interfered with Password Resets: Fixed in XA 4.13.1
When a user tries to reset their password from the Password Reset Screen or Forgot Password screen, SnapAPP was preventing users from changing the stored password in the text box. This has been fixed in the 4.13.1 version.
We have made an improvement in SnapAPP to DisablePageSSO, a registry setting with which a user can specify URLs for a site or domain that shouldn't be treated with SnapAPP as default. Those pages would be excluded or disabled for SnapAPP for that particular site or domain. SnapAPP will no longer fetch and set credentials on those pages, and the user can perform the actions on those pages such as setting a new password.
Open the registry editor and open this path:
Note
Computer\HKEY_LOCAL_MACHINE\SOFTWARE\HealthCast\eXactACCESS\SnapAPP Settings
Create a new key under SnapAPP Settings by right-clicking on it, and set its name to DisablePageSSO.
Under DisablePageSSO, create a new key with the name of the domain of the relevant site.
Note
Ensure that you write the domain only without HTTP://, HTTP://, or www prefixes.
For the domain name key, add those URLs as a string value in the right panel as displayed below. URLs added here should not contain any dynamic parts such as query string values or parameters for username or ID.
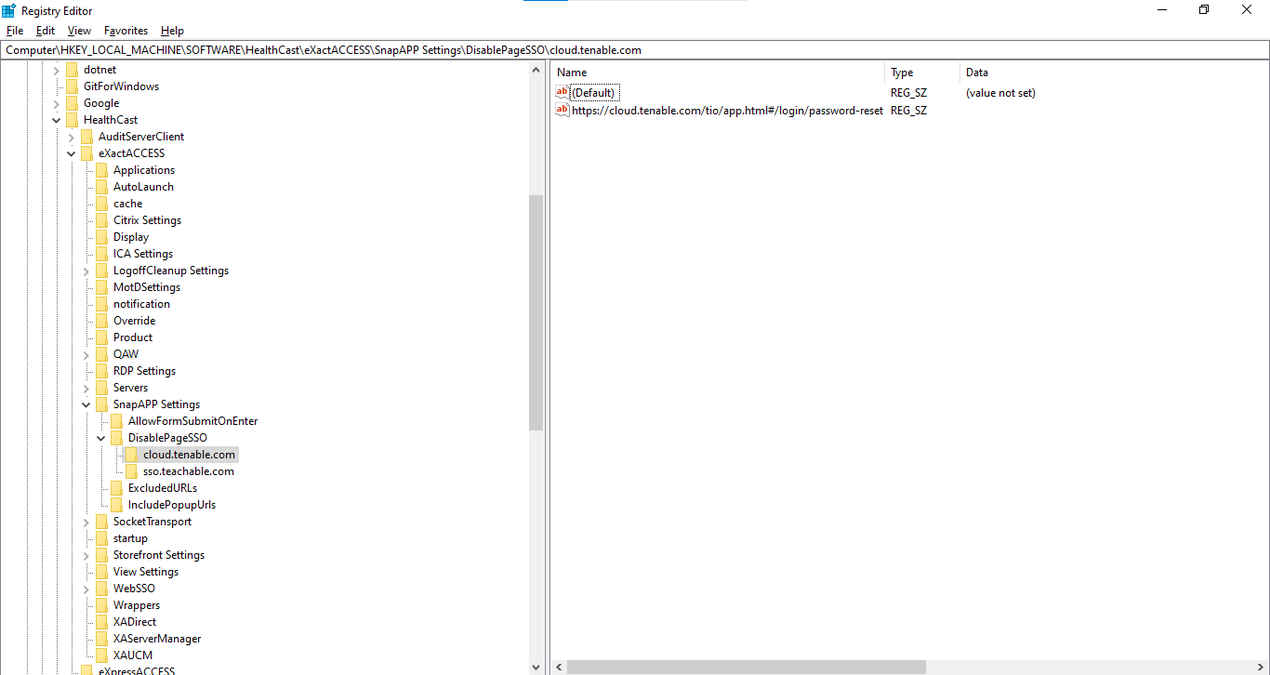
SnapAPP will then check for the DisablePageSSO setting in the registry and will check for the domains. If the domain of the current URL exists in this list, then SnapAPP will check for the blocked URLs for that specific domain and will not fetch and set those credentials for that URL.
This process uses Wild Card Pattern Matching to match the current URL with the partial URLs specialized here.
In this example, we have the domain cloud.tenable.com that we want to disable SnapAPP extension for some pages or URLs. For example, the two URLs are Login Page URL and Forgot/Reset Password Page URL.
Login Page:
https://cloud.tenable.com/tio/app.html#/loginForgot/Reset Password Page: https://cloud.tenable.com/tio/app.html#/login/password-reset/e3894099254792fb831f4f354acd1354687335e8b1df0918
Note
Note that this URL has a dynamic part after the /password-reset. This could represent a user ID, category info, or any GUID. Exclude this part when adding it DisablePageSSO setting in the registry.
Case 1: When the user enters the login page URL, it will not match with the existing URL in the registry. So SnapAPP will work as usual.
Case 2: When the user enters the password reset page URL, it will match with the existing URL in the registry by the help of the Wild Card Pattern Matching process, as the registry URL is checked with an asterisk (*) included at the end. The user's URL will match with the existing one and SnapAPP will be disabled for that page and will not fetch and set credentials on or for that page.
Note
DisablePageSSO setting is an advanced setting for SnapAPP. It should not already exist in the registry. If you want this feature, you would need to add this setting under SnapAPP settings in the registry.